Wednesday, 16 April 2014

Easter Bunny Bucket Gift Bag Tutorial

Hey there folks!

Really sorry for the delay in getting this to you, but I've been laid low with a lurgy this past week or so - ug! BUT am better now! Hurrah - just in time for all the yummy Easter chocolate goodies, that I hope to scoff over the weekend!! Nom nom!

Anyway, without further ado - and due to popular request -  here is my step-by-step tutorial for how to make the Easter Bunny  Bucket Gift Bag that I showed you in my last post:
 
This is what we will be making:


To make the bag, you first need to make a tray box. Cut a piece of Old Olive cardstock to 10cm x 10cm (3 & 15/16ths" x 3 & 15/16ths") and score it on all four sides at 2cm (13/16ths") as shown below:


You then need to crease the score lines with a bone folder. Cut along the scorelines from the edge of the cardstock, up to where they meet the horizontal score line, on two opposing sides of the cardstock as per the photograph below. It is a good idea to trim a little wedge out of the square corner pieces, as shown here:

 
Next you need to put a little bit of liquid Tombow multipurpose glue on the four square tabs on one side of the square of card and then fold the sides in and glue it together to make the tray. The Tombow allows you some wiggle time to get your box square but you will need to press & hold the glued-down corners a little, between your fingers to help them stay stuck:


Your tray box should look like this:
 

Next you need to cut a piece of designer series paper (dsp), that is 12cm x 27cm (or approx. 4 & 3/4" x 10 & 10/16"). I used an Old Olive coloured sheet from the lovely Polka Dot Parade dsp (I do love that dsp, I use it a lot!).


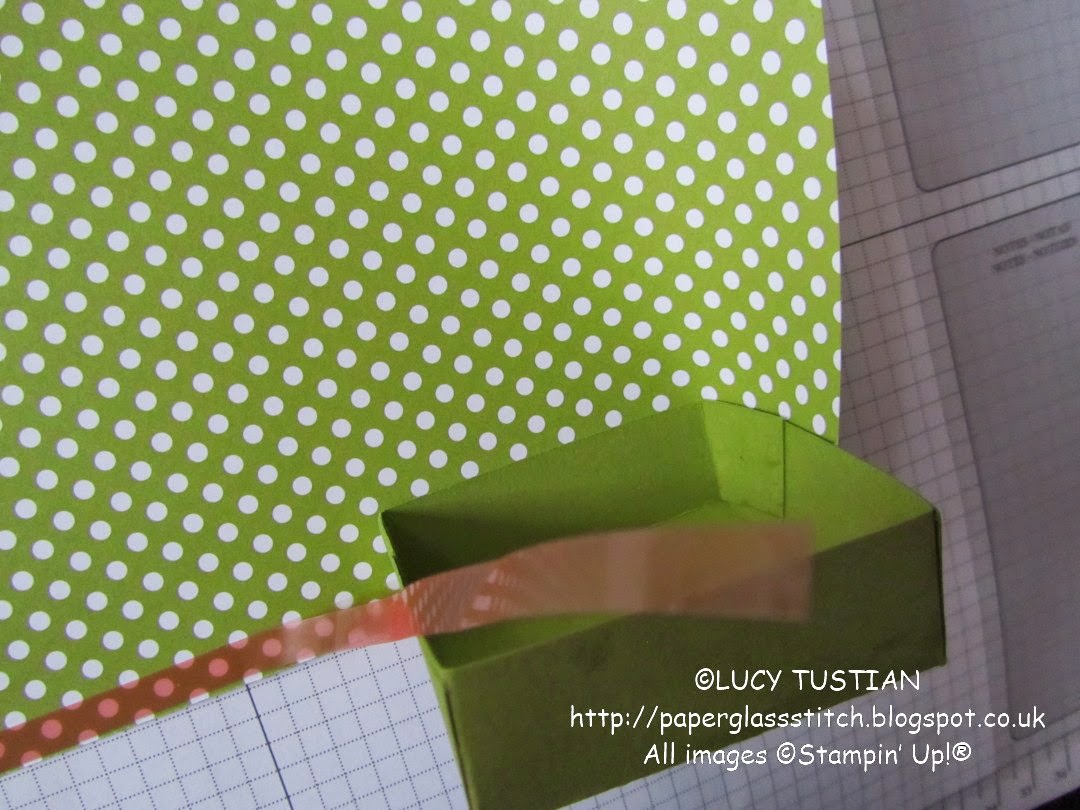
Then you need to put a piece of Sticky Strip (double-sided tape) along one long edge and one short edge of the wrong side/back of the dsp, (as close to the edge of the dsp as possible) as shown below:


Now you need to carefully adhere the tray to the dsp in the following way: Peel a little of the backing off the piece of sticky strip which is along the long edge of the dsp. Start at the corner that is nearest to the short side of the dsp, that doesn't have sticky strip on it (i.e. the bottom right hand side corner as you look at it in the above photograph). Place the tray with the bottom edge of its base lining up along the edge of the dsp, so that the short edge of the dsp starts half way along one side of it. (It is easier to see what I mean if you look at the next  few photographs.) You will then need to carefully roll the tray, peeling the Sticky Strip backing off as you go, making sure that the edge of the dsp aligns with the base of the box as you turn it, sticking the tray to the dsp:


Just before you reach the end, you will need to stop and peel off the backing from the Sticky Strip that is along the short edge of the dsp. You can then carry on rolling the box until you reach the end of the dsp. Be careful when sticking down the short edge of the dsp to the back of the bucket bag as you want it to stick straight and not buckle it up. Press it down to create a good seal, with your hand inside the bag: 


You will now have your basic bucket shape made:

 
Next you need to make the handles of the gift bag by using the Large Oval Punch:
 
 
The following photographs show you where to place the punch, in order to get the oval holes in the right place. The front of the bag will be the side opposite where the ends of the dsp overlap. Turn the gift bag so that the opening/neck of the bag is towards you and with the punch upside down, so that you can see where you will be punching, slide the front side of the dsp into the punch. To make sure your oval is central to the top of the bag, line up the corners of the punch, by eye, to match the corners of the tray/base. Then, to make sure you will be punching the oval handle far away enough from the top of the gift bag, make sure you line up the edge of the dsp (top of the bag) to correspond with the top edge line of the Stampin' Up! logo that is on the bottom of your punch (see the photograph below!). When you are satisfied that the position is right, punch your first oval out. Remove the punch and then repeat the above instructions to line up and punch out a second oval, from the back of the gift bag (i.e. from the side that has the seam along it). Here is a photograph to make all this a bit clearer:


Note that the top corners of the punch in the picture above are in alignment with the top (well, the base, really!) of the bag and that the top line of the frame of the logo near my thumbnail is in alignment with the open/top edge of the bag.


Now for the Easter Bunny decoration! You will need the following punched shapes to make your bunny: the Large Oval Punch - x2 in Whisper White and x2 in Pink Pirouette; the 1 & 3/4" (4.4cm) Circle Punch x1 in Whisper White; and finally the 2 & 1/2" (6.4cm) Circle Punch x1, cut in half,  in Whisper White:
 
 
You will need to trim a little bit off each of the pink ovals for the Bunny's inner ears, so that they are slightly smaller than the white, outer ears (see my pen line on the pink oval on the right, below, to see what to trim off) and then you can glue the pink ones on top of the white ones in the position  that is shown below:
 
 
Next you need to put a little bit of Tombow glue onto the bottom of the front of each ear and stick them behind the white 1 & 3/4" (4.4cm) punched circle, in the position shown in the next photograph:
 
 
To get one ear to flop over at a cute and jaunty angle, fold the tip of it over your bone folder like I have done here, and rub your thumb along the edge of the bone folder to crease it, like so:


Next, attach four Stampin' Dimensionals to the back of the bunny's head and remove the backing paper in readiness to stick the head on the bunny's body:


The half circle cut from the 2 &1/2" (6.4cm) circle punch, circle makes the body. Glue this with Tombow, onto the lower part of the front of the bucket gift bag, aligning the straight cut edge along the bottom of the gift bag like this:


Now you can attach your prepared bunny head onto the bunny's body:
 
 
All you need now is a sachet of small but yummy Easter eggs, - or any other gift that takes your fancy -  to pop inside the decorated Easter Bunny Bucket Gift Bag and then a bit of Stampin' Up!'s lovely Whisper White 5/8" (1.6cm) wide Organza Ribbon to tie the handles together with a pretty bow and hey presto, you've got a beautiful, hand made Easter gift for a loved one, friend or colleague:


They are so easy and quick to make, why not make more than one?!
 
 
I hope that you have enjoyed this step-by-step tutorial and that you do have a go at making some of these yourself. The basic Bucket Gift Bag can be made in all sorts of different sizes: smaller, taller, thinner, fatter, shorter etc. and can be decorated in all sorts of ways - just make your initial tray box a different size or alter the dimensions of the dsp to suit the gift you wish to put in it. I made several at Christmas. They are great for gift-wrapping awkward shaped or easily-squashed/fragile items - as well as last minute gifts - so go on, give them a try!! They are not just for Easter presents you know! Oh and also you can have fun trying different punches for the handles, too...
 
I first learnt how to make the Bucket Gift Bag (in a different size) a while ago, I think it was at a team-training event with the lovely Michelle Last, but I can't remember exactly when it was now. Thank you, Michelle, for the great idea that inspired me to make these. The Bucket Gift Bag is now one of my "go to" gift-wrapping staple stand-bys! :O)
 
 
Phew, after such a long blog post, I think it is time for a lovely cup of peppermint tea...and perhaps a little "quality control test" of some of the dark chocolate mini eggs that I bought to go in one of these bucket bags - but, shhhh, don't tell anyone that one of the gift bags might end up being short a couple or three choccy eggs!!  I'd better not "test" too many though, or, I shall have to go and buy some more.... ;O)
 
Until next time, happy crafting, and do let me know how you get on with making these gift bags yourself. Hopefully I'll have time to show you a couple more Easter ideas before the weekend, if not, have a lovely Easter weekend everybody!
 
Lucy x
 

Tuesday, 8 April 2014

More Easter Treats!

Hey there!

I thought I'd share some photographs of the Easter Treat projects that I designed especially for the Stampin' Up! UK Stampissimo video that I shared with you in my last post... come and have a look:
 
This is the Crocus Treat Pouch that I made, step-by-step, on the video:


And here is a close-up of the cello bag:


On this one I stamped the "Happy Easter" sentiment from the very versatile "Delightful Dozen" stamp set with my white Stazon ink pad. On the one I showed you how to make in the video, I changed it up a bit and stamped that cello bag with one of the flowers from the very popular "Petite Petals" stamp set. (Be careful that you use a food-safe cello bag like the ones that Stampin' Up! sell, though, if you are putting unwrapped food items in them like I have here.)
 
Next is the little Daffodil (or should that be narcissi?!) Miniature Easter Egg Holder which is made in a very similar way to the above Crocus Pouch but with the addition of a little upside-down tray to hold the egg in place:


I show you how to make this in the video too. It uses the fabulous Scallop Tag Topper Punch, the Petite Petals Punch and the really useful (and time-saving) Fringe Scissors - all of which are in the gorgeous 2014 Spring/Summer catalogue.
 
I think that these would make lovely table-setting gifts - you could stamp, print or write your guests' names on the little banner instead of the Happy Easter that I stamped using the  Teeny Tiny Sentiments stamp set. I am sure that you could also change the size up for a bigger egg if you wanted the gift to be a bit more generous, chocolate-wise!!
 
I got a little bit carried away with the punch art theme when I was designing these projects, but I couldn't leave out the Easter Bunny, now could I? Here he is:


I must confess that I have left the bunny's face blank, because whatever I tried just seemed to make it look cross-eyed, demonic or scary like the Were-Rabbit from the Wallace and Gromit film - so I just left it clean and simple... and plain. But, seeing as this bucket gift bag can house more chocolate treats than the other two treat holders can, I hope I am forgiven for leaving the bunny without a face?! hehe
 
 
The final two projects were a couple of 8"x8" (20.5cm x20.5cm) scrap book pages that I have turned into home decor pieces by placing them in 9"x9" (23.5cm) box frames:


The wording on these is stamped using the Notable Alphabet stamp set (for the larger letters) and the really useful, but perhaps over-looked, Simply Serif Mini Alphabet stamp set - which I use a lot for scrapbooking and for adding names onto special birthday cards etc.


Snowdrops are my absolute, all-time favourite flowers, as the optimistic arrival of their delicate pure white and bright green flowers, in the dull and dreary, early part of the year, is the first cheery sign that Spring will indeed at last be on it's way soon! They never fail to bring a smile to my face! :O)
 
Well, that's it for today, I hope that I have put a smile on your face and inspired you to make some of the above cute Spring and Easter projects.
 
I shall be back soon with some more Easter ideas and instructions on how to make the Easter Bunny bucket gift bag too...
 
Until then, happy crafting everyone!
 
Lucy x
 
 
All the Stampin' Up! products can be purchased on my online-shop, as long as you are from the UK, France, Germany, Austria or the Netherlands, and will be delivered direct to your door! Alternatively, please contact me directly to place an order if you prefer, and I shall place the order for you.

Saturday, 5 April 2014

Stampin' Up! UK's "Easter Treats" Youtube video filming day...a behind-the-scenes-account!

A few weeks ago, I received a 'phone call from the lovely Paula Gorry at Stampin' Up! UK's HQ asking me if I'd like take part in filming a Stampissimo "how to" video later in the year... erm... YES PLEASE!!!! What an honour to be asked!! Wow! How exciting...I love a challenge! Great, I thought, it's a few months away, plenty of time to design some fabulous projects... and go on a diet, lose a couple of stones, get my hair done, lose the winter pallor etc etc...well, you know, us girls are never happy about what we look like, are we?! LOL!!
 
Well, to cut a long story short, I had another 'phone call a little while later asking me would I mind coming to the rescue, at short notice, as the lady they'd booked for the 19th on March couldn't make it as she was really poorly and would it be OK if I swapped filming dates with her... I immediately said yes, of course! (eek no time for the diet...but yey, less time to get nervous about it!!) and only 10 days later, I found myself on a train to the UK head office in High Wycombe!

Paula kindly met me off the train and after a quick en route visit to a well-known home and garden store, to get some plants for the brand new film set in the office, we arrived, with me being rather too nervous but very excited to see the head office for the first time!

The film set had only arrived and been set up a couple of days before the filming day - not that you would be able to tell - Kelly had done an amazing job of making it all look awesome!

Here is the lovely Paula on the fabulous set:


Doesn't it look swish?! The lovely "Ben and Jerry" as they are fondly known, (it's Ben and James, really!)  were our camera crew for the day and their calm professionalism and expertise really helped calm my nerves no end! I was still shaking with nerves though when we started filming! I was convinced that I'd say something completely stupid, trip over something, or, that my bad cough would hamper it all... thank heavens for their amazing editing skills is all I can say!! (Thank you guys!)
 
Here are a couple of photos of the set up of the filming equipment...


Those lights were very bright! There were three cameras, one in front, one to the side and one directly above the desk, looking down on where I was to make the projects... and here is my view from behind the desk... how scary is that?!!


No, not the sight of Ben and "Jerry", nor the lovely Kelly, but, to be in front of so many cameras...all pointing at me, I mean!! Waaaaay out of my comfort zone!! I much prefer to be behind a camera... Eek! Shudder!
 
Here are a couple of photos that were taken before filming started, whilst the guys were still setting up all their amazing cameras and recording equipment, I think you'll agree that I'm only just managing to mask my "scared bunny in headlights" feelings of panic in the photos of me with Paula and with Kelly!! LOL! I was so nervous...


Here are a few more pictures of the set throughout the day:
 
 
Oh dear -one day I will learn how to craft tidily!! And the left-over bowl of choccy eggs & veggie jellybean eggs (in the top left of the picture above) was considerably more depleted by the end of the morning than this - well, it is important to do a "quality control test" of all treats and after all, an army marches on it's stomach, so they say!! hehe ;O)


I love the Celebration Banner across the front of the desk that Kelly made - especially the dangly strings of circles between the letters... which reminds me, I've still not got around to making my banner up yet - oops!
 
Here is a group photo, taken by Kelly with my camera, after all the filming had been done - phew, relief! hehe:
 
 
And another:
 
"But who is the handsome chappy on the right?", I hear you ask! "Nooo, not the one in the DroogMedia t-shirt , [sorry, James!!], the handsome, furry chappy, sporting the dapper red bow tie": Ahh, well, that's Mr Manoo, of course.... the Head Office mascot, who is very well-known in demo circles!! In fact I was completely star struck when I met him that day... but I managed to get a 'selfie' of the two of us and I think it is actually my favourite photo of the whole day:


:O) Hope you've enjoyed this behind-the-scenes account of my exciting day at head office? I had a fantastic day - despite all my nerves and terrible cough! A HUGE thank you to Stampin' Up! UK, Paula Gorry, Kelly Francis, the lovely Ben and James Wolstenholme from DroogMedia and Mr Manoo, who all helped make the day so enjoyable and fun - thank you!
 
 
And finally, click here to see the video - I hope you enjoy it and like all the projects which I designed and make on it - and please come back again soon, as I shall hopefully be  posting a tutorial for the Easter Bunny Gift Bag on here in the next few days!
 
If you are in the UK, France, Germany, The Netherlands or Austria, then you can buy any of the products used to make these projects, from my online shop here and get them shipped straight to your door!
 
Thank you and happy crafting everyone!
 
Lucy x


Tuesday, 11 February 2014

Making your own gift packaging is Sweet (Sorbet!)

First of all, I must just say how overwhelmed I am by the amazing response from my "So Very Grateful For The Pinkies Blog Hop" post over the weekend! WOW! Thank you so much to everyone who took the time to leave a comment, I was really touched! Also, as so many people have asked me how I made the shadow box card, I will endeavour to get a tutorial up on my blog at some point this week! So, watch this space, as they say!!

In the meantime, I thought I'd share some ideas for gift packaging that I have recently made. These will be given out as free thank you gifts to my class attendees who book a place for themselves and a friend of theirs, who is new to me/my class. Both the attendee AND their new friend get to choose a gift from my special basket as a thank you from me for the introduction. At my next evening class, one lady will be bringing FOUR of her pals with her, so she will be getting to choose FIVE gifts and her four pals will each get one gift too! I am really looking forward to meeting them all and I can't wait to see which gifts they all choose!

Anyway, here is the photograph for you to see:


I made the tags by stamping on Whisper White Cardstock with the gorgeous "Petal Parade" Sale-a-Bration stamp set (available for FREE when you spend £45 until 31st March 2014) using the  following colours: Crisp Cantaloupe, Pool Party, Sahara Sand and Pistachio Pudding. I then used my trusty Envelope Punch Board to shape the tops of the tags and also to round the bottom corners.
 
I punched a pretty flower-shaped hole in each tag using the "Itty Bitty Shapes Punch Pack" and threaded them with with either Coastal Cabana Ruffle Stretch Trim ribbon or the Crisp Cantaloupe Twine (the latter is from another fabulous Sale-A-Bration freebie set: the Sweet Sorbet Accessory Pack, which has three generous reels of different colour twine and some printed cork stickers! Love it!). The 'thank you' sentiment comes from the "So Very Grateful" stamp set and is stamped in Jet Black Stazon ink. I carefully swiped my Write Marker brush tips around the edges of the sentiment banners to add a bit of definition, before sticking them onto the labels with Stampin' Dimensionals, to give a bit of height.


I took the inspiration for the tag colours from the utterly beautiful "Sweet Sorbet" Designer Series Paper that is also available for FREE in the Sale-A-Bration offer - which I have really fallen in love with! It is my "go to" paper at the moment and I am already sad that it will only be around until the end of March -boo hoo!
 
 The peachy-coloured gift envelope and its co-ordinating belly band are both made using the "Sweet Sorbet" papers and again, I used the fantastic Envelope Punch Board to whizz it up in a jiffy! I adore my Envelope Punch Board - it is just SO versatile and you make make so many other fabulous projects with it too: boxes, gift card holder cards, crackers, mini albums - all sorts! It is an amazing piece of kit!

Think you don't recognise the gift bag on the left of the top photograph? Well, it started life as one of Stampin' Up!'s "Tag a Bag Gift Bags" - three scores, three cuts, a little bit of glue plus a small rectangle of cardstock, to strengthen the base, was all it took to transform the flat paper bag into a pretty, three-dimensional, free-standing gift bag! Da-naaa! Easy! Bit of ribbon and a tag and you're done!
 
If you want to have a go at making your own gift packaging then it is really easy using the Stampin' Up! products I've mentioned above, as they all coordinate beautifully!
 
All of them (and more!) are available to order through me. You can place an order direct with me (via phone or email) or, if you prefer, you can buy them via my online shop 24hours/7days a week. Shipping is only £4.95 direct to your door, regardless of the size of you order! AND don't forget that for every £45 spent (before shipping) during Sale-A-Bration, you earn one FREE special Sale-A-Bration item, too!

The hardest part is deciding which of the 13 gorgeous Sale-A-Bration goodies to choose first!! Good luck! ;O)

Right, I am off to make some more gift packages and plan my shadow-box card tutorial I think...

Until next time, happy crafting everyone!
 
Lucy x


Saturday, 8 February 2014

So Very Grateful for the Pinkies Blog Hop!


Thank you for joining us on another Pinkies Blog Hop! We're showcasing lots of gorgeous projects using products from the new Stampin' Up! ® Spring/Summer catalogue. Simply use the buttons at the end of each post to keep hopping!


Welcome to those who have come here via Erna's blog hop post.

Gosh, there are so many fantastic new things in the new Spring/Summer Catalogue! I have found it really hard to choose which to showcase here for the Pinkies Blog Hop... I eventually decided to show you a card that I made recently as a team training day swap:
 
 I used the fabulous new stamp set called "So Very Grateful", stamped it in Jet Black Stazon ink onto Whisper White cardstock and then coloured the flowers and leaves with Stampin' Up! Write Markers... The card is 3"x3" in size.
 
Here is the card front:
 
 
 The card base is in Raspberry Ripple, with an Old Olive layer under the Whisper White layer. The markers I used were the same colours plus Primrose Petals, Blushing Bride and Pear Pizazz. However, all is not what it seems - in a good way! With a bit of clever scoring with my trusty Scoring Tool, a quick punch out using the Full Heart Punch and a bit more stamping and colouring with my Stampin' Write Markers, a dab of Tombow Glue and ....


 ...Ta-daa!! As if by magic the flat card turns into a shadow box! The style of the flowers reminds me of tattoos for some reason, so that is why I added a little Happy Birthday banner across the punched out heart - to resemble the scroll across the heart that you see so often on classic "pin up" 1950's type tattoos (am sure there's a proper name for that style of tattoo, but I can't remember it!). The sentiment comes from the "Remembering Your Birthday" stamp set - I used the omitting technique to just get the words I wanted from the stamp onto the cardstock.

Here's another photograph taken from a different angle to show the shadow box construction a bit better:


Almost every person who I gave this card to "oooooh-ed" out loud when they realised that it moves when you open it and the inside turns into a box!! I love cards that move and do things - I call them mechanical cards...but I am sure that's not the right word for it! (Someone will correct me, I'm sure!!)

While I was playing with the stamp set, I couldn't resist making a few more things with it and as the Scalloped Tag Topper Punch is another one of my favourite things from the new catalogue, I thought I'd use it too - it is SO versatile, you can make so many more things with it than just tags... Here are a couple of bookmarks I made - this time using just one colour of ink (Strawberry Slush) and an aqua painter to make a mono-chrome, softer look, topped with, um, well, the topper punch and a little bit of matching Strawberry Slush Ruffle Stretch Trim... 


Well, that's it for today. Hope you enjoyed my Pinkies Blog Hop Post, be sure to come back soon to see some more projects that I have made with some of the other gorgeous new catalogue items... in the meantime, please click the "next" icon below to go to the lovely Sarah's blog hop post: 

Happy crafting!

Lucy :O)
http://stampinsarahiow.blogspot.co.uk/2014/02/pinkies-stampin-up-spring-summer.html


http://ernalogtenberg.blogspot.co.uk/2014/02/springsummer-bloghop.html


Friday, 7 February 2014

New toy alert!!

Oh my gosh! I have an amazing new tool which I absolutely ADORE! It is the brand new Stampin' Up! Texture Boutique Embossing Machine... and I love it!


"So what is it?" I hear you cry! Well... here are a few facts and figures to explain:

  • It allows you to dry-emboss textured patterns onto your card/paper using the Textured Impressions Embossing Folders from Stampin' Up!
  • It is lighter and smaller than a Big Shot (but, unlike the Big Shot, it does not cut)
  • Because of its size and lightness it is easier to transport, so you can emboss anywhere!
  • It is a bargain at only £26.95 (the product code is 132657)
  • It even comes with its very own cute mini screw-driver so you can put its handle on when you get first get it out of its box!! (Love that!)

I took mine with me to my card class yesterday and the ladies all loved it (so much so that several of them ordered one straight away!) We used the machine to make of our three card projects and I gave them a choice of several embossing folders to use on their cards. I think their favourite folder design, by far, was the Decorative Dots one (which you can get for FREE if you spend £45 as it's one of the SALE-A-BRATION items!).

In fact if you buy the Texture Boutique and three embossing folders for it, during the SALE-A-BRATION period, you would qualify for a FREE item from the SALE-A-BRATION brochure - one of which is the Decorative Dots folder! Bargain, or what, hey?!

Here's another look at my card class sneak peek photo from my last post, which shows you the gorgeous textured dotty pattern that you get with the Decorative Dots embossing folder:


A little word of warning though: Stampin' Up! only have a limited initial supply of these fabby machines and once those supplies have been snapped up, they won't be getting any more in until the launch of the new Annual Catalogue in July... so don't delay, place your order with me today to avoid disappointment and what I imagine would seem a very long wait! :O)

That's it for today, I'm going off to play with my favourite new toy again!! Be sure to come back tomorrow, though, as I'm taking part in another Pinkies Blog Hop and I will be showing you a couple of projects I've made using some of the new products from the Spring Summer 2014 Catalogue...

So, until tomorrow, happy crafting everyone!

Lucy x

Wednesday, 5 February 2014

February Card Class Sneak Peek!

Hello!

I am SO looking forward to starting my new classes - thank you so much to those who have already booked a spot on the February and March classes! Can't wait to see you all, stamp with you and have some fun...

Here are a couple of  sneak peek pictures of two of the up-coming class projects that we will be making in February... hope you like them! If you want to see the whole project(s), then you'll just have to book a place on my class!! ;O)


There is still time to book a place on my Feb. 6th morning class - if you are very quick! Just contact me before 8pm today (Wednesday) to let me know! If you can't make it to that class, then how about the evening class on the 26th Feb.?
 
 
Want more details about my classes? - Then click on the Classes and Events tab above, where they are all listed, along with a bit more information too.
 

If you book a place on one of my classes and book a space for a friend, who is new to me, too, then BOTH you AND your friend will get a FREE GIFT from me at the class, as a thank you! I've been busy wrapping and decorating some Stampin' Up! goodie bags for those who have already booked classes for them and their "new" friend(s)... Hope you like them, ladies!

It's not too late to amend your bookings if you want to receive one (or more!) of these little beauties:


 I do love the chevron patterned Tag A Bag Gift Bags and the Sweet Treat Bags - if you want the latter, then hurry hurry as they  are only available to buy until 14th February! Don't forget you can order them (or anything else from Stampin' Up!) on my online shop! If you haven't bought from me online before then you just need to create an account and choose me as your demonstrator and off you go! Any problems or questions, please do ask me and I'll be happy to help!

Right, that's it for today, as I've got bags to pack and CAKE to buy for my class tomorrow!! I am soooo looking forward to it... the class that is, not the cake... well, yes, the cake too, but not just the cake... I'm looking forward to the class as well!!

Until next time, happy crafting...(and cake for you, too, I hope?!)

Lucy x