Showing posts with label Stampin' Up!. Show all posts

Saturday, 5 September 2015

Pinkies Blog Hop for the new Autumn/Winter Stampin' Up! catalogue 2015: I can't "resist" trying an old favourite technique with some (holly) jolly new products!


Thank you for joining us on another Pinkies Blog Hop! We're showcasing lots of gorgeous projects using products from the new Stampin' Up!® Autumn/Winter Seasonal Catalogue. 


Simply use the buttons at the end of each post to keep hopping!


Welcome, especially if you have hopped directly from Angélique's blog,
what fab ideas she has - I think my wishlist has just grown... again!! 


I am SO excited by this new Autumn/Winter Catalogue - I LOVE this time of year and the build up to Christmas and boy, does this catalogue deliver! There are SO many gorgeous products in it -  I had a really hard time deciding which items to buy first and then I remembered you don't actually have to buy it ALL at once...hard not to though!! I'm looking forward to my second order already! Us "demos" are lucky to be able to get our mitts on the new goodies early, via a demo pre-order and we get sneak peeks at it all before our customers. Let me know if you'd like to join my team and get that privilege before the next catalogue comes out! ;)

Anyway... I have chosen to show you a few items I have made using the fabulous new Holly Jolly Greetings stamp set and Christmas Greetings Thinlits Dies bundle:


I fell in love with this stamp set and the lovely word thinlits as soon as Ii saw it. (It reminds me of the Crazy About You set that is in the Annual Catalogue - one of my favourite "go to" sets!) I was inspired by one of the ideas that the A/W catalogue shows. Here is the card in a bit more detail:


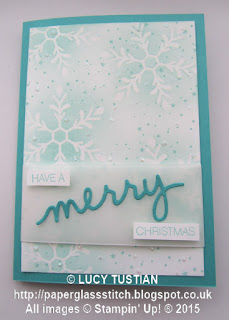
I used the emboss resist technique for the snowflake background. To do this I swiped my embossing buddy all over a 9.5x13.8cm piece of Whisper White cardstock,  then stamped the lovely snowflake stamp several times in Versamark ink over the card. I then added Stampin' Up!'s clear embossing powder and heated it with my Heat Tool. Then I took a Stampin' Sponge and rubbed Pool Party ink just in the centres of the snowflakes, using a circular motion, making it darker nearer the centres and lighter towards the edges. A quick rub with a piece of kitchen towel and I was ready for the next stage - stamping the dots and stars stamp randomly over the card in Pool Party ink. I then rubbed the embossing buddy over the card again and applied small dots of the amazing brand new Fine Tip Glue Pen in precise, tiny dots, then spooned Dazzling Diamonds glitter over it and tapped the excess off! Oh my gosh, that Fine Tip Glue is AWESOME!! Swoon! You MUST get some! Trust me, it is fantastic!


The next step was to wrap a 4cm strip of Vellum Cardstock across the bottom third of the now sparkly snowflake background piece. I cut the vellum about 2cm wider than the piece of card and stuck the overlap excess on the back of the piece of card using Fast Fuse. Now for the greeting - the "Have a" and "Christmas" words were stamped with Pool Party ink on scraps of whisper white cardstock and trimmed to size, then stuck to the vellum with cut up pieces of Stampin' dimensionals to give them a bit of depth. The gorgeous "merry" is one of the Christmas Greetings Thinlits Dies (there is also a "jolly" and a "peace" in the set too). I cut it from a scrap of Bermuda Bay cardstock with my Bigshot and used teeny tiny dots of the Fine Tip Glue to stick it at a jaunty angle onto the vellum - it is so easy to be very precise with this special glue - the tip of the applicator really is tiny! The final stage was to glue this all onto an A6-sized, Bermuda Bay card base. I really hope that you can see just how glossy the snowflakes are and how sparkly and glittery the dots are?

I decorated the inside of the card  with a Pool Party stamped snowflake with added Fine Tip glued-on glitter and then, whilst I had the inks and stamp set still out on my desk, I decided to make some Christmas gift tags in the same vein:


On the tags I stamped the large snowflakes in Pool Party ink and the dots and stars in Smoky Slate ink. The Fine Tip ink is precise enough to add glittery detail to the small teardrop shapes and centres of the snowflakes. The words are from the Holly Jolly stamp set too, and are in Bermuda Bay ink. I decided to just have a play when I made these tags and tried out various ways of tying on the ribbons/twine. The tags on the above photograph are sitting on an A4 piece of cardstock, to give you an idea of their sizes. The white ribbon is the Whisper White seam-binding ribbon and the thick bakers' twine and sequin trim are Bermuda Bay. There is also a little bit of the fine silver metallic thread on one of them too - I think that the thicker Cording Trim from the new A/W catalogue would probably look much better though, so I shall be adding that to my next order! I think these would make great card-toppers too, don't you?


Well, I hope that I have inspired you with my projects today, do click on the button below to click onto Lea's blog and continue looking at all the other hop stops along the way!

Thank you for taking the time to visit my blog today. If you have any questions about what I have made, then please leave me a comment below and I shall be very happy to help answer them if I can! I would love to know what is on the top of your wishlist. If you would like me to send you a paper copy of the catalogue before you decide, then please do contact me and I will happily send one out to you.

Until next time, happy crafting (and shopping) everyone!

Lucy x


Wednesday, 8 July 2015

Go Wild with some Tip Top Stampin' inspiration from me!

Hello,

Today I have some photographs of our team training day to show to you. I love being part of such a friendly, welcoming and inspiring group of talented and creative people! It was such a fun day and it was so nice to see some dear friends again and meet some new ones, all whilst having the opportunity to craft and be inspired together for a whole day.

One of the best things about being an Independent Stampin' Up! Demonstrator is being part of such a lovely family of like-minded people, who don't look at you oddly if you "oooooh" over a piece of patterned paper or pretty ribbon... or "ahhhhhh" over lovely buttons... or if you relate everyday items to Stampin' Up! colour names: "I saw a lovely Bermuda Bay handbag the other day", or, "Her skirt was a lovely flowery pattern in Mint Macaron and Night of Navy"!

I volunteered to do an "Inspiration Station" for our team training on Sunday and chose to showcase the Go Wild Designer Series Paper Stack papers. Everything I made for my display used the Go Wild DSP and its gorgeous colour palette of Tip Top Taupe, Whisper White and Basic (or Memento Tuxedo) Black - with a little bit of gold here and there, for a touch of bling where necessary! Here is a photograph of my display table:


I wanted to show that you can make all sorts of things with a limited colour palette and that Tip Top Taupe, black and white can be both masculine or girly, depending on how you use them! I LOVE the Go Wild DSP. It is a great mix of animal print patterns and quite graphic designs that are reminiscent of African batiks etc. There are 48 sheets in a pack - 4 each of 12, double-sided designs that are 6x6" (15.2x15.2cm) square. I found that a little bit of paper can go a long way and I made all of the above (and more) and still have several full sheets and usable off-cut scraps left over for future projects. A bargain for £7.25 I reckon! There is also a Go Wild Cardstock Pack of 24 A4 sheets of cardstock in Basic Black, Tip Top Taupe and Whisper White (8 sheets of each of the three colours) for £6.50 to go with it too.

The picture below is of a collection of cards that were inspired by and CASED from a card design in the Stampin' Up! 2015-16 Annual Catalogue (on page 105), but using my black, white and taupe colour palette; plus a box made using the Gift Box Punch Board (which, incidentally, is discounted this week in the Weekly Deals for 8th to 14th July 2015!)


I really loved the card on page 105 of the catalogue and have wanted to CASE it ever since I first saw it. (CASE meaning to "Copy And Share Everything"). The original uses a softer colourway with what looks to me like Pool Party, Crumb Cake, Soft Suede with Silver Glimmer Paper.  The larger card in my photograph above is a copy of that card layout, using some of the Go Wild DSP punched out with the Hexagon Punch;  Gorgeous Grunge and Six-Sided Sampler stamp sets stamped in Tip Top Taupe ink;  the Bold Butterfly Framelits and Gold Glimmer Paper, Gold Glitter Glue and the fantastic new Gold Metallic Thread for a bit of glamorous sparkle.

I decided to theme my swaps to my table display and chose to make a 3x3" card front, similar to those in the photograph above.  I totally forgot to take any photographs whilst I was making them all though and only remembered to photograph them on Sunday after I had already given some away - oops! Here is a photograph of what were remaining when I finally remembered to take pictures of them:


And here is a close up of three of them:


I used a selection of the DSP designs to use for the hexagons, but kept everything else the same for each card. The first step was to stamp the splattered dots from the Gorgeous Grunge stamp set with Tip Top Taupe ink onto a square of the new Thick Whisper White cardstock. A DSP hexagon was then glued on top, using Tombow Multipurpose glue. The Metallic Gold Thread was then looped and stuck onto a dimensional on top of the DSP hexagon. Then, the little strip of Gold Glimmer Paper was stuck onto the same dimensional (and pressed down well!). The Basic Black filigree butterfly was then glued on top of that, using a glue dot. The final touch was to squeeze some Gold Glitter glue onto the butterfly for it's body and leave it to dry. A simple but effective card I think - and it didn't take too long to make them either! I shall definitely be making some more of these - I really like them. I might even try them with different DSP and other colours... hmm...

Well that's it for today, apart from showing you what is in this week's Weekly Deals. There are more items than usual in this week's deals and there are only limited numbers of the items at these discounted prices. Once that stock has been sold, the items will still be available, but at the normal, full catalogue price - so hurry up and grab them quick if you want them at a discount!

It is a bizarre coincidence that the Gold Glimmer Paper that I used in the projects above, is in this week's deals... a great opportunity to re-stock I think, don't you? I love it and a little goes a long way with this gorgeously sparkly, glittery paper! I couldn't be without my Magnetic Plate for the Bigshot to cut out my butterflies either (so useful for all the framelits and thinlits - an absolute must-have in my craft room!) - as is the Gift Box Punch Board - what a bargain that is this week! Get one now if you've not got one - it is SO versatile, I love it!

Stampin' Up! are really spoiling us this week!


If you place an online order with me between now and the end of July and you use the hostess code FQZ4JER4 when you place the order and do NOT tick the "no contact" option when you order, I will send you a little gift in the post as a thank you. Please remember to not use the "no contact" option though, if you want to receive the thank you gift from me.  If you do use the "no contact" option, you will miss out, as I won't have access to your details and I will be unable to send you your thank you gift! 

To start shopping with me, click here

Well, that is it for today, do come back later in the week as I have LOTS more photographs of my Inspiration Station projects to show you - including a Project Life layout I made especially for the day and a very cute gift box too!

Until next time, happy crafting and don't forget, you don't always have to "go wild" with lots of bright colours to make some interesting and beautiful cards, gifts or packaging! ;)

Lucy x
  

Monday, 6 July 2015

A handy notepad and pen-holder wallet using Stampin' Up!'s Envelope Paper and Watercolor Wings butterflies!

Hello, today I have a project for you that I think would make a lovely gift - whether as a teacher thank you, for a friend's birthday, or even a "just because" kind of a present for someone who is in your thoughts... 

It is a notepad and pen holder wallet, with a pair of coordinating butterfly paperclip bookmarks tucked into the pocket inside:


The front cover is decorated with the lovely woodgrain patterned Envelope Paper in Tip Top Taupe, with a small taupe and Mint Macaron,  Watercolour Wings butterfly popped up on dimensionals. The wallet has a closure made using half inch circle punched pieces of cardstock placed on dimensionals. Whisper White Bakers' Twine is attached under the righthand side circle and it wraps, in a figure of eight, around both of the circles to keep the wallet closed:


Inside there is a small notepad (decorated at the top with the same patterned envelope paper as the front cover) plus a loop to hold a small pen. There is also a handy inside pocket, decorated with the same paper. Tucked into this are two large paperclips, that I decorated with butterflies stamped in the same colour inks as the one on the front cover:


Here are the butterfly paperclips, aren't they cute?


I love how versatile the Watercolor Wings butterfly stamps are - especially in combination with the Butterflies Thinlits and Bold Butterflies Framelits. I have used the same two colours (Mint Macaron and Tip Top Taupe) for all the butterflies, and have stamped off some of the ink to give more tones of the same colour to add interest.

I do like practical, useful things, especially when they are pretty too and I think that this notepad and pen-holder wallet fits the bill perfectly, don't you? I think that anyone who likes to be organised would appreciate this as a little gift. It is very quick and easy to make these wallets and they don't cost much either, which is handy if you have several people you want to give them to! You could also make several for yourself and keep one in your handbag, one by your bed for those things you think of when you should be falling asleep at night and maybe one on your desk for jotting notes on during the day too?

We made these wallets in my card class last week and everyone really enjoyed making them!  I gave the ladies a choice of colourways, using the different 2015-2017 In Color Envelope Paper colours as a starting point, so they were all a bit different and their butterflies were beautiful.

Unfortunately I was enjoying the class so much that I totally forgot to take any photographs of their finished wallets - oops! I blame my forgetfulness on  the unusually hot weather we had that day and the distraction of the yummy berry and coconut icecream that I had made especially for the class as a cooling treat! (I normally bake cakes for my classes, but it was far too hot to have the oven on in my kitchen, the day before the class - hence my decision to make the icecream instead! Yum!) 

Well, that's it for today, so, until next time, happy crafting everyone! Hope the sun is shining on you, wherever you are!

Come back soon to see some of projects I made for a team-training event, using the fabulous "Go Wild" Designer Series Paper Stack as my inspiration...

Happy crafting to you all.

Lucy x


Wednesday, 1 July 2015

Go spread some sunshine with a handmade card - nothing wishy-WASHI about cheering someone's day, is there?

Gosh, July? Already? Wow! Pinch punch, first of the month, no returns, white rabbits - as we used to say when I was a kid! Do you say that where you are in the World too, I wonder? I would love to know!

As it is the first of July today, I believe it is Canada Day, so, for all my Canadian family and friends and readers - happy Canada Day to you all. Hope you celebrate it well?

Today I have a bright and jolly birthday card for you that was quick and easy to make, using the gorgeous Cherry On Top Designer Washi Tape, some circle punches and not much else! Come  and take a look:


The card base is Watermelon Wonder, with a mat of Whisper White on top. I tore off a strip of each of the different washi tape designs and laid them in a criss-cross, random position on the white card layer. I then stamped the scalloped flower from the Crazy About You stamp set in Watermelon Wonder ink onto a scrap of Whisper White Cardstock and punched it out with the 1 3/4" (4.4mm) scallop circle punch, popped it up on dimensionals and stuck it onto the card.

I then punched out several tiny circles, from Cucumber Crush cardstock scraps, using the smallest eye pieces of the Owl Builder Punch, then a couple of the largest eye circles plus a 1/2" (1.3cm) circle punch circle in Bermuda Bay cardstock. Then, finally, I punched one Watermelon Wonder 3/4"(1.9cm) circle and randomly stuck them all onto the card with Tombow glue, so that they followed a vague triangle pattern, to make it easy on the eye and balance out. I wanted them to echo the multi-coloured, different-sized circles on the spotty washi tape.

The final touch was to stamp the greeting, in Bermuda Bay ink, onto another scrap of Whisper White cardstock, using my trusty, much-used and much-loved Stamp-a-ma-jig to align the words; then, punch it out with my 1 3/8" (3.5cm) circle punch and glue it on top of the scalloped flower. The sentiments come from the Crazy About You set - there are an abundance of words to choose from in that fabulously useful stamp set! I love it!


However, before I stuck down the mat to the card base and chose what greeting to use, I decided to have a play around, to see which combination I preferred. The following two photographs show what the card looks like with either a Bermuda Bay or Cucumber Crush base:


I think the choice of background colour makes a huge difference to the look of the card, don't you? Each one picks out different aspects of the embellishments on the card and puts a different emphasis on the card as well.

I also played around with the greetings too, as you can see in these rough "drawing board" photographs that I took at my crafting table:


You'll have to excuse the rather messy (and inky!) backdrop in these last two photographs, and I apologise for the less than perfect picture quality too - I hadn't intended on showing them to anyone when I took them -  but, I just wanted to show you how you can make cards for several different occasions using the exact same card design, but switching up the sentiment choice. I think they all work well, but I chose the birthday one in the end.

I think these would make a great gift,  if you made a set of several cards, with different greetings on each one and either made a box for them, or, popped them in one of the Stampin' Up! Tag A Bag Gift Bags, tied up with a pretty ribbon, with a personalised hand-stamped tag on it.

I am sure that any teacher would appreciate a set of these at the end of the school term, or, you could just send them to someone you know as a "happy mail" RAK (Random Act of Kindness) to cheer them on their way?

I love to get anything in the post that is not a bill or a pizza flyer - and proper old-fashioned snail mail is so few and far between these days, isn't it? When was the last time you received something through your letterbox that was neither a bill nor a piece of junk mail? And, more to the point, when was the last time you SENT a piece of anything handwritten or handmade in the post "just because"? Just think how much happier we could make the world, if everyone sent out something in the "snail mail" today? You never know how much you might brighten someone's day by sending them something pretty and unexpected in the post, it might just tip the balance if they are feeling down. So, what are you waiting for? Make something and send it out to someone you know TODAY. Go on, do it, today, now, and make a small but significant difference to someone's week... I think it might even brighten your own week, knowing that you have sent somebody else some sunshine too...

Until next time, happy crafting everyone. Go spread some sunshine today...

Lucy x 

P.S. Last minute edit: Stampin' Up! have added even more products to both this week's Weekly Deals  AND to the Clearance Rack! Here are this week's Weekly Deals - there are a bumper 11 items for you this week: 
My top picks from the clearance rack are the Texture Boutique Embossing Machine which is down to only £13.49 (half price!), the Mosaic Punch which is now only £5.59 (60% off!), the Jumbo Sticky Rounds, now only £1.79 and also the Kartenset hip, hip, hurra! - which although is only available in German, is a bargain at only £7.19, down from £17.95 - worth it for the ink spots, clear block and card blanks and die cuts alone, even if you don't use the stamps, I think! Bargain! Some whopping deals there - that will definitely add to this week's sunshine, don't you think?! Lucy x

Wednesday, 24 June 2015

Thank you with a Cherry On Top and some chocolate too!

Today I thought I'd share another project that I made recently, using the gorgeous Cherry On Top Designer Series Paper Stack: a pretty thank you card plus a small, wrapped and decorated bar of very delicious, lime and chilli dark chocolate. Come and take a look:

Here is the card and the envelope: (You may recognise the hearts from another couple of recent posts... I got a bit carried away with the stamping and punching that day, so, waste-not-want-not, hey?)


Here is a photograph of the decorated chocolate bar alongside the card and envelope:


The card was so easy and quick to make - just a few strips of Cherry On Top DSP glued onto a notecard; a stamped thank you sentiment; a few of the stamped and punched hearts on dimensionals and then 'Bob's your Uncle', as they say! I must confess now though, that the two strips along the bottom of the card were to cover a little accidental, inky finger-print mistake... Oops! I stand by the motto of "It's not a mistake, it's an opportunity for embellishment!" and I think that actually it adds a little extra something to the card (and shows off more of the paper stack designs at the same time too, don't you think?).


I do love all of the designs in the Cherry On Top DSP, they are so bright, cute and cheery! Talking of cute, here is a close up of the bow on the decorated chocolate bar:


I think that the mini heart, polka-dot style, patterned paper is one of my favourite designs from the Cherry On Top DSP stack. It is just so pretty. The Bow Builder Punch is such a fantastic way of making really cute and quick bows for your paper-crafted projects - I am so glad that it has carried over to the new Annual Stampin' Up! Catalogue. I use mine a lot!

The paper I used to wrap the chocolate bar with is the brand new, fabby Envelope Paper (in Watermelon Wonder) - as you can see, this new paper is not just for envelopes! It is a lighter weight than the regular DSP, but is still strong. It has a slight sheen to it too - which you can just see on the top of the above photograph. I love that it co-ordinates so well with the Cherry On Top papers and the In Color inks.

Here are the weekly deals for this week (24th -30th June 2015): Click here to go to my shop to see them in more detail.


I can highly recommend the fast fuse adhesive as I use it a LOT! It made covering my recent decorated notebooks a total breeze. I have both the Six-sided Sampler and the Work Of Art stamp sets and find them so useful for so many different projects. I think the "splodges" from Work Of Art are SO useful and I love how the Six-Sided Sampler matches the Hexagon Punch so beautifully... I don't have the Choose Happiness set though, but have seen some stunning cards made with it, so I am rather tempted to buy it for myself. It has been on my wish list for a while now, actually, so I might just choose to get a little happiness in my craft stash at that bargain price! I am definitely going to get another Fast Fuse (or two!) as I have a habit of losing things in my stash quite often and it's one of my crafting essentials, so I don't want to risk not finding some when I need it! Ooer! Better to be safe than sorry, eh?! 

Well, that's it for today, hope you like today's project and the Weekly Deals? Don't forget that time is running out if you want to get yourself TWO FREE STAMP SETS by joining my team! You only have until 30th June to take up this fantastic offer!


Until next time, happy crafting everyone!

Lucy x


Saturday, 20 June 2015

Watercolor Wings decorated notebooks for another Pinkies Blog Hop!


Thank you for joining us on another Pinkies Blog Hop! We're showcasing lots of gorgeous projects using products from the new Stampin' Up!® Annual Catalogue. Simply use the buttons at the end of each post to keep hopping!


Thank you if you have joined me from Sarah's blog - what lovely ideas!


I have totally fallen head over heels with the Watercolor Wings stamp set - I am a huge fan of butterflies and the two-step layered butterflies in this set are just beautiful. I love their slightly sketchy, textured look and have discovered that there are endless ways of combining ink colours to produce a myriad of designs.

Today, however, I am keeping it simple and using just two colours in my projects: Perfect Plum and the new Mint Macaron. I adore how these two colours go so beautifully together. Come and see what I have done with them:


I decided to decorate two hardback notebooks by covering them with some of the Mint Macaron Envelope Paper, stuck down with Fast Fuse (so quick and easy to do!). I then stamped a large butterfly directly onto the larger book's cover with the larger butterfly layer pieces from the stamp set. I cut out a filigree butterfly from Perfect Plum cardstock with the Butterfly Thinlits using my trusty Bigshot (and a bit of wax paper to release it easily) and applied tiny dots of Tombow glue to the back of it to stick it down securely:


For the smaller notebook I used my Chalk Talk Framelits to make a double-layered label, wrapped a little of the gorgeous Mint Macaron 1" (2.5cm) Dotted Lace Trim around it, overlapping two pieces ever so slightly to make it appear wider. I then stamped one of the smaller butterflies from Watercolor Wings onto Whisper White cardstock, cut it out with the Butterflies Thinlits' smallest butterfly shape and then adhered it to the ribbon with Stampin' Dimensionals:


I think it looks really pretty, don't you? A good mix of vintage and feminine whilst still being clean and simple.

This last photograph shows the inside of the larger notebook. I decided to stamp the inside cover with the words "There is nothing in the caterpillar that tells you it is going to be a butterfly" taken from the Butterfly Basics Stamp Set. I also stamped some of the stylised flowers from that set onto the first page of the book and the front cover too, to keep it from being too plain! I love how these two stamp sets and the two butterfly thinlits sets coordinate so beautifully. Even better is that they are available in bundles with a 15% saving - thank you Stampin' Up! for that!


That's it for today, don't forget that you can get two FREE stamp sets if you join my team before the end of June 2015, I welcome both hobbyists and business-minded stampers and am happy to help answer any questions you may have about how to join and what to expect. If you join my team you will also come under the umbrella of the Pinkies team and together we offer a huge pool of knowledge, experience, inspiration, ideas  and friendship. I love being a demo and being a Pinkie too is the cherry on top of that!

Thank you for taking the time to view my post today, please click on the images below to hop onwards to the next person, Christa's, blog, or, back towards Sarah's.

Hope you come back to see me again soon:  next week I will have another project to show you, using the same colours and stamps that I have used today' to make a pretty gift set of cards which would make an ideal teacher thank you present! 

Until next time, happy crafting everyone!


Lucy x


Wednesday, 17 June 2015

Faux-corrugated card technique with Watermelon Wonder and Watercolor Wings!

I've been playing a lot with the Watercolor Wings stamp set recently - I love it! I've been experimenting with different colour-combinations and it is amazing to see just how different the butterflies look when stamped in different inks!

I have mostly been stamping them with soft colours so far,  but, decided to try out some bright and striking colours instead. Here is a card that I inked up with Stampin' Up!'s Watermelon Wonder, Memento Tuxedo Black and a little bit of Pumpkin Pie!

Here is the card I made:


I love how bold the Watermelon Wonder, Pumpkin Pie and Tuxedo Black look against the Whisper White cardstock. I slightly mis-aligned the layers of the butterfly and changed my mind about the orange Pumpkin Pie body, so over-stamped it with black ink - however, I think this all gives it a bit of a pop-art feel, don't you? However, it needed a little something extra, so I decided to score some lines with my Simply Scored Tool on the Watermelon Wonder card base - which I think looks a bit like some sort of ribbon behind the black butterfly panel... I still felt it needed something else, so decided to do a bit more scoring on the black layer.

Here it is in more detail:


I began with just a few score lines towards the bottom of the card, but then thought it needed even more detail - so I decided to score the whole of the black card layer to see what it would look like.

I was pleased with the result! I think it looks a bit like corrugated card and as I haven't yet got my mitts on Stampin' Up!'s brand new Corrugated Paper (in White and Kraft colours) I thought this makes a good faux alternative, don't you? It is a great way to add more interest without adding more layers or embellishments to a card...

Hope you like it?

That's all for today, but there will be more butterflies on Saturday, but in more subtle colours: Mint Macaron and Perfect Plum. Hope you return to take a look!

Don't forget that as it is Wednesday today, there is a brand new set of Weekly Deals on offer which are only available until next Tuesday (23rd June 2015). Here they are:


Click here to take a closer look at them.

I love the Arrows embossing folder - I use it on a lot of projects - it is great for all sorts of occasions - especially cards for kids and teenagers and for masculine cards too. The Decorative Dots embossing folder is probably my most-used embossing folder - I have used it on all sorts of things, from Christmas cards to animal-themed cards! The silver basic buttons are another "must have" item for me too - they are nicely weighted and so versatile as they go with everything being neutral in colour and style! Seam-binding ribbon is my all-time most-used ribbon - it ties beautifully, it can be crumpled, you can pull the threads and turn it into ruffled ribbon, it lies beautifully flat on cards and is easily stuck down with snail, glue dots or fast fuse glue. I haven't got any in Early Espresso though, so that will definitely be going on my order after my class on Thursday... and I think the two stamp sets might accidentally fall onto my order too as I have not got those yet and have been umm-ing and ahh-ing about them for a while now! Hmm... What will you choose?! Decisions, decisions, eh? :)

I shall be back on Saturday with more butterflies - this time in Perfect Plum and Mint Macaron, for a more subtly-coloured couple of projects! Hope you will like them...

Until next time, happy crafting everyone! 

Lucy x

STOP PRESS NEWS: I was utterly delighted to find out that my entry into the Always Playing With Paper Blog Colour Challenge last week was chosen as one of the design team's Top Picks - How exciting! I am thrilled - what an honour! Thank you Nance from APWP, you made my whole week! :)


Monday, 15 June 2015

Cherry On Top cookie pouch

Today I have a quick post for a quick-to-make cookie packet treat pouch using the fabulous new Cherry On Top Designer Series Paper (DSP) Stack.


The paper comes in several designs all in a really useful 6x6" (15.2x15.2cm) sheet size. There are a bumper 48 sheets in each stack - with four each of 12 double-sided designs in fabby, bright and cheery, Summery colours and gorgeous patterns. Stampin' Up! have had the simply genius idea of offering coordinating packs of matching A4 cardstock colours to go with each of the paper stacks and other packs of DSP in the new Annual Catalogue. The Cherry On Top Cardstock pack has 8 sheets each of Bermuda Bay, Cucumber Crush and Watermelon Wonder cardstock for a great price of £6.50. No more struggling to find enough sheets of matching cardstock when you are on a roll and making multiple projects with your DSP! Yey!

Here are the papers in action:


I chose the fun cup cake, ice creams and cherries sheet and the multi-coloured nibbled doughnuts designs to make these pouches which hold a cute two-pack of double-chocolate Oreo cookies which I bought from my local corner shop. I am sure that you could easily adapt the design and measurements to fit a treat of your choice though if you can't find these exact ones... 


I put a line of Fast Fuse glue along the bottom edge and along one side edge of the DSP and wrapped the paper around the snack pack, pressing down the seams gently, making sure that I kept the edges of the papers straight and also allowing enough room for the packs to slide in and out of the pouch easily. I used a small (3/4") circle punch to cut a half-moon thumb-grip hole out of the front of the pouch.

I punched two Decorative Label Punch shapes out - one in Crushed Cucumber and one in Watermelon Wonder - to make the pull tabs. I then stapled a narrow "faux-ribbon" to the top, made from strip of one of the other cute paper designs in the Cherry On Top DSP, and "flagged" on the ends using the same circle punch as the thumb-grip hole (to make a change from the usual fish-tail flags I would normally do!). I decorated the labels with punched out hearts which were left over from my recent Telford Swaps  and raised them up on half a dimensional each. (The heart stamp is from the Something To Say stamp set, punched out using the Itty Bitty Accents Punch Pack.)  The top half of the label tabs were glued together with Tombow and then the lower halves were attached to the cookie packs using glue dots. 


In the photographs above and below you can see that I  scored a series of lines at the bottom of each treat pouch to make it look like the sealed ends of the cookie packaging. To do this I used my Simply Scored Scoring Tool and the smaller end of the Stylus to create four score lines at 1/8th of an inch intervals. You can also see how neatly the tab top fits inside the pouch under the thumb-grip hole. There is plenty of space left on the punched labels for any message you might like to write on them for the recipient of the cookie treat pouch. If these were to be a table gift at a party, then you could maybe attach another label on the front of the pouch with each guest's name and use them for place-settings too, perhaps?


There was just enough room to glue-dot an individually-wrapped peppermint teabag onto the cookie pack, below the label, so that I could slide the cookies and the attached teabag together into the pouch, meaning that the people I sent these to, could sit down with their feet up and have a soothing cuppa and a couple of biccies on me, whilst they flicked through their lovely brand new copy of the Stampin' Up! catalogue that I sent to them!

Not got a copy of the catalogue yet? Would you like me to send you a paper copy? Then contact me and I will be very happy to send you one if you don't already have your own demonstrator... The first five people to request a catalogue, will get one of my Cherry On Top "cookie and cuppa" treat pouches, plus, an In Color bookmark sampler with their catalogue too. 


(Thanks go to my fellow Pinkie, Katy, for the inspiration for the sampler.)

Until next time, happy crafting everyone!

Lucy x


Click on the above image for more information on how to get two FREE stamp sets in June!