Showing posts with label Paper Glass Stitch. Show all posts

Wednesday, 22 July 2015

A Tiny Treat Box and a whole Bundle of other super Stampin' Up! deals to be had!

Hello!

Today I have a quick to make, little gift box to show you. It uses the Stampin' Up! Tiny Treat Boxes which I think are just adorable! The boxes come in a pack of 25 for just £6.50/8,50€ so are great value at only 26p/€0,34 each. They are food safe and acid free. Once assembled they are 5.1x5.1x5.1cm in size (i.e. 2" x 2" x2"). They are perfect for small gifts such as jewellery, sweets or chocolates. 

I have decorated mine with one of  the gorgeous Go Wild patterned paper stack papers - I love that the little polka dots on this are actually little hexagons, not circles:


I wanted to reflect the hexagon 'dots' on the paper in my decoration/label on the top of the box - and so the Hexagon Punch and the Six-Sided Sampler stamp set were the obvious choice! I have found this stamp set and punch combo so useful and have used it on so many different projects. You can get the Stamp Set and Hexagon punch together in a bundle and save 15% too! Click here to see this and the other bundles that are available with the 15% saving.


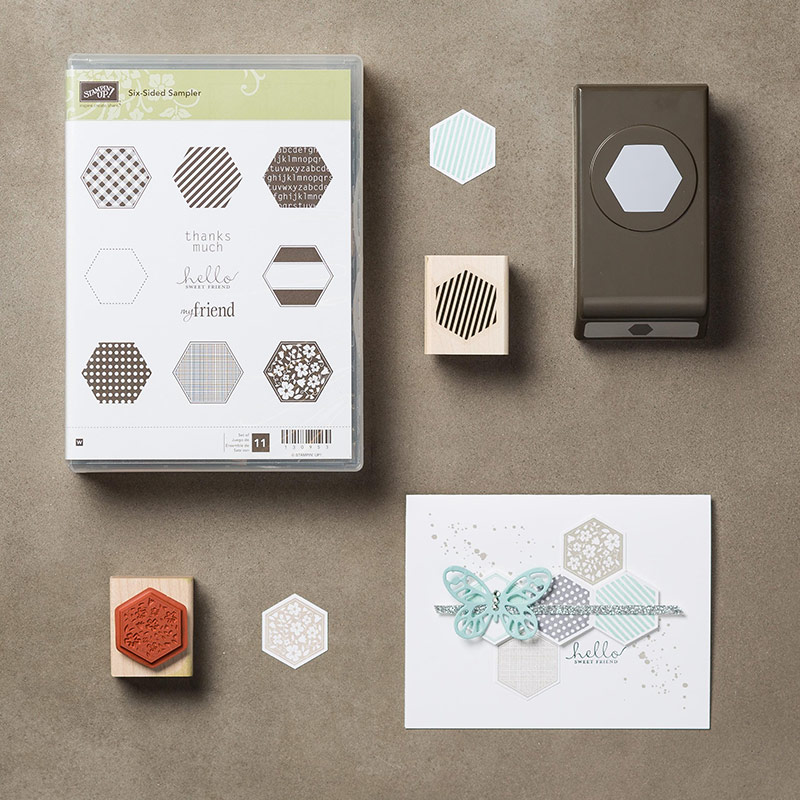
I stamped the bar-pattern hexagon on a scrap of Whisper White cardstock with Tip Top Taupe ink, then using my Stampa-ma-jig,  I stamped the 'hello sweet friend' stamp in black Memento ink in the centre bar of it;  then punched it out with the Hexagon Punch. The black banner behind the hexagon is actually two separate pieces, punched using the Banner Punch! I do love that little punch!

The sides and lid of the box each have a 4.5x4.5cm  (1 3/4"x 1 3/4") square of the paper glued onto them with Tombow liquid multi-purpose glue. I punched a half-circle out of one of the squares using my 1.9cm/3/4" circle punch, so that it did not cover the thumb hole on the front of the box:


Here is a picture of how the hexagon label on the lid is constructed, the hexagon is on a dimensional and the two banner punched shapes are glued onto the lid's dsp square underneath the hexagon and lined-up to give the illusion of one, longer banner:


And here is how it looks like from the top:


I love how Stampin' Up! products coordinate so beautifully - in fact it was this coordination that drew me to Stampin' Up! in the first place! Not only are the colours available in ink, card, papers, accessories and ribbon etc, but a lot of their stamps have a matching punch that coordinates beautifully with them. I also love how Stampin' Up! make it even easier by providing us with bundles of products at a discount too!

Talking of discounts - this week's Weekly Deals are out today and there are some corkers in it this week... looks like I'll be putting another order in this week to get myself some of these items whilst they are available at the discounted price. Again this week's deals have a limited level of stock allocated for the discounted price in the deal - and once this allocation is all sold, then the price will revert to the regular catalogue price, so if you want to grab these bargains, don't delay, put an order in TODAY!!


Click here to see these items in more detail and to purchase them now! 

I must confess, I hadn't even noticed that there was a Smoky Slate Natural Chevron Ribbon  - how did I miss that?! It's gorgeous! I have been meaning to get some of the White Perfect Accents for a while now, as I've seen other people use them in their projects and they look amazing and my stock of ribbons is quite low at the moment, so I will definitely be adding the Calypso Coral Seam-binding ribbon to my next order too, as it will go beautifully with the Pretty Petals DSP stack papers which I recently bought. I also want to try out the metallic foil doilies too... 

Remember that if you place an order online with me before the end of July 2015 and you use the Hostess Code FQZ4JER4, then I shall send you a thank you gift in the post in August.

Thank you for taking the time to read my blog post today. I hope you like today's project? Do leave me a comment, as I love to hear from you. The comments are moderated by me before they are published to avoid spammers leaving links to their dodgy websites - you'd be amazed by their hilarious attempts and what they say! Hehe! So, do not worry if you don't see your comment appear straight away, I shall get to it eventually and I appreciate every one of your genuine comments, thank you!

Until next time folks, happy crafting!

Lucy x

Saturday, 18 July 2015

Stamping, sparkly stars and strawberries - a perfect recipe for a card class!

Hello, today I want to share with you some photographs taken at my class on Thursday. It was such a lovely morning, we all had such fun - shame that a couple of my lovely regulars couldn't make this one - you were missed, ladies! 

I had already planned for us to make a Christmas card using some of the English Garden papers, however, when I saw the Weekly Deals announced on Wednesday morning, I decided to challenge myself to make a Christmas card using several of the items that are on offer this week and was so pleased with what I came up with that I went with the new card design. The English Garden Christmas card will wait until the next class!

Normally, I bake cakes for my card class, but I had a double epic fail on Wednesday evening - firstly I was so busy doing other things that I only realised at about 10.30pm that I had forgotten to bake the cakes, "no problem", I thought, "I'll just bake the cupcakes now; won't take long..." Hmm... went to the cupboard to get out the ingredients and realised to my horror that I had run out of flour! Nooo! I use gluten-free flour, but I thought, "no problem, I'll just go and buy some normal flour from the corner shop and just not eat any myself..." Nope! Too late - the corner shop shuts at 10.30pm... So, what's a girl to do? Raid the fridge and take some beautiful English strawberries instead! Yum! Can't beat British strawberries at this time of year!


They were SO good - and as they had been out of the 'fridge for a while before we ate them, mid-class, they seemed extra delicious and packed with flavour! Yum! Just what we needed, with our cuppas after making the first card!

Here are the cards that my ladies made. I have wanted to do this type of fold for a while now and decided to use the Stars Framelits to cut the window out instead of the more traditional square or circle. I love how each person's card is different - the one on the bottom right is going to be a birthday card for a male, so it shows how versatile the card can be!


This next two photographs show what the card looks like from above, so you can see how it stands up and how the mechanism works! 


I love how the stars all look so different. That Everyday Chic Designer Washi Tape is just gorgeous - and, like the Stars Framelits, it is in this week's Weekly deals too! As are the gorgeous Metal-rimmed Pearls that can be seen in the centre most of the stars above.

Here is another shot of those yummy strawberries, along with the card I made!


The black stars and the sentiment are from the Festival Of Trees stamp set and the silver sparkle is courtesy of the Silver Glimmer Paper. Love that stuff!

Anyway that is it for today - I am running a bit late today, so, sorry that this is a bit rushed and shorter than my normal posts.

You can look at the Weekly Deals here. Don't forget if you place an order online with me before the end of July 2015 and you use the hostess code of FQZ4JER4 (and don't choose the "no contact" option!) then I will send you a little thank you gift in the post in August!


Thank you for taking the time to visit my blog and read through my post today.

Until next time, happy crafting everyone!

Lucy x


Monday, 13 July 2015

Onto a winner with Stampin' Up!'s Garden In Bloom stamps!

I have decided to take a break from the Tip Top Taupe, Black and Whisper White colour scheme from my recent team training inspiration station projects and inject a bit of colour today!

At our team training events, one of the most popular things of the day is always the raffle, which is usually jam-packed with all sorts of fantastic Stampin' Up! goodies... (Thanks, Michelle!)

Normally, I rarely win anything in raffles, but I still optimistically buy some tickets in any raffle I'm asked to take part in... In the past if I have won anything, it's been notable for it's uselessness - think winning a turkey in a Christmas raffle when you don't eat meat and the rest of your close family is living overseas, or, winning a "romantic dinner for two" at a local gastro pub - two weeks after splitting up with a boyfriend... Yes folks, in the past I have been THAT lucky! I kid you not! So, imagine my total and utter delight at winning not one prize in the team raffle, not two, but THREE prizes! Yes THREE PRIZES... of Stampin' Up! goodies too! Whoopieeee!! I couldn't quite believe it, and felt a bit greedy for winning three... but, still took them - hey, I deserved a bit of raffle luck for a change, people, don't judge!! ;) 

One of the three prizes I received, was the fabulous Garden In Bloom stamp set - a photopolymer stamp set that has several flowers, leaves, a stem, a couple of butterflies and a very cute bee as well as some lovely sentiments amongst its 20 stamps:

Garden In Bloom Photopolymer stamp set 139433 £23.00/30,00€
I was so excited to win this as it was one of the next items on my "wish list" of new Stampin' Up! goodies to buy for myself and my classes! I love the two-step stamping and multitude of possibilities the many different stamps give you for your cards and other paper-crafting projects. Each of the flower and leaf stamps has a little built-in tab arrow, that doesn't get ink on it, but shows you which direction your stamp needs to go in. For example if you use the largest flower outline stamp with the arrow facing straight up (in a 12 o'clock position), then you know that when it comes to the next layer of the stamp, you just face that stamp's tab at the 12 o'clock position too and then stamp within the flower outline so that your petals will all match up beautifully. Some of the stamps you can instantly see which is the correct way up, but with others the little tab arrows save you no-end of bother! 

Here is what I made with my first try:


I made a series of square cards, all with Old Olive bases and Whisper White mat layers. I kept my colour palette to Rose Red, Old Olive, Daffodil Delight and the Tuxedo Black Memento ink. The cards are approximately 10cm (4") square. The outlines of the flowers and leaves were stamped directly from their ink pads, but the "solid" insides were stamped off on my grid paper first, before being stamped onto the card. The yellow flower centres are stamped with the same little stamp that the yellow bumble bee body was stamped with. I'm not sure if it was designed to be for both, but it definitely fits both!


On these two cards (above) I kept the layout pretty much the same but used differently-sized leaves on each. I think I much prefer the card without the sentiment on the front and decided to stamp on the inside of that instead:


The sentiment inside these ones comes from Endless Thanks. I just love the mix of the hand-written-look font with the smaller, typed-style font. I think I shall get a lot of use out of the Endless Thanks set as it has lots of different sentiments as well as a lovely scrolled banner and several flowers, leaves and a tiny heart in it too:

Endless Thanks Photopolymer Stam Set 138796 £14.00/19,00€

Isn't that cute? For the next card, I stamped a single large flower and bent the stem stamp into a gentle curve on my acrylic block, before stamping it. (So easy to do with photopolymer stamps!) I really like the sentiment on this card. I thought it would make a lovely thank you card too, as you can see from the inside layer, shown below:


I love the little cute, almost blotchy, butterfly, don't you? It is so dinky!

I stepped up the next card a little, using the same curved stem and large flower, but this time adding the larger leaves, a bumble bee and an extra flower. Shh... don't tell anyone, but the small flower is hiding an inky green finger print, which I partially disguised in one of the little leaves, but then needed something else to balance it all (remember: "it is not a mistake, it is an opportunity for embellishment!"). I stamped the little, three-step flower on a scrap piece of Whisper White and fussy cut it out with my paper snips and stuck it onto the card with a glue dot. The arrow tabs are especially useful when stamping this little flower...


More leaves and this lovely sentiment taken from Butterfly Basics stamp set, made the final touches to the inside of the card. Job done!

I hope you have liked today's cards? I think that you could make several  of these and put them together in a little hand made box, for a very pretty birthday or thank you gift - and of course there are endless possibilities for using different colours to get quite different looks.

These will be my July thank you cards, so if you order from me this month, whether online, at a class, by email, or, in person, you will receive one of these thank you cards from me. (If you order more than once, I shall make sure that I make your cards in different colourways, so you don't end up with several the same!0


Remember if you place an online order with me via my shop during July 2015 and you  use the hostess code FQZ4JER4 when you place your order, I shall send you a little gift in the post as a thank you in August.

Well, that's it for today. Thank you for taking the time to visit my blog and reading this post. I hope you have liked today's projects? I'd love it if you left me a comment to let me know what you think and which card design you prefer the most!

Until next time, happy stamping everyone!

Lucy x


Saturday, 11 July 2015

Let yourself 'Go Wild' with Stampin' Up!'s Gift Box Punch Board!

Hello again! Today I want to show you a couple of gift boxes that I made using the Gift Box Punch Board and the fabulous Go Wild Designer Series Paper (DSP) Stack from Stampin' Up! as promised in my last blog post!

The Gift Box Punch Board is such a fantastic tool. With it you can create a variety of sizes of gift boxes, up to 4" (approx.10cm) on each side. It is really easy to use and all you have to do to create gift boxes  is to punch and score your piece of cardstock/DSP - you don't even need to glue it together if you don't want to, as it has a clever, integral punch that cuts a little curved notch out of the box flaps to allow you to close them securely. It comes with clear instructions and measurements are printed onto it too.

Stampin' Up! Gift Box Punch Board 135863 £18.00 now £13.50 for a limited time 


What is even better about the Gift Box Punch Board is that it is normally only £18, better still is that there are a limited number of them in the WEEKLY DEALS this week (until Tuesday 14th July 2015) at a bargain price of only £13.50 - wow! That is a good deal! There is only a limited stock of these at this price though, so if you want to grab yourself a bargain, you will have to be quick!

Here is one of the boxes I made recently for my Go Wild Inspiration Station at our team training day. It is the largest, 4x4" (10x10cm) sized square box, made from Basic Black cardstock (12x12"). And I have decorated it with the Go Wild DSP stack (the stripey Tip Top Taupe and Whisper White Pattern) and a Tip Top Taupe Bow made using the Gift Bow Bigz Die (129977) and the Amazing Birthday Stamp Set: 


As I wanted the bow to go on the top of the box, I decided to make the opening slightly different from how I would normally do it. The front side of the box is actually what would conventionally be the top opening of the box, but, I glued down three of the triangular "lid" flaps (as you would when making an envelope) and covered them with a strip of the Go Wild DSP:


I then cut a semi-circular  thumb-grip hole with my 1" Circle Punch and glued another similar strip of the DSP to the triangular flap of what is now the lid of the box:


The above photographs show how the strip of DSP is cut and glued onto the front side and the lid's triangular flap to enable a "hidden"opening. The half-circle thumb hole shows how you open the box and allows you to easily open it too. The box is self-closing, there is no need for additional glue to keep the lid closed.

This final image shows the box fully open. You will see the concertina folds which attach the lid to the rest of the box. You could cut these triangles away, but, I think it makes a stronger box if you don't. On the other sides of the box, the equivalent concertina triangles have been glued shut and then glued onto the corresponding inside side of the box. It really is quite sturdy and would easily hold a fairly heavy gift inside it. 


It is more complicated and takes longer to explain how to make a box with the Gift Box Punch Board than it actually takes to make one! It really is a simple process though!

Stampin' Up! have made a fantastic video showing how to use the Gift Box Punch Board - click here to see it!

Here are another couple of boxes that I made using the punch board and the Go Wild DSP. I have left the lid openings in their "normal" position for these two boxes and used the integral clasp-making punch to create the curved notches which allow the box lids to stay closed:


This one is 2x2" (approx. 5x5cm) square and made with the lovely black and white animal print DSP from the Go Wild Paper Stack. The "Surprise" stamp comes from the Amazing Birthday Stamp Set and is punched out using the 1 1/4" (3.2cm) Circle Punch; the gold circle is a 1 3/8" (3.5cm) circle punched out of the Gold Foil Sheets.


As you can see above, I made a matching 3x3" card and decorated the envelope with an extra piece of the lovely graphic chevron design of Go Wild DSP to go with this last box.

Well, that is it for today. I hope that I have inspired you to go try out the Gift Box Punch Board AND the Go Wild DSP Stack. Click here to go and order them from me today, whilst the board is still on special offer! Remember to use the hostess code of FQZ4JER4 for every online purchase you make with me between now and the end of July to receive a thank you gift in the post  from me during August. (You will need to un-check the "no Contact" option for me to do this!)

Thank you for taking the time out of your busy day to read my post. Until next time, happy crafting everyone!

Lucy x


Wednesday, 8 July 2015

Go Wild with some Tip Top Stampin' inspiration from me!

Hello,

Today I have some photographs of our team training day to show to you. I love being part of such a friendly, welcoming and inspiring group of talented and creative people! It was such a fun day and it was so nice to see some dear friends again and meet some new ones, all whilst having the opportunity to craft and be inspired together for a whole day.

One of the best things about being an Independent Stampin' Up! Demonstrator is being part of such a lovely family of like-minded people, who don't look at you oddly if you "oooooh" over a piece of patterned paper or pretty ribbon... or "ahhhhhh" over lovely buttons... or if you relate everyday items to Stampin' Up! colour names: "I saw a lovely Bermuda Bay handbag the other day", or, "Her skirt was a lovely flowery pattern in Mint Macaron and Night of Navy"!

I volunteered to do an "Inspiration Station" for our team training on Sunday and chose to showcase the Go Wild Designer Series Paper Stack papers. Everything I made for my display used the Go Wild DSP and its gorgeous colour palette of Tip Top Taupe, Whisper White and Basic (or Memento Tuxedo) Black - with a little bit of gold here and there, for a touch of bling where necessary! Here is a photograph of my display table:


I wanted to show that you can make all sorts of things with a limited colour palette and that Tip Top Taupe, black and white can be both masculine or girly, depending on how you use them! I LOVE the Go Wild DSP. It is a great mix of animal print patterns and quite graphic designs that are reminiscent of African batiks etc. There are 48 sheets in a pack - 4 each of 12, double-sided designs that are 6x6" (15.2x15.2cm) square. I found that a little bit of paper can go a long way and I made all of the above (and more) and still have several full sheets and usable off-cut scraps left over for future projects. A bargain for £7.25 I reckon! There is also a Go Wild Cardstock Pack of 24 A4 sheets of cardstock in Basic Black, Tip Top Taupe and Whisper White (8 sheets of each of the three colours) for £6.50 to go with it too.

The picture below is of a collection of cards that were inspired by and CASED from a card design in the Stampin' Up! 2015-16 Annual Catalogue (on page 105), but using my black, white and taupe colour palette; plus a box made using the Gift Box Punch Board (which, incidentally, is discounted this week in the Weekly Deals for 8th to 14th July 2015!)


I really loved the card on page 105 of the catalogue and have wanted to CASE it ever since I first saw it. (CASE meaning to "Copy And Share Everything"). The original uses a softer colourway with what looks to me like Pool Party, Crumb Cake, Soft Suede with Silver Glimmer Paper.  The larger card in my photograph above is a copy of that card layout, using some of the Go Wild DSP punched out with the Hexagon Punch;  Gorgeous Grunge and Six-Sided Sampler stamp sets stamped in Tip Top Taupe ink;  the Bold Butterfly Framelits and Gold Glimmer Paper, Gold Glitter Glue and the fantastic new Gold Metallic Thread for a bit of glamorous sparkle.

I decided to theme my swaps to my table display and chose to make a 3x3" card front, similar to those in the photograph above.  I totally forgot to take any photographs whilst I was making them all though and only remembered to photograph them on Sunday after I had already given some away - oops! Here is a photograph of what were remaining when I finally remembered to take pictures of them:


And here is a close up of three of them:


I used a selection of the DSP designs to use for the hexagons, but kept everything else the same for each card. The first step was to stamp the splattered dots from the Gorgeous Grunge stamp set with Tip Top Taupe ink onto a square of the new Thick Whisper White cardstock. A DSP hexagon was then glued on top, using Tombow Multipurpose glue. The Metallic Gold Thread was then looped and stuck onto a dimensional on top of the DSP hexagon. Then, the little strip of Gold Glimmer Paper was stuck onto the same dimensional (and pressed down well!). The Basic Black filigree butterfly was then glued on top of that, using a glue dot. The final touch was to squeeze some Gold Glitter glue onto the butterfly for it's body and leave it to dry. A simple but effective card I think - and it didn't take too long to make them either! I shall definitely be making some more of these - I really like them. I might even try them with different DSP and other colours... hmm...

Well that's it for today, apart from showing you what is in this week's Weekly Deals. There are more items than usual in this week's deals and there are only limited numbers of the items at these discounted prices. Once that stock has been sold, the items will still be available, but at the normal, full catalogue price - so hurry up and grab them quick if you want them at a discount!

It is a bizarre coincidence that the Gold Glimmer Paper that I used in the projects above, is in this week's deals... a great opportunity to re-stock I think, don't you? I love it and a little goes a long way with this gorgeously sparkly, glittery paper! I couldn't be without my Magnetic Plate for the Bigshot to cut out my butterflies either (so useful for all the framelits and thinlits - an absolute must-have in my craft room!) - as is the Gift Box Punch Board - what a bargain that is this week! Get one now if you've not got one - it is SO versatile, I love it!

Stampin' Up! are really spoiling us this week!


If you place an online order with me between now and the end of July and you use the hostess code FQZ4JER4 when you place the order and do NOT tick the "no contact" option when you order, I will send you a little gift in the post as a thank you. Please remember to not use the "no contact" option though, if you want to receive the thank you gift from me.  If you do use the "no contact" option, you will miss out, as I won't have access to your details and I will be unable to send you your thank you gift! 

To start shopping with me, click here

Well, that is it for today, do come back later in the week as I have LOTS more photographs of my Inspiration Station projects to show you - including a Project Life layout I made especially for the day and a very cute gift box too!

Until next time, happy crafting and don't forget, you don't always have to "go wild" with lots of bright colours to make some interesting and beautiful cards, gifts or packaging! ;)

Lucy x
  

Monday, 29 June 2015

Be Sassy with your Stampin' today: a time-saving Definitely Dahlia project and a money-saving special offer too!

Today I would like to share with you some quick and easy to make cards, that I designed recently for my card classes, using the gorgeous new background stamp called "Definitely Dahlia" and my all-time favourite, most-used sentiment stamp set "Sassy Salutations":


I wanted to use the brand new thick Whisper White cardstock for the card bases and I LOVE it - I knew I would when I first saw it in the new Stampin' Up! Catalogue, hurrah a sturdier white cardstock at last - thank you Stampin' Up!. I used the regular Whisper White cardstock for the top layer and as you can see, the two different weights of card are a perfect colour match with each other! 

I went slightly out of my comfort zone with the pale pastel colours for these cards, but I do like the washed out, subtle look of them. All three use the exact same layout - with just the addition of a butterfly cut out of Silver Foil Sheet, using the Butterflies Thinlits, for the Thinking Of You version:


The dahlia for this version was stamped in Soft Sky Ink and the words were stamped in Pool Party Ink on the banner of Soft Sky Cardstock. All it needed was a little bit of bling in the form of three rhinestone gems.

In the pink versions of the card, below, I used Pink Pirouette for the stamped dahlias and banners and Blushing Bride Ink for the sentiments. I decided that these ones needed some subtle pearl gemstones, rather than rhinestones, for their bling.  I think that the Congratulations card would be great for all sorts of occasions, but would make a super new baby girl, or even a Christening card, don't you? If the new baby was a boy, then you could easily swap to the blue colourway instead! I love how one card layout can be so versatile and can be used for so many different occasions. Very time-saving, don't you think?! I like to think of it as time-efficient, rather than lazy, when I recycle a card idea for a different purpose! Hehe!


I can't tell you how many times I've used the Sassy Salutations stamps on my cards and other paper projects. I love the size of the greetings and the bold, swirly font style. I think they are great for both feminine and masculine cards too and are my go-to set when I need a large sentiment on a card. Here are all the greetings for you to see: (Click here for more information on them).


Don't forget that you could get this, or any other two stamp sets of your choice, for FREE if you buy a starter kit and join my team - but hurry, this fantastic offer runs out tomorrow (Tuesday 30th June 2015). For a cost to you of only £99 (or 129€) you get to choose any products YOU WANT, up to the value of £130 ( or 175€),  PLUS you will get ANY TWO stamp sets of your choice FOR FREE too. I truly think that this is probably the best joining offer that Stampin' Up! have offered. Perfect for if you have a big wish list and want to save yourself some money, or, if you want to start your own crafting business with a little extra free help.

I would love to welcome you into my team! Click here or on the image below to get going!


That's it for today, until next time, happy stamping and come back soon!

Lucy x

Saturday, 27 June 2015

Winging it with hand-dyed ribbons for a pretty little gift!

Today I would like to share with you a little gift set I have made using Stampin' Up!'s Watercolor Wings stamp set. The folded pouch holds four 3x3" cards and envelopes and is made with the new Envelope Paper in Mint Macaron. I think it would make an ideal teacher thank you gift or even a nice little birthday present and it is very quick to make:


I used Mint Macaron and Perfect Plum. I love this colour combination. I used the same two colours in my covered notebooks that I showed you in my recent Pinkies Blog Hop post.

As Stampin' Up! do not have any Perfect Plum ribbons, I decided to dye some of the Whisper White Organza Ribbon and Whisper White Bakers' Twine with a few drops of Perfect Plum Ink Refill ink and a tiny bit of water. I placed about a dozen drops of the ink into a small plastic pot, added about a tablespoon of tap water and then coiled the ribbon and twine into the liquid, making sure that it was all submerged by using a bamboo barbecue skewer to dunk it under the surface! (You could use a cocktail stick, but I hadn't got any left!) I left it for a few minutes to let the ink to soak in, then removed it and pegged it to my washing line to dry in the sunshine. 

The ribbon came out a bit paler than I wanted for this particular project, so I decided to use my Perfect Plum Ink Pad to add a bit more ink to it. I placed one end of the ribbon on the ink pad and held a small acrylic block over it with one hand, whilst gently and slowly pulling the ribbon with my other hand, until the ink covered all the ribbon. Be warned - you will get inky fingers doing this, however careful you are (my fingers looked like I had been picking blackberries afterwards!) and you will need to allow plenty of drying time before you use the ribbon on your project, too. I do love how you can make bespoke ribbons and twines this way though. It is worth the wait, do give it a go!

Here are a few more photographs of the gift set and the cards inside it:


I do love the versatility of the Watercolor Wings stamp set - the butterflies are so beautiful. I really like how the four butterflies above look so different, despite only two ink pads being used. I stamped off the ink first on my grid paper, before stamping some of the layers and then used direct stamping on other layers. This gives a fantastic range of tones of the same colour - thus showing that you can still get a variety of effects even if you don't yet have many ink pad colours in your craft stash! It doesn't look like only two colours have been used, does it?


I like how you can see the lovely wood grain pattern on the inside of the gift pouch in the last photograph too. If you haven't yet bought the Envelope Paper, I can highly recommend it. I have used it a lot - and I must confess I've not even made an actual envelope with it yet! Ooer! It is hugely versatile and a bargain at only £5.50 (7,50€) for twenty 12x12" (30.5x30.5cm) sheets. It is strong-enough to be scored and folded, but is a slightly lighter-weight than our regular Designer Series Paper.

Well, that is it for today, do leave me a comment. I am wondering if you would like to see a step-by-step tutorial for making the above folded gift pouch? If I get enough response I will do one for you all to see.

Until next time, happy crafting everyone!

Lucy x

ONLY FOUR DAYS LEFT to get yourself TWO FREE STAMP SETS with your starter kit - so hurry or you will miss out! Click here or on the photograph below, to find out how: Offer ends this Tuesday, 30th June 2015.


Wednesday, 17 June 2015

Faux-corrugated card technique with Watermelon Wonder and Watercolor Wings!

I've been playing a lot with the Watercolor Wings stamp set recently - I love it! I've been experimenting with different colour-combinations and it is amazing to see just how different the butterflies look when stamped in different inks!

I have mostly been stamping them with soft colours so far,  but, decided to try out some bright and striking colours instead. Here is a card that I inked up with Stampin' Up!'s Watermelon Wonder, Memento Tuxedo Black and a little bit of Pumpkin Pie!

Here is the card I made:


I love how bold the Watermelon Wonder, Pumpkin Pie and Tuxedo Black look against the Whisper White cardstock. I slightly mis-aligned the layers of the butterfly and changed my mind about the orange Pumpkin Pie body, so over-stamped it with black ink - however, I think this all gives it a bit of a pop-art feel, don't you? However, it needed a little something extra, so I decided to score some lines with my Simply Scored Tool on the Watermelon Wonder card base - which I think looks a bit like some sort of ribbon behind the black butterfly panel... I still felt it needed something else, so decided to do a bit more scoring on the black layer.

Here it is in more detail:


I began with just a few score lines towards the bottom of the card, but then thought it needed even more detail - so I decided to score the whole of the black card layer to see what it would look like.

I was pleased with the result! I think it looks a bit like corrugated card and as I haven't yet got my mitts on Stampin' Up!'s brand new Corrugated Paper (in White and Kraft colours) I thought this makes a good faux alternative, don't you? It is a great way to add more interest without adding more layers or embellishments to a card...

Hope you like it?

That's all for today, but there will be more butterflies on Saturday, but in more subtle colours: Mint Macaron and Perfect Plum. Hope you return to take a look!

Don't forget that as it is Wednesday today, there is a brand new set of Weekly Deals on offer which are only available until next Tuesday (23rd June 2015). Here they are:


Click here to take a closer look at them.

I love the Arrows embossing folder - I use it on a lot of projects - it is great for all sorts of occasions - especially cards for kids and teenagers and for masculine cards too. The Decorative Dots embossing folder is probably my most-used embossing folder - I have used it on all sorts of things, from Christmas cards to animal-themed cards! The silver basic buttons are another "must have" item for me too - they are nicely weighted and so versatile as they go with everything being neutral in colour and style! Seam-binding ribbon is my all-time most-used ribbon - it ties beautifully, it can be crumpled, you can pull the threads and turn it into ruffled ribbon, it lies beautifully flat on cards and is easily stuck down with snail, glue dots or fast fuse glue. I haven't got any in Early Espresso though, so that will definitely be going on my order after my class on Thursday... and I think the two stamp sets might accidentally fall onto my order too as I have not got those yet and have been umm-ing and ahh-ing about them for a while now! Hmm... What will you choose?! Decisions, decisions, eh? :)

I shall be back on Saturday with more butterflies - this time in Perfect Plum and Mint Macaron, for a more subtly-coloured couple of projects! Hope you will like them...

Until next time, happy crafting everyone! 

Lucy x

STOP PRESS NEWS: I was utterly delighted to find out that my entry into the Always Playing With Paper Blog Colour Challenge last week was chosen as one of the design team's Top Picks - How exciting! I am thrilled - what an honour! Thank you Nance from APWP, you made my whole week! :)