
Hey there folks!
Really sorry for the delay in getting this to you, but I've been laid low with a lurgy this past week or so - ug! BUT am better now! Hurrah - just in time for all the yummy Easter chocolate goodies, that I hope to scoff over the weekend!! Nom nom!
Anyway, without further ado - and due to popular request - here is my step-by-step tutorial for how to make the Easter Bunny Bucket Gift Bag that I showed you in my last post:
This is what we will be making:

To make the bag, you first need to make a tray box. Cut a piece of Old Olive cardstock to 10cm x 10cm (3 & 15/16ths" x 3 & 15/16ths") and score it on all four sides at 2cm (13/16ths") as shown below:


You then need to crease the score lines with a bone folder. Cut along the scorelines from the edge of the cardstock, up to where they meet the horizontal score line, on two opposing sides of the cardstock as per the photograph below. It is a good idea to trim a little wedge out of the square corner pieces, as shown here:

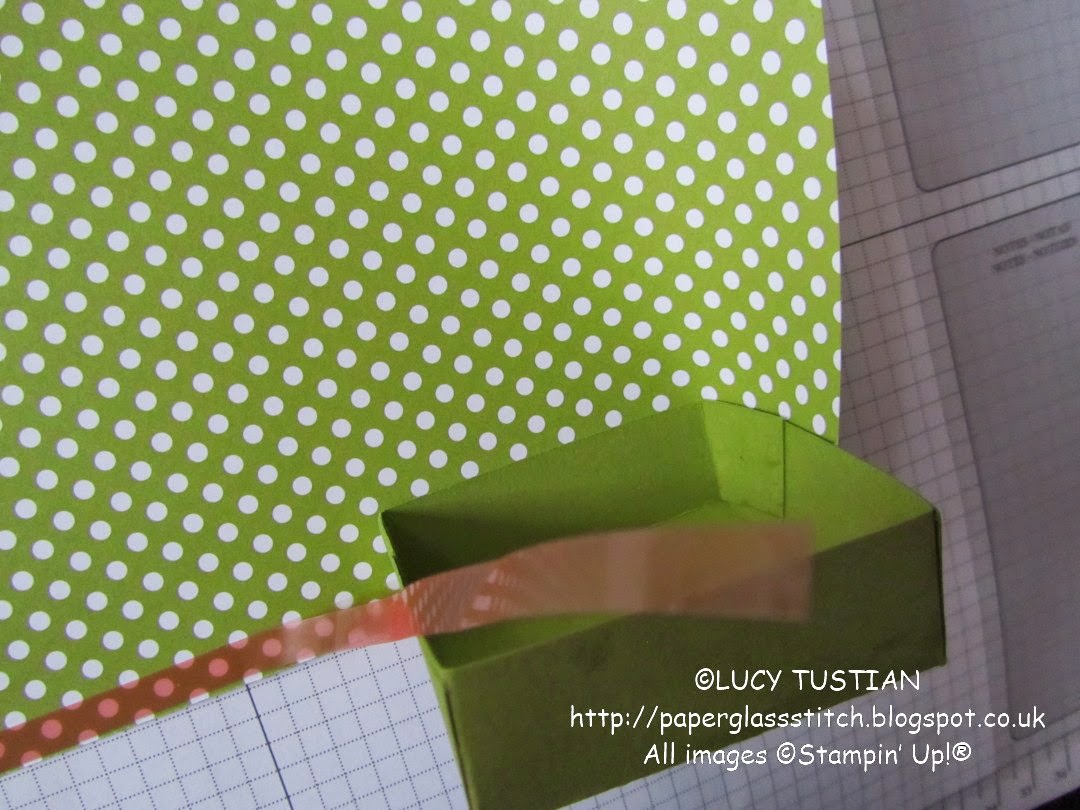
Next you need to put a little bit of liquid Tombow multipurpose glue on the four square tabs on one side of the square of card and then fold the sides in and glue it together to make the tray. The Tombow allows you some wiggle time to get your box square but you will need to press & hold the glued-down corners a little, between your fingers to help them stay stuck:


Your tray box should look like this:

Next you need to cut a piece of designer series paper (dsp), that is 12cm x 27cm (or approx. 4 & 3/4" x 10 & 10/16"). I used an Old Olive coloured sheet from the lovely Polka Dot Parade dsp (I do love that dsp, I use it a lot!).


Then you need to put a piece of Sticky Strip (double-sided tape) along one long edge and one short edge of the wrong side/back of the dsp, (as close to the edge of the dsp as possible) as shown below:

Now you need to carefully adhere the tray to the dsp in the following way: Peel a little of the backing off the piece of sticky strip which is along the long edge of the dsp. Start at the corner that is nearest to the short side of the dsp, that doesn't have sticky strip on it (i.e. the bottom right hand side corner as you look at it in the above photograph). Place the tray with the bottom edge of its base lining up along the edge of the dsp, so that the short edge of the dsp starts half way along one side of it. (It is easier to see what I mean if you look at the next few photographs.) You will then need to carefully roll the tray, peeling the Sticky Strip backing off as you go, making sure that the edge of the dsp aligns with the base of the box as you turn it, sticking the tray to the dsp:


Just before you reach the end, you will need to stop and peel off the backing from the Sticky Strip that is along the short edge of the dsp. You can then carry on rolling the box until you reach the end of the dsp. Be careful when sticking down the short edge of the dsp to the back of the bucket bag as you want it to stick straight and not buckle it up. Press it down to create a good seal, with your hand inside the bag:

You will now have your basic bucket shape made:

Next you need to make the handles of the gift bag by using the Large Oval Punch:

The following photographs show you where to place the punch, in order to get the oval holes in the right place. The front of the bag will be the side opposite where the ends of the dsp overlap. Turn the gift bag so that the opening/neck of the bag is towards you and with the punch upside down, so that you can see where you will be punching, slide the front side of the dsp into the punch. To make sure your oval is central to the top of the bag, line up the corners of the punch, by eye, to match the corners of the tray/base. Then, to make sure you will be punching the oval handle far away enough from the top of the gift bag, make sure you line up the edge of the dsp (top of the bag) to correspond with the top edge line of the Stampin' Up! logo that is on the bottom of your punch (see the photograph below!). When you are satisfied that the position is right, punch your first oval out. Remove the punch and then repeat the above instructions to line up and punch out a second oval, from the back of the gift bag (i.e. from the side that has the seam along it). Here is a photograph to make all this a bit clearer:

Note that the top corners of the punch in the picture above are in alignment with the top (well, the base, really!) of the bag and that the top line of the frame of the logo near my thumbnail is in alignment with the open/top edge of the bag.

Now for the Easter Bunny decoration! You will need the following punched shapes to make your bunny: the Large Oval Punch - x2 in Whisper White and x2 in Pink Pirouette; the 1 & 3/4" (4.4cm) Circle Punch x1 in Whisper White; and finally the 2 & 1/2" (6.4cm) Circle Punch x1, cut in half, in Whisper White:

You will need to trim a little bit off each of the pink ovals for the Bunny's inner ears, so that they are slightly smaller than the white, outer ears (see my pen line on the pink oval on the right, below, to see what to trim off) and then you can glue the pink ones on top of the white ones in the position that is shown below:

Next you need to put a little bit of Tombow glue onto the bottom of the front of each ear and stick them behind the white 1 & 3/4" (4.4cm) punched circle, in the position shown in the next photograph:

To get one ear to flop over at a cute and jaunty angle, fold the tip of it over your bone folder like I have done here, and rub your thumb along the edge of the bone folder to crease it, like so:


Next, attach four Stampin' Dimensionals to the back of the bunny's head and remove the backing paper in readiness to stick the head on the bunny's body:

The half circle cut from the 2 &1/2" (6.4cm) circle punch, circle makes the body. Glue this with Tombow, onto the lower part of the front of the bucket gift bag, aligning the straight cut edge along the bottom of the gift bag like this:

Now you can attach your prepared bunny head onto the bunny's body:

All you need now is a sachet of small but yummy Easter eggs, - or any other gift that takes your fancy - to pop inside the decorated Easter Bunny Bucket Gift Bag and then a bit of Stampin' Up!'s lovely Whisper White 5/8" (1.6cm) wide Organza Ribbon to tie the handles together with a pretty bow and hey presto, you've got a beautiful, hand made Easter gift for a loved one, friend or colleague:


They are so easy and quick to make, why not make more than one?!

I hope that you have enjoyed this step-by-step tutorial and that you do have a go at making some of these yourself. The basic Bucket Gift Bag can be made in all sorts of different sizes: smaller, taller, thinner, fatter, shorter etc. and can be decorated in all sorts of ways - just make your initial tray box a different size or alter the dimensions of the dsp to suit the gift you wish to put in it. I made several at Christmas. They are great for gift-wrapping awkward shaped or easily-squashed/fragile items - as well as last minute gifts - so go on, give them a try!! They are not just for Easter presents you know! Oh and also you can have fun trying different punches for the handles, too...
I first learnt how to make the Bucket Gift Bag (in a different size) a while ago, I think it was at a team-training event with the lovely Michelle Last, but I can't remember exactly when it was now. Thank you, Michelle, for the great idea that inspired me to make these. The Bucket Gift Bag is now one of my "go to" gift-wrapping staple stand-bys! :O)
Phew, after such a long blog post, I think it is time for a lovely cup of peppermint tea...and perhaps a little "quality control test" of some of the dark chocolate mini eggs that I bought to go in one of these bucket bags - but, shhhh, don't tell anyone that one of the gift bags might end up being short a couple or three choccy eggs!! I'd better not "test" too many though, or, I shall have to go and buy some more.... ;O)
Until next time, happy crafting, and do let me know how you get on with making these gift bags yourself. Hopefully I'll have time to show you a couple more Easter ideas before the weekend, if not, have a lovely Easter weekend everybody!
Lucy x
Love this. Thank you for the tutorial. Anne x
ReplyDeleteThank you, Anne. Really glad you like my tutorial! Hope you have fun making some of your own bucket Gift Bags. Lucy :O)
Delete