Showing posts with label punch art. Show all posts

Saturday, 6 September 2014

Thinking outside the box with the Curvy Keepsake Thinlets for the Pinkies Autumn/Winter Catalogue Blog Hop!


Thank you for joining us on another Pinkies Blog Hop! We are showcasing lots of gorgeous projects from the new Stampin' Up! ® Autumn/Winter Seasonal Catalogue. Simply use the buttons at the end of each post to keep hopping!


A very warm welcome to you, especially if you have hopped to me from the lovely Tracy's blog - I do love seeing how creative other people are, don't you? :O)

There are soooo many yummy things in the new Autumn/Winter Catalogue - I think that it is one of the best yet! So many fantastic ideas for packaging, gifts and decorations..I love it all!
 
Well, nearly all.... I'm a bit squeamish about (ok, terrified, of) spiders and so I think I may have to give the aptly-named "Frightful Wreath Simply Created Kit" on page 37 a  wide berth - but only because of the beaded spider in the kit! (It seems that the dreaded annual 'Spider-month' has come early to my house this year and the hairy blighters have been both large in numbers and size so far ... eww... so I am extra spooked by them now - bleuuugh!!)   I do, however, like the rest of the wreath though... and I do like Halloween a LOT... so I may just have to bypass the eight-legged beastie and get myself one of the kits afterall...

Anyway, talking of Halloween, that brings me to my blog-hop projects that I would like to share with you today: One of my favourite things to do for Halloween is to make themed treats to give to people. As soon as I saw the Curvy Keepsake Box Thinlits Die and the box ideas in the new Stampin' Up! catalogue, I just knew that they would make great pumpkins due to the lovely curved shape and had to give it a try.... So, here is what I came up with:


With my Bigshot and the thinlits, I used Pumpkin Pie cardstock to make the box  and drew lines on it with the brush-tip end of my Pumpkin Pie Write Marker, to look like the ridges of the pumpkin. To make the leaves, I use the ever-useful Autumn Accents Bigz Die (from the Annual Catalogue) to cut out three of the serrated (Beech?) leaves from Old Olive cardstock. To give the leaves some texture I folded them in half - to make the central vein - and then pinched the serrations with my fingers to make more vein-like indentations along both sides of the leaves. Here is a view of the box from above, to show you better:


I made the tendrils by using my paper trimmer to cut long, tapered slivers from a piece of Old Olive cardstock and then rolled them tightly around my trusty Paper-Piercing Tool to produce the curved spirals. I then carefully glued them onto the uppermost box closure flap with Tombow Multipurpose Liquid glue, so that the box can be safely opened, to get  to the sweeties inside it, without damaging the box. I couldn't resist making the cute little punch-art toad to go with it! He is made using the Small Oval Punch and the Owl Builder Punch - his smile comes from the little bit that you cut out using the notch-end of the punch from the fabby new Gift Box Punch Board, that is also in the new catalogue (I LOVE that new punch board, so easy to make fantastic boxes really quickly and easily!).

After I had made the pumpkin, I began to think about what else I could make using the Curvy Keepsake Thinlets for Halloween and gosh, so many ideas sprang into my head! I decided to make a black witch's cat next...  Just after I'd made the cat, I saw, on a facebook group, THE most amazing idea for a witch using the same thinlits. It was made by a lady called Lynn Starzl in America, so,  I just had to CASE her idea and make a witch to complete my Halloween trio. Come and see:

HOW cute is that witch?!! :O) Thank you Lynn!  I love the use of the burlap ribbon strands for her hair and the hat is made from another of my favourite new things from the Autumn/Winter catalogue: the new Tree Punch!! So clever! The witch's hat slots over the box handles, so, it can easily be removed when you want to open the box and get to the treats inside! How clever is that?! I used the Owl Builder Punch for both the cat's and the witch's eyes and nose. The whiskers were hand-drawn with my white uni-ball Signo® Gel Pen. The cats ears are cut down from the Small Oval punch shapes. I DO love Stampin' Up's punches - they are just SO versatile!
 
I have also used the same Curvy Keepsake Box Thinlits to make several Christmas-themed boxes, other animals and even an Easter Chick (a little bit ahead of myself there, I know, but it shows that the catalogue items are not just for Autumn and Christmas!!). I will show you more ideas on future blog posts, so do come back again soon to see them. They are quite addictive once you start making them! :O)
 
Anyway, that's enough from me for today; I hope that I have inspired you to "think outside the box" when looking at the new catalogue products and can see how many other ways you can use them all!
 
Thank you for taking the time to look at my blog-hop post today. Sarah's blog is next, so hop on over using the button below.

Happy hopping everyone!

Lucy x
 
http://www.stampwithsarah.co.uk/pinkies-autumnwinter-catalogue-2014-blog-hop/


http://bedlamandbutterflies.blogspot.co.uk/2014/09/pinkies-stampin-up-autumn-winter.html

 
You can view all the products showcased above on my online shop by clicking here - if you are in the UK, France, Germany, The Netherlands or Austria, you can order them from me directly or via my online shop. If you order online with me by  the 29th September 2014 and use the hostess code VRSYYZAV when you place your order, I will personally send you a free gift as a thank you for shopping with me!
 
If you would like me to send you a paper copy of the catalogue, please contact me and I shall be happy to post one to you. You can add one to your online order, too, if you prefer. The order code for a single English language catalogue is 138029.  Catalogues are also available in French and German, too. :O) Lucy x

Thursday, 17 April 2014

More Easter Ideas!

Hey there folks!
 
Are you getting "eggscited" about Easter yet?! Hehe. Personally, I am looking forward to a lovely long sunny bank holiday weekend - or at least I'm looking forward to scoffing all that yummy guilt-free chocolate on Sunday, rain or shine!!
 
I've got a few more ideas for you, that I have made for Easter.... come and have a look:
 
Here are a couple of punch art Easter cards which were inspired by my mini Easter egg holders I designed and made for the recent Stampin' Up! UK Stampissimo Easter Treats youtube video. Do you recognise the little daffodils?!


I used Stampin' Up!'s fantastic Note cards & Envelopes as the base of these cards. (Yey, no cutting and scoring, makes for a quicker project and I like the size of them too - they are smaller than A6 cards.) The background piece is Soft Sky cardstock. As you probably know from my previous posts, the daffodils were made using the Petite Petals Punch and the flower shape from the Itty Bitty Punch Pack, with Daffodil Delight and Pumpkin Pie cardstock. The leaves were hand cut using my trusty Paper Snips (what would I do without those essential wonders?!) and the grass was cut using the fabulous Fringe Scissors (both are cut from Gumball Green cardstock).
 
 
The clutch of Easter eggs were punched out of the really pretty Gingham Garden designer series paper (dsp) using the Small Oval Punch and then tucked behind the grass and under the Daffodil Delight Stitched Grosgrain Ribbon. Here is a close up to show you the three-dimensional effect and texture of the card's design:


Here is a closer view of the eggs:


Actually, I must confess that the idea for tucking the eggs behind the ribbon came from a little mistake I made when punching out one of the egg shapes - I wasn't concentrating and the dsp didn't go all the way into the punch properly (oops! "More haste, less speed" as my darling Nan used to say to me when I was little!). So, I ended up with an egg with a missing slice off it. I love this paper so much, I didn't want to waste it, plus, I liked the way the pink daisy was positioned on it - so following my ethos of "it's not a mistake, it's an opportunity for embellishment!" I decided to place the egg so it looked like it wasn't really missing a bit, but was a whole egg tucked behind the ribbon! Another example of a "happy accident" in Lucy's craft room! hehe ;O)
 
I often say that to be a good crafter, you don't have to be perfect, it's more important to know what to do when things go a bit wrong and be able to rectify these little mistakes and accidents to rescue your project - otherwise you can end up wasting a lot of time and effort as well as materials! A smudged finger print on your card, or, a dot of ink? Don't worry, "it's not a mistake it's an opportunity for embellishment..."  - so, think on your feet and hey presto, you can decide that actually where that finger print or ink spot was, is really a perfect place for a flower, a butterfly, a rhinestone jewel or even a ribbon bow!
 
I also had fun recently making a couple more designs of little Easter egg holders using the Scallop Tag Topper Punch - these are slightly larger than the Mini Daffodil Easter Egg Holders I have already showed you, but hold the same-sized egg. I made a yellow Easter Chick and an Easter Bunny - they were inspired by some I'd seen on a facebook crafting forum, but I'm afraid, I can't remember exactly where I saw them or who had made them now (I must start paying more attention to these things!) Sorry, if they were yours, thank you and please let me know who you are so that I can credit you by name! Anyway, here they are:


 I was really chuffed with my idea of using the Mosaic Punch for the chick's open beak! I think he looks like he's squawking rather loudly, don't you?! And possibly tapping his foot with impatience here maybe? hehe
 
We made these two egg holders in the last class that  I taught and all the ladies said that they had great fun making them and that they wanted to make more of them at home. Hope that they have! I know that my nieces and nephew would love making these...not sure the chocolate eggs would last until Easter Sunday though!!
 
Anyway, Happy Easter everybody, hope you all have a lovely long weekend, preferably a sunny one with lots of chocolate and plenty of time for crafting! I seem to have used a lot of punches recently but not done much stamping... Need to rectify that, I think...
 
Until next time, happy crafting!
 
Lucy x


Wednesday, 16 April 2014

Easter Bunny Bucket Gift Bag Tutorial

Hey there folks!

Really sorry for the delay in getting this to you, but I've been laid low with a lurgy this past week or so - ug! BUT am better now! Hurrah - just in time for all the yummy Easter chocolate goodies, that I hope to scoff over the weekend!! Nom nom!

Anyway, without further ado - and due to popular request -  here is my step-by-step tutorial for how to make the Easter Bunny  Bucket Gift Bag that I showed you in my last post:
 
This is what we will be making:


To make the bag, you first need to make a tray box. Cut a piece of Old Olive cardstock to 10cm x 10cm (3 & 15/16ths" x 3 & 15/16ths") and score it on all four sides at 2cm (13/16ths") as shown below:


You then need to crease the score lines with a bone folder. Cut along the scorelines from the edge of the cardstock, up to where they meet the horizontal score line, on two opposing sides of the cardstock as per the photograph below. It is a good idea to trim a little wedge out of the square corner pieces, as shown here:

 
Next you need to put a little bit of liquid Tombow multipurpose glue on the four square tabs on one side of the square of card and then fold the sides in and glue it together to make the tray. The Tombow allows you some wiggle time to get your box square but you will need to press & hold the glued-down corners a little, between your fingers to help them stay stuck:


Your tray box should look like this:
 

Next you need to cut a piece of designer series paper (dsp), that is 12cm x 27cm (or approx. 4 & 3/4" x 10 & 10/16"). I used an Old Olive coloured sheet from the lovely Polka Dot Parade dsp (I do love that dsp, I use it a lot!).


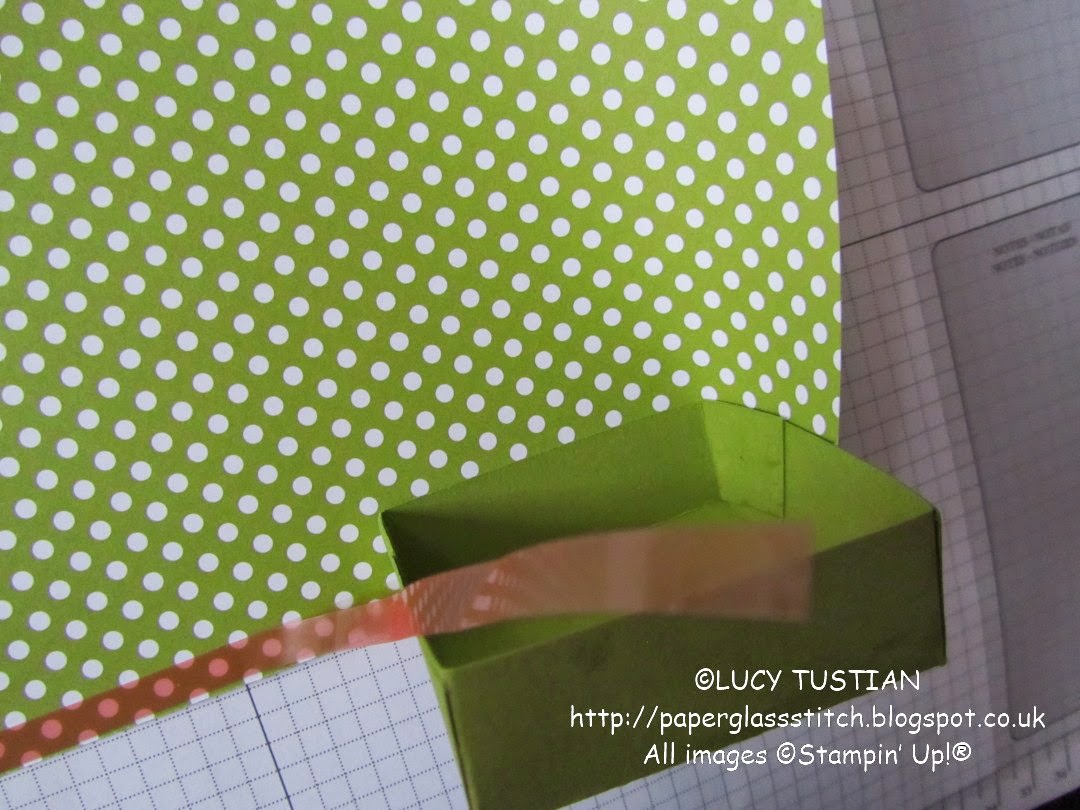
Then you need to put a piece of Sticky Strip (double-sided tape) along one long edge and one short edge of the wrong side/back of the dsp, (as close to the edge of the dsp as possible) as shown below:


Now you need to carefully adhere the tray to the dsp in the following way: Peel a little of the backing off the piece of sticky strip which is along the long edge of the dsp. Start at the corner that is nearest to the short side of the dsp, that doesn't have sticky strip on it (i.e. the bottom right hand side corner as you look at it in the above photograph). Place the tray with the bottom edge of its base lining up along the edge of the dsp, so that the short edge of the dsp starts half way along one side of it. (It is easier to see what I mean if you look at the next  few photographs.) You will then need to carefully roll the tray, peeling the Sticky Strip backing off as you go, making sure that the edge of the dsp aligns with the base of the box as you turn it, sticking the tray to the dsp:


Just before you reach the end, you will need to stop and peel off the backing from the Sticky Strip that is along the short edge of the dsp. You can then carry on rolling the box until you reach the end of the dsp. Be careful when sticking down the short edge of the dsp to the back of the bucket bag as you want it to stick straight and not buckle it up. Press it down to create a good seal, with your hand inside the bag: 


You will now have your basic bucket shape made:

 
Next you need to make the handles of the gift bag by using the Large Oval Punch:
 
 
The following photographs show you where to place the punch, in order to get the oval holes in the right place. The front of the bag will be the side opposite where the ends of the dsp overlap. Turn the gift bag so that the opening/neck of the bag is towards you and with the punch upside down, so that you can see where you will be punching, slide the front side of the dsp into the punch. To make sure your oval is central to the top of the bag, line up the corners of the punch, by eye, to match the corners of the tray/base. Then, to make sure you will be punching the oval handle far away enough from the top of the gift bag, make sure you line up the edge of the dsp (top of the bag) to correspond with the top edge line of the Stampin' Up! logo that is on the bottom of your punch (see the photograph below!). When you are satisfied that the position is right, punch your first oval out. Remove the punch and then repeat the above instructions to line up and punch out a second oval, from the back of the gift bag (i.e. from the side that has the seam along it). Here is a photograph to make all this a bit clearer:


Note that the top corners of the punch in the picture above are in alignment with the top (well, the base, really!) of the bag and that the top line of the frame of the logo near my thumbnail is in alignment with the open/top edge of the bag.


Now for the Easter Bunny decoration! You will need the following punched shapes to make your bunny: the Large Oval Punch - x2 in Whisper White and x2 in Pink Pirouette; the 1 & 3/4" (4.4cm) Circle Punch x1 in Whisper White; and finally the 2 & 1/2" (6.4cm) Circle Punch x1, cut in half,  in Whisper White:
 
 
You will need to trim a little bit off each of the pink ovals for the Bunny's inner ears, so that they are slightly smaller than the white, outer ears (see my pen line on the pink oval on the right, below, to see what to trim off) and then you can glue the pink ones on top of the white ones in the position  that is shown below:
 
 
Next you need to put a little bit of Tombow glue onto the bottom of the front of each ear and stick them behind the white 1 & 3/4" (4.4cm) punched circle, in the position shown in the next photograph:
 
 
To get one ear to flop over at a cute and jaunty angle, fold the tip of it over your bone folder like I have done here, and rub your thumb along the edge of the bone folder to crease it, like so:


Next, attach four Stampin' Dimensionals to the back of the bunny's head and remove the backing paper in readiness to stick the head on the bunny's body:


The half circle cut from the 2 &1/2" (6.4cm) circle punch, circle makes the body. Glue this with Tombow, onto the lower part of the front of the bucket gift bag, aligning the straight cut edge along the bottom of the gift bag like this:


Now you can attach your prepared bunny head onto the bunny's body:
 
 
All you need now is a sachet of small but yummy Easter eggs, - or any other gift that takes your fancy -  to pop inside the decorated Easter Bunny Bucket Gift Bag and then a bit of Stampin' Up!'s lovely Whisper White 5/8" (1.6cm) wide Organza Ribbon to tie the handles together with a pretty bow and hey presto, you've got a beautiful, hand made Easter gift for a loved one, friend or colleague:


They are so easy and quick to make, why not make more than one?!
 
 
I hope that you have enjoyed this step-by-step tutorial and that you do have a go at making some of these yourself. The basic Bucket Gift Bag can be made in all sorts of different sizes: smaller, taller, thinner, fatter, shorter etc. and can be decorated in all sorts of ways - just make your initial tray box a different size or alter the dimensions of the dsp to suit the gift you wish to put in it. I made several at Christmas. They are great for gift-wrapping awkward shaped or easily-squashed/fragile items - as well as last minute gifts - so go on, give them a try!! They are not just for Easter presents you know! Oh and also you can have fun trying different punches for the handles, too...
 
I first learnt how to make the Bucket Gift Bag (in a different size) a while ago, I think it was at a team-training event with the lovely Michelle Last, but I can't remember exactly when it was now. Thank you, Michelle, for the great idea that inspired me to make these. The Bucket Gift Bag is now one of my "go to" gift-wrapping staple stand-bys! :O)
 
 
Phew, after such a long blog post, I think it is time for a lovely cup of peppermint tea...and perhaps a little "quality control test" of some of the dark chocolate mini eggs that I bought to go in one of these bucket bags - but, shhhh, don't tell anyone that one of the gift bags might end up being short a couple or three choccy eggs!!  I'd better not "test" too many though, or, I shall have to go and buy some more.... ;O)
 
Until next time, happy crafting, and do let me know how you get on with making these gift bags yourself. Hopefully I'll have time to show you a couple more Easter ideas before the weekend, if not, have a lovely Easter weekend everybody!
 
Lucy x
 

Saturday, 5 April 2014

Stampin' Up! UK's "Easter Treats" Youtube video filming day...a behind-the-scenes-account!

A few weeks ago, I received a 'phone call from the lovely Paula Gorry at Stampin' Up! UK's HQ asking me if I'd like take part in filming a Stampissimo "how to" video later in the year... erm... YES PLEASE!!!! What an honour to be asked!! Wow! How exciting...I love a challenge! Great, I thought, it's a few months away, plenty of time to design some fabulous projects... and go on a diet, lose a couple of stones, get my hair done, lose the winter pallor etc etc...well, you know, us girls are never happy about what we look like, are we?! LOL!!
 
Well, to cut a long story short, I had another 'phone call a little while later asking me would I mind coming to the rescue, at short notice, as the lady they'd booked for the 19th on March couldn't make it as she was really poorly and would it be OK if I swapped filming dates with her... I immediately said yes, of course! (eek no time for the diet...but yey, less time to get nervous about it!!) and only 10 days later, I found myself on a train to the UK head office in High Wycombe!

Paula kindly met me off the train and after a quick en route visit to a well-known home and garden store, to get some plants for the brand new film set in the office, we arrived, with me being rather too nervous but very excited to see the head office for the first time!

The film set had only arrived and been set up a couple of days before the filming day - not that you would be able to tell - Kelly had done an amazing job of making it all look awesome!

Here is the lovely Paula on the fabulous set:


Doesn't it look swish?! The lovely "Ben and Jerry" as they are fondly known, (it's Ben and James, really!)  were our camera crew for the day and their calm professionalism and expertise really helped calm my nerves no end! I was still shaking with nerves though when we started filming! I was convinced that I'd say something completely stupid, trip over something, or, that my bad cough would hamper it all... thank heavens for their amazing editing skills is all I can say!! (Thank you guys!)
 
Here are a couple of photos of the set up of the filming equipment...


Those lights were very bright! There were three cameras, one in front, one to the side and one directly above the desk, looking down on where I was to make the projects... and here is my view from behind the desk... how scary is that?!!


No, not the sight of Ben and "Jerry", nor the lovely Kelly, but, to be in front of so many cameras...all pointing at me, I mean!! Waaaaay out of my comfort zone!! I much prefer to be behind a camera... Eek! Shudder!
 
Here are a couple of photos that were taken before filming started, whilst the guys were still setting up all their amazing cameras and recording equipment, I think you'll agree that I'm only just managing to mask my "scared bunny in headlights" feelings of panic in the photos of me with Paula and with Kelly!! LOL! I was so nervous...


Here are a few more pictures of the set throughout the day:
 
 
Oh dear -one day I will learn how to craft tidily!! And the left-over bowl of choccy eggs & veggie jellybean eggs (in the top left of the picture above) was considerably more depleted by the end of the morning than this - well, it is important to do a "quality control test" of all treats and after all, an army marches on it's stomach, so they say!! hehe ;O)


I love the Celebration Banner across the front of the desk that Kelly made - especially the dangly strings of circles between the letters... which reminds me, I've still not got around to making my banner up yet - oops!
 
Here is a group photo, taken by Kelly with my camera, after all the filming had been done - phew, relief! hehe:
 
 
And another:
 
"But who is the handsome chappy on the right?", I hear you ask! "Nooo, not the one in the DroogMedia t-shirt , [sorry, James!!], the handsome, furry chappy, sporting the dapper red bow tie": Ahh, well, that's Mr Manoo, of course.... the Head Office mascot, who is very well-known in demo circles!! In fact I was completely star struck when I met him that day... but I managed to get a 'selfie' of the two of us and I think it is actually my favourite photo of the whole day:


:O) Hope you've enjoyed this behind-the-scenes account of my exciting day at head office? I had a fantastic day - despite all my nerves and terrible cough! A HUGE thank you to Stampin' Up! UK, Paula Gorry, Kelly Francis, the lovely Ben and James Wolstenholme from DroogMedia and Mr Manoo, who all helped make the day so enjoyable and fun - thank you!
 
 
And finally, click here to see the video - I hope you enjoy it and like all the projects which I designed and make on it - and please come back again soon, as I shall hopefully be  posting a tutorial for the Easter Bunny Gift Bag on here in the next few days!
 
If you are in the UK, France, Germany, The Netherlands or Austria, then you can buy any of the products used to make these projects, from my online shop here and get them shipped straight to your door!
 
Thank you and happy crafting everyone!
 
Lucy x