Showing posts with label Autumn Winter Catalogue. Show all posts

Saturday, 5 September 2015

Pinkies Blog Hop for the new Autumn/Winter Stampin' Up! catalogue 2015: I can't "resist" trying an old favourite technique with some (holly) jolly new products!


Thank you for joining us on another Pinkies Blog Hop! We're showcasing lots of gorgeous projects using products from the new Stampin' Up!® Autumn/Winter Seasonal Catalogue. 


Simply use the buttons at the end of each post to keep hopping!


Welcome, especially if you have hopped directly from Angélique's blog,
what fab ideas she has - I think my wishlist has just grown... again!! 


I am SO excited by this new Autumn/Winter Catalogue - I LOVE this time of year and the build up to Christmas and boy, does this catalogue deliver! There are SO many gorgeous products in it -  I had a really hard time deciding which items to buy first and then I remembered you don't actually have to buy it ALL at once...hard not to though!! I'm looking forward to my second order already! Us "demos" are lucky to be able to get our mitts on the new goodies early, via a demo pre-order and we get sneak peeks at it all before our customers. Let me know if you'd like to join my team and get that privilege before the next catalogue comes out! ;)

Anyway... I have chosen to show you a few items I have made using the fabulous new Holly Jolly Greetings stamp set and Christmas Greetings Thinlits Dies bundle:


I fell in love with this stamp set and the lovely word thinlits as soon as Ii saw it. (It reminds me of the Crazy About You set that is in the Annual Catalogue - one of my favourite "go to" sets!) I was inspired by one of the ideas that the A/W catalogue shows. Here is the card in a bit more detail:
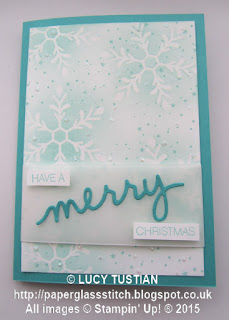


I used the emboss resist technique for the snowflake background. To do this I swiped my embossing buddy all over a 9.5x13.8cm piece of Whisper White cardstock,  then stamped the lovely snowflake stamp several times in Versamark ink over the card. I then added Stampin' Up!'s clear embossing powder and heated it with my Heat Tool. Then I took a Stampin' Sponge and rubbed Pool Party ink just in the centres of the snowflakes, using a circular motion, making it darker nearer the centres and lighter towards the edges. A quick rub with a piece of kitchen towel and I was ready for the next stage - stamping the dots and stars stamp randomly over the card in Pool Party ink. I then rubbed the embossing buddy over the card again and applied small dots of the amazing brand new Fine Tip Glue Pen in precise, tiny dots, then spooned Dazzling Diamonds glitter over it and tapped the excess off! Oh my gosh, that Fine Tip Glue is AWESOME!! Swoon! You MUST get some! Trust me, it is fantastic!


The next step was to wrap a 4cm strip of Vellum Cardstock across the bottom third of the now sparkly snowflake background piece. I cut the vellum about 2cm wider than the piece of card and stuck the overlap excess on the back of the piece of card using Fast Fuse. Now for the greeting - the "Have a" and "Christmas" words were stamped with Pool Party ink on scraps of whisper white cardstock and trimmed to size, then stuck to the vellum with cut up pieces of Stampin' dimensionals to give them a bit of depth. The gorgeous "merry" is one of the Christmas Greetings Thinlits Dies (there is also a "jolly" and a "peace" in the set too). I cut it from a scrap of Bermuda Bay cardstock with my Bigshot and used teeny tiny dots of the Fine Tip Glue to stick it at a jaunty angle onto the vellum - it is so easy to be very precise with this special glue - the tip of the applicator really is tiny! The final stage was to glue this all onto an A6-sized, Bermuda Bay card base. I really hope that you can see just how glossy the snowflakes are and how sparkly and glittery the dots are?

I decorated the inside of the card  with a Pool Party stamped snowflake with added Fine Tip glued-on glitter and then, whilst I had the inks and stamp set still out on my desk, I decided to make some Christmas gift tags in the same vein:


On the tags I stamped the large snowflakes in Pool Party ink and the dots and stars in Smoky Slate ink. The Fine Tip ink is precise enough to add glittery detail to the small teardrop shapes and centres of the snowflakes. The words are from the Holly Jolly stamp set too, and are in Bermuda Bay ink. I decided to just have a play when I made these tags and tried out various ways of tying on the ribbons/twine. The tags on the above photograph are sitting on an A4 piece of cardstock, to give you an idea of their sizes. The white ribbon is the Whisper White seam-binding ribbon and the thick bakers' twine and sequin trim are Bermuda Bay. There is also a little bit of the fine silver metallic thread on one of them too - I think that the thicker Cording Trim from the new A/W catalogue would probably look much better though, so I shall be adding that to my next order! I think these would make great card-toppers too, don't you?


Well, I hope that I have inspired you with my projects today, do click on the button below to click onto Lea's blog and continue looking at all the other hop stops along the way!

Thank you for taking the time to visit my blog today. If you have any questions about what I have made, then please leave me a comment below and I shall be very happy to help answer them if I can! I would love to know what is on the top of your wishlist. If you would like me to send you a paper copy of the catalogue before you decide, then please do contact me and I will happily send one out to you.

Until next time, happy crafting (and shopping) everyone!

Lucy x


Saturday, 6 September 2014

Thinking outside the box with the Curvy Keepsake Thinlets for the Pinkies Autumn/Winter Catalogue Blog Hop!


Thank you for joining us on another Pinkies Blog Hop! We are showcasing lots of gorgeous projects from the new Stampin' Up! ® Autumn/Winter Seasonal Catalogue. Simply use the buttons at the end of each post to keep hopping!


A very warm welcome to you, especially if you have hopped to me from the lovely Tracy's blog - I do love seeing how creative other people are, don't you? :O)

There are soooo many yummy things in the new Autumn/Winter Catalogue - I think that it is one of the best yet! So many fantastic ideas for packaging, gifts and decorations..I love it all!
 
Well, nearly all.... I'm a bit squeamish about (ok, terrified, of) spiders and so I think I may have to give the aptly-named "Frightful Wreath Simply Created Kit" on page 37 a  wide berth - but only because of the beaded spider in the kit! (It seems that the dreaded annual 'Spider-month' has come early to my house this year and the hairy blighters have been both large in numbers and size so far ... eww... so I am extra spooked by them now - bleuuugh!!)   I do, however, like the rest of the wreath though... and I do like Halloween a LOT... so I may just have to bypass the eight-legged beastie and get myself one of the kits afterall...

Anyway, talking of Halloween, that brings me to my blog-hop projects that I would like to share with you today: One of my favourite things to do for Halloween is to make themed treats to give to people. As soon as I saw the Curvy Keepsake Box Thinlits Die and the box ideas in the new Stampin' Up! catalogue, I just knew that they would make great pumpkins due to the lovely curved shape and had to give it a try.... So, here is what I came up with:


With my Bigshot and the thinlits, I used Pumpkin Pie cardstock to make the box  and drew lines on it with the brush-tip end of my Pumpkin Pie Write Marker, to look like the ridges of the pumpkin. To make the leaves, I use the ever-useful Autumn Accents Bigz Die (from the Annual Catalogue) to cut out three of the serrated (Beech?) leaves from Old Olive cardstock. To give the leaves some texture I folded them in half - to make the central vein - and then pinched the serrations with my fingers to make more vein-like indentations along both sides of the leaves. Here is a view of the box from above, to show you better:


I made the tendrils by using my paper trimmer to cut long, tapered slivers from a piece of Old Olive cardstock and then rolled them tightly around my trusty Paper-Piercing Tool to produce the curved spirals. I then carefully glued them onto the uppermost box closure flap with Tombow Multipurpose Liquid glue, so that the box can be safely opened, to get  to the sweeties inside it, without damaging the box. I couldn't resist making the cute little punch-art toad to go with it! He is made using the Small Oval Punch and the Owl Builder Punch - his smile comes from the little bit that you cut out using the notch-end of the punch from the fabby new Gift Box Punch Board, that is also in the new catalogue (I LOVE that new punch board, so easy to make fantastic boxes really quickly and easily!).

After I had made the pumpkin, I began to think about what else I could make using the Curvy Keepsake Thinlets for Halloween and gosh, so many ideas sprang into my head! I decided to make a black witch's cat next...  Just after I'd made the cat, I saw, on a facebook group, THE most amazing idea for a witch using the same thinlits. It was made by a lady called Lynn Starzl in America, so,  I just had to CASE her idea and make a witch to complete my Halloween trio. Come and see:

HOW cute is that witch?!! :O) Thank you Lynn!  I love the use of the burlap ribbon strands for her hair and the hat is made from another of my favourite new things from the Autumn/Winter catalogue: the new Tree Punch!! So clever! The witch's hat slots over the box handles, so, it can easily be removed when you want to open the box and get to the treats inside! How clever is that?! I used the Owl Builder Punch for both the cat's and the witch's eyes and nose. The whiskers were hand-drawn with my white uni-ball Signo® Gel Pen. The cats ears are cut down from the Small Oval punch shapes. I DO love Stampin' Up's punches - they are just SO versatile!
 
I have also used the same Curvy Keepsake Box Thinlits to make several Christmas-themed boxes, other animals and even an Easter Chick (a little bit ahead of myself there, I know, but it shows that the catalogue items are not just for Autumn and Christmas!!). I will show you more ideas on future blog posts, so do come back again soon to see them. They are quite addictive once you start making them! :O)
 
Anyway, that's enough from me for today; I hope that I have inspired you to "think outside the box" when looking at the new catalogue products and can see how many other ways you can use them all!
 
Thank you for taking the time to look at my blog-hop post today. Sarah's blog is next, so hop on over using the button below.

Happy hopping everyone!

Lucy x
 
http://www.stampwithsarah.co.uk/pinkies-autumnwinter-catalogue-2014-blog-hop/


http://bedlamandbutterflies.blogspot.co.uk/2014/09/pinkies-stampin-up-autumn-winter.html

 
You can view all the products showcased above on my online shop by clicking here - if you are in the UK, France, Germany, The Netherlands or Austria, you can order them from me directly or via my online shop. If you order online with me by  the 29th September 2014 and use the hostess code VRSYYZAV when you place your order, I will personally send you a free gift as a thank you for shopping with me!
 
If you would like me to send you a paper copy of the catalogue, please contact me and I shall be happy to post one to you. You can add one to your online order, too, if you prefer. The order code for a single English language catalogue is 138029.  Catalogues are also available in French and German, too. :O) Lucy x

Wednesday, 3 September 2014

A new catalogue is here; and there are "Good Greetings" to look forward to as well!

Hellooooo!
 
Sorry for my long absence... the hot summer, a holiday with my sister and her family in Wales, plus, an operation on my knee a few weeks ago, have all got in the way of my crafting somewhat!
 
How is it September already?! Wow, where does the time go? Ooer! The Summer is truly over. Lots of schools have started back this week and I am very proud of my eldest niece who had her first day at secondary school yesterday :O) Can't believe she's growing up so much - I was spooning yogurt to her in her highchair not so long ago, or so it seems! She is now eleven! Wowser! Hmm...That yogurt-feeding memory is over ten years old! Eek! Aunty Lucy is feeling old right now!
 
But, do not fear, Stampin' Up!'s brand new spangly, nay, SPARKLY, Autumn-Winter Catalogue has arrived! Yey! There are sooooo many lovely, yummy things in there. You can buy from it up until 5th January 2015, but you don't have to wait until then!! Once you see it, you will NOT want to wait very long to get your hands on all the yummyness, I am sure!
 
You can click here for a link to the pdf of the catalogue, or, click here to go straight to my online shop and view all the products...


http://www2.stampinup.com/ECWeb/ItemList.aspx?categoryid=3568
 
 
The catalogue is jam-packed with ideas for so many creative projects - ideas for cards, decorations, gift wrapping, packaging, advent calender box ideas, home decor, Autumnal events, Halloween and of course Christmas too. I think it covers a wide range of tastes and styles too, so there really is something for everybody in there I believe! There are lots of kits to make your crafting quicker if you get short of time and there are several bundles of items that offer a discount, so will save you money too. I am looking forward to sharing some of things I have made (or plan to make!) over the next few weeks and months in the run up to Christmas. It is not all Christmas stuff though, there are all sorts of fab ideas buzzing around my head! So, watch this space, as they say!
 
The title on the front cover of the catalogue says  "Make it fun, make it together" - don't you think that is a lovely idea? I think it is always nice to create things in the company of others, don't you? It can help inspire you  and you can share ideas - and perhaps some of the workload too!  Lots of the celebrations throughout the Autumn and over the Christmas and New Year period are all about celebrating those special occasions with family and friends gathered around you.
 
On top of all the excitement of the new catalogue, there is also a limited-time special offer where anyone who hosts a £200 Stampin' Up! party can get a FREE stamp set called "Good Greetings" - on top of the normal Hostess Rewards. The offer ends on 31st October 2014, so, if you'd like to get your hands on the free stamp set, earn some more free products and have a fun night in with friends and me showing you how to make some fantastic, easy to make, but impressive paper craft projects, then get in touch with me as soon as possible to get a date booked in the diary with me! There are 19 sentiment stamps in the Good Greetings Stamp Set and they cover all sorts of occasions so will be a very useful set to have in your crafting stash I think, don't you? It is available in wood- or clear-mount. Come and have a look:


If you don't live near enough to me to have a party, don't worry, you can still get the stamp set for free: either place an order for yourself for £200, or, contact me and together we can organise a catalogue party where you pass a catalogue or two around family and friends, collate their orders and I will help you place the orders and then the goodies will be shipped directly to you. It doesn't matter if you and your family and friends are scattered all around the UK, they can still order using a specially designated hostess code for your party and get their goodies sent directly to them, wherever they are! If you would like to know a bit more about it, or, have a date in mind already, then please do contact me and I shall be happy to help you. Distance should be no barrier to getting this gorgeous freebie! :O)


Well, that's it for today. I will leave you with a photograph I took yesterday in the sunshine which I think sums up the changing of the seasons. I really love this time of year when the last rays of Summer mingle with the cooler temperatures and that distinctive smell of Autumn is in the air! We have all the amazing changing colours; scrunchy falling leaves and delicious fruits coming into season, to look forward to from now on in - yum! Plus all the excitement of Harvest Festivals, Halloween and Christmas is on its way too! How exciting! What is your favourite part of Autumn? Please do leave me a comment and let me know! Or maybe it is a different season where you are in the world? What does September mean to you, where you are? I'd love to know! :O)


Happy crafting everyone - and remember to contact me if you'd like a paper copy of the catalogue, book a party date or would like more information about how to earn that gorgeous stamp set for FREE!


Lucy x


Saturday, 14 September 2013

Pinkies Blog Hop!

Pinkies Stampin' Up! Seasonal Catalogue Blog Hop...


Thank you for  joining us on another  Pinkies Blog Hop. 
We’re  showcasing lots of gorgeous projects using products from the 
new Stampin’ Up!® Autumn/Winter Seasonal Catalogue.
Simply use the buttons at the end of each post to keep on hopping. 
 
 
If you have arrived from Sarah's blog, a big hello to you...


Firstly I would just like to say that I am sooo excited to be taking part in my first ever blog hop! Whoop whoop!! There are so many fantastic, yummy new products in the new Stampin' Up! Autumn/Winter Seasonal Catalogue, that I have found it very hard to narrow down my choice of what to show you today, so, I hope you like what you see here; I have certainly enjoyed creating the projects!
 
A couple of weeks ago, I decided to challenge myself to make Christmas 2013 a wholly hand-made Christmas... I make all sorts of things - cards, jewellery, stained glass, crochet, sweets, jam, chutney - you name it I've probably made it at some point over the years! I've always been a crafter, for as long as I can remember! However, as I'm not exactly the most organised person I know, I jumped with glee when I saw the new Season of Style This and That Journal in the new catalogue - this could be the key to completing my gargantuan self-challenge!! No more easily-lost scraps of paper with scribbled lists on for me this year... just this beautiful journal with pre-printed pages in useful sections, some coordinating Designer Stickers and a rotary stamp to help me keep organised and on track to completing my hand-made presents challenge! Here is a photograph of the inside cover of the journal with a set of the stickers that I have tucked inside the useful pocket and a piece of the yummy new 1" (2.5cm) wide Cherry Cobbler Stitched Edge Grosgrain Ribbon tied to the binding to make a book mark:


I bought one for my sister for her birthday too and  I decorated the front of hers, but I've yet to decorate my own one though!


I love the way that Stampin' Up! coordinate their products so beautifully. The Season of Style Designer Series Paper matches this journal beautifully and as I'll have lots of hand-made gifts to give this Christmas, I thought I'd better make a start on some pretty packaging for all those gifts... Here are just a few ideas for some gift boxes/bags - all of which are really simple, quick and easy to make:


I have used the Season of Style DSP, the same Cherry Cobbler ribbon as above, plus the textured 12x12" Cherry Cobbler cardstock to make these and embellished them with the help of the Very Merry Tags stamp set, a few of Stampin' Up! must-have punches, the really cute and dinky Old Olive Simply Styled Embellishments paper clips (which are also from the Autumn/Winter Catalogue) plus I've added a little bit of sparkle with a Vintage Faceted Button and some Dazzling Details glitter glue... I think my favourite is the bucket gift bag with the Rudolph tag - the Cherry Cobbler Candy Dot nose matches the polka-dot pattern on the paper perfectly, don't you think? He's so cute!


 Anyway, that's enough from me for one day! Please pop back again soon, as I plan to show you more of things that I make in my hand-made Christmas quest - and will show you how to make some of the boxes and gift bags too. Do you fancy joining me in the hand-made Christmas challenge? Do let me know if you do! 


So next stop is Caroline's blog, 
why don't you take a peek at what lovely things that they have created?  
Thank you so much for visiting!


Lucy