Showing posts with label Pinkies Blog Hop. Show all posts

Saturday, 5 September 2015

Pinkies Blog Hop for the new Autumn/Winter Stampin' Up! catalogue 2015: I can't "resist" trying an old favourite technique with some (holly) jolly new products!


Thank you for joining us on another Pinkies Blog Hop! We're showcasing lots of gorgeous projects using products from the new Stampin' Up!® Autumn/Winter Seasonal Catalogue. 


Simply use the buttons at the end of each post to keep hopping!


Welcome, especially if you have hopped directly from Angélique's blog,
what fab ideas she has - I think my wishlist has just grown... again!! 


I am SO excited by this new Autumn/Winter Catalogue - I LOVE this time of year and the build up to Christmas and boy, does this catalogue deliver! There are SO many gorgeous products in it -  I had a really hard time deciding which items to buy first and then I remembered you don't actually have to buy it ALL at once...hard not to though!! I'm looking forward to my second order already! Us "demos" are lucky to be able to get our mitts on the new goodies early, via a demo pre-order and we get sneak peeks at it all before our customers. Let me know if you'd like to join my team and get that privilege before the next catalogue comes out! ;)

Anyway... I have chosen to show you a few items I have made using the fabulous new Holly Jolly Greetings stamp set and Christmas Greetings Thinlits Dies bundle:


I fell in love with this stamp set and the lovely word thinlits as soon as Ii saw it. (It reminds me of the Crazy About You set that is in the Annual Catalogue - one of my favourite "go to" sets!) I was inspired by one of the ideas that the A/W catalogue shows. Here is the card in a bit more detail:
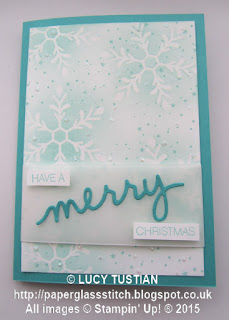


I used the emboss resist technique for the snowflake background. To do this I swiped my embossing buddy all over a 9.5x13.8cm piece of Whisper White cardstock,  then stamped the lovely snowflake stamp several times in Versamark ink over the card. I then added Stampin' Up!'s clear embossing powder and heated it with my Heat Tool. Then I took a Stampin' Sponge and rubbed Pool Party ink just in the centres of the snowflakes, using a circular motion, making it darker nearer the centres and lighter towards the edges. A quick rub with a piece of kitchen towel and I was ready for the next stage - stamping the dots and stars stamp randomly over the card in Pool Party ink. I then rubbed the embossing buddy over the card again and applied small dots of the amazing brand new Fine Tip Glue Pen in precise, tiny dots, then spooned Dazzling Diamonds glitter over it and tapped the excess off! Oh my gosh, that Fine Tip Glue is AWESOME!! Swoon! You MUST get some! Trust me, it is fantastic!


The next step was to wrap a 4cm strip of Vellum Cardstock across the bottom third of the now sparkly snowflake background piece. I cut the vellum about 2cm wider than the piece of card and stuck the overlap excess on the back of the piece of card using Fast Fuse. Now for the greeting - the "Have a" and "Christmas" words were stamped with Pool Party ink on scraps of whisper white cardstock and trimmed to size, then stuck to the vellum with cut up pieces of Stampin' dimensionals to give them a bit of depth. The gorgeous "merry" is one of the Christmas Greetings Thinlits Dies (there is also a "jolly" and a "peace" in the set too). I cut it from a scrap of Bermuda Bay cardstock with my Bigshot and used teeny tiny dots of the Fine Tip Glue to stick it at a jaunty angle onto the vellum - it is so easy to be very precise with this special glue - the tip of the applicator really is tiny! The final stage was to glue this all onto an A6-sized, Bermuda Bay card base. I really hope that you can see just how glossy the snowflakes are and how sparkly and glittery the dots are?

I decorated the inside of the card  with a Pool Party stamped snowflake with added Fine Tip glued-on glitter and then, whilst I had the inks and stamp set still out on my desk, I decided to make some Christmas gift tags in the same vein:


On the tags I stamped the large snowflakes in Pool Party ink and the dots and stars in Smoky Slate ink. The Fine Tip ink is precise enough to add glittery detail to the small teardrop shapes and centres of the snowflakes. The words are from the Holly Jolly stamp set too, and are in Bermuda Bay ink. I decided to just have a play when I made these tags and tried out various ways of tying on the ribbons/twine. The tags on the above photograph are sitting on an A4 piece of cardstock, to give you an idea of their sizes. The white ribbon is the Whisper White seam-binding ribbon and the thick bakers' twine and sequin trim are Bermuda Bay. There is also a little bit of the fine silver metallic thread on one of them too - I think that the thicker Cording Trim from the new A/W catalogue would probably look much better though, so I shall be adding that to my next order! I think these would make great card-toppers too, don't you?


Well, I hope that I have inspired you with my projects today, do click on the button below to click onto Lea's blog and continue looking at all the other hop stops along the way!

Thank you for taking the time to visit my blog today. If you have any questions about what I have made, then please leave me a comment below and I shall be very happy to help answer them if I can! I would love to know what is on the top of your wishlist. If you would like me to send you a paper copy of the catalogue before you decide, then please do contact me and I will happily send one out to you.

Until next time, happy crafting (and shopping) everyone!

Lucy x


Saturday, 30 May 2015

Pinkies Blog Hop - A sneak-peek Sprinkle of Life from the new Stampin' Up! Annual Catalogue 2015


Thank you for joining us on another Pinkies Blog Hop! We're showcasing lots of gorgeous projects using products from the new Stampin' Up!® Annual Catalogue. Simply use the buttons at the end of each post to keep hopping!


Thank you if you have joined me from Christa's blog - what lovely work!


For me, one of the most exciting things about every new Annual Catalogue from Stampin' Up! is the new set of In Colors - and the new ones launching 2nd June 2015 do NOT disappoint: Tip Top Taupe, Watermelon Wonder, Cucumber Crush, Delightful Dijon and Mint Macaron... Come and see what you think:

I have made some simple 3x3" cards using the new In Color A4 Cardstock, ink pads and Stampin' Write Markers with the gorgeous new "Sprinkles Of Life" charity stamp set:


The "Sprinkles Of Life" stamp set is the new charity stamp set from Stampin' Up! and for every set sold, Stampin' Up! give £2 to the Ronald McDonald House Charities®  which keeps families together and surrounded by love when their children are receiving medical treatment far from home (with over $1million contributed to date!).

Stamping these cards was a breeze as the "Sprinkles of Life" set are photopolymer stamps so alignment is easy peasey! The cute tree trunk is stamped in Tip Top Taupe. The tree leaves and the grass/vegetation are all the gorgeous fresh and bright new green that is Cucumber Crush and for the flowers I have used the ink that matches the card base - so either Delightful Dijon, Mint Macaron or Watermelon Wonder. The tiny bird's outline is stamped with Memento Tuxedo black Ink and then coloured in with my Tip Top Taupe Write Marker. I then punched out the bird using the fabulous new Tree Builder Punch and adhered it to the card with a portion of a Stampin' Dimensional to raise it up a bit and make it look like it is sitting on the branch of the tree:


The inside of the card has a matching Whisper White insert stamped with one of the 8 sentiments that come in the 22-piece stamp set - yes, that's right: twenty two stamps in the set for a bargainous £19 (25€).

I have repeated a group of the flowers inside each card and on the front of each envelope, as, you can't have a naked envelope, now, can you?!


I cannot decide which of the colourways is my favourite - I like them all, for different reasons. I think perhaps I am edging towards the Watermelon Wonder one at the moment... but, I the Delightful Dijon is growing on me!! I must confess I wasn't sure about the dijon to begin with, but I really like the colour now and it goes really well with so many other Stampin' Up! colours too... 

Which one is your favourite? Do let me know in the comments below...


There are so many other lovely stamps in the "Sprinkles Of Life" set: there is a cloud that doubles up as a scoop of icecream, or, the top of a cup cake; in the same shape there is a bunch of pretty flowers for you to colour in;  there is an apple, a candle, raindrops, cupcake sprinkles and loose leaves; plus an icecream cone cup and a wicker basket too, as well as the 8 gorgeous (and useful!) sentiments... and these shapes match the fab new Tree Builder Punch too... I have SO many ideas for many, many different projects... so do come back and maybe you'll see some more ideas here sometime soon! I think I could base a whole day class, just around this one stamp set actually! Hmm... Now there's an idea... ;0)

Thank you for taking the time to look at my blog hop post today. I hope I have inspired you to make something with the new items once the catalogue launches on 2nd June! If you would like me to send you a paper copy of the New Catalogue, please contact me.

Until next time, happy stamping - and hopping too!

Lucy x


http://yvonnepotterton.blogspot.co.uk/2015/05/beautiful-best-thoughts-and-gift-bag.html

 
http://dusktilldawn3.blogspot.co.uk/2015/05/pinkies-bloghop.html


Saturday, 6 September 2014

Thinking outside the box with the Curvy Keepsake Thinlets for the Pinkies Autumn/Winter Catalogue Blog Hop!


Thank you for joining us on another Pinkies Blog Hop! We are showcasing lots of gorgeous projects from the new Stampin' Up! ® Autumn/Winter Seasonal Catalogue. Simply use the buttons at the end of each post to keep hopping!


A very warm welcome to you, especially if you have hopped to me from the lovely Tracy's blog - I do love seeing how creative other people are, don't you? :O)

There are soooo many yummy things in the new Autumn/Winter Catalogue - I think that it is one of the best yet! So many fantastic ideas for packaging, gifts and decorations..I love it all!
 
Well, nearly all.... I'm a bit squeamish about (ok, terrified, of) spiders and so I think I may have to give the aptly-named "Frightful Wreath Simply Created Kit" on page 37 a  wide berth - but only because of the beaded spider in the kit! (It seems that the dreaded annual 'Spider-month' has come early to my house this year and the hairy blighters have been both large in numbers and size so far ... eww... so I am extra spooked by them now - bleuuugh!!)   I do, however, like the rest of the wreath though... and I do like Halloween a LOT... so I may just have to bypass the eight-legged beastie and get myself one of the kits afterall...

Anyway, talking of Halloween, that brings me to my blog-hop projects that I would like to share with you today: One of my favourite things to do for Halloween is to make themed treats to give to people. As soon as I saw the Curvy Keepsake Box Thinlits Die and the box ideas in the new Stampin' Up! catalogue, I just knew that they would make great pumpkins due to the lovely curved shape and had to give it a try.... So, here is what I came up with:


With my Bigshot and the thinlits, I used Pumpkin Pie cardstock to make the box  and drew lines on it with the brush-tip end of my Pumpkin Pie Write Marker, to look like the ridges of the pumpkin. To make the leaves, I use the ever-useful Autumn Accents Bigz Die (from the Annual Catalogue) to cut out three of the serrated (Beech?) leaves from Old Olive cardstock. To give the leaves some texture I folded them in half - to make the central vein - and then pinched the serrations with my fingers to make more vein-like indentations along both sides of the leaves. Here is a view of the box from above, to show you better:


I made the tendrils by using my paper trimmer to cut long, tapered slivers from a piece of Old Olive cardstock and then rolled them tightly around my trusty Paper-Piercing Tool to produce the curved spirals. I then carefully glued them onto the uppermost box closure flap with Tombow Multipurpose Liquid glue, so that the box can be safely opened, to get  to the sweeties inside it, without damaging the box. I couldn't resist making the cute little punch-art toad to go with it! He is made using the Small Oval Punch and the Owl Builder Punch - his smile comes from the little bit that you cut out using the notch-end of the punch from the fabby new Gift Box Punch Board, that is also in the new catalogue (I LOVE that new punch board, so easy to make fantastic boxes really quickly and easily!).

After I had made the pumpkin, I began to think about what else I could make using the Curvy Keepsake Thinlets for Halloween and gosh, so many ideas sprang into my head! I decided to make a black witch's cat next...  Just after I'd made the cat, I saw, on a facebook group, THE most amazing idea for a witch using the same thinlits. It was made by a lady called Lynn Starzl in America, so,  I just had to CASE her idea and make a witch to complete my Halloween trio. Come and see:

HOW cute is that witch?!! :O) Thank you Lynn!  I love the use of the burlap ribbon strands for her hair and the hat is made from another of my favourite new things from the Autumn/Winter catalogue: the new Tree Punch!! So clever! The witch's hat slots over the box handles, so, it can easily be removed when you want to open the box and get to the treats inside! How clever is that?! I used the Owl Builder Punch for both the cat's and the witch's eyes and nose. The whiskers were hand-drawn with my white uni-ball Signo® Gel Pen. The cats ears are cut down from the Small Oval punch shapes. I DO love Stampin' Up's punches - they are just SO versatile!
 
I have also used the same Curvy Keepsake Box Thinlits to make several Christmas-themed boxes, other animals and even an Easter Chick (a little bit ahead of myself there, I know, but it shows that the catalogue items are not just for Autumn and Christmas!!). I will show you more ideas on future blog posts, so do come back again soon to see them. They are quite addictive once you start making them! :O)
 
Anyway, that's enough from me for today; I hope that I have inspired you to "think outside the box" when looking at the new catalogue products and can see how many other ways you can use them all!
 
Thank you for taking the time to look at my blog-hop post today. Sarah's blog is next, so hop on over using the button below.

Happy hopping everyone!

Lucy x
 
http://www.stampwithsarah.co.uk/pinkies-autumnwinter-catalogue-2014-blog-hop/


http://bedlamandbutterflies.blogspot.co.uk/2014/09/pinkies-stampin-up-autumn-winter.html

 
You can view all the products showcased above on my online shop by clicking here - if you are in the UK, France, Germany, The Netherlands or Austria, you can order them from me directly or via my online shop. If you order online with me by  the 29th September 2014 and use the hostess code VRSYYZAV when you place your order, I will personally send you a free gift as a thank you for shopping with me!
 
If you would like me to send you a paper copy of the catalogue, please contact me and I shall be happy to post one to you. You can add one to your online order, too, if you prefer. The order code for a single English language catalogue is 138029.  Catalogues are also available in French and German, too. :O) Lucy x

Saturday, 19 July 2014

Pinkies Blog Hop: Showcasing New Annual Catalogue projects!


Thank you for joining us on another Pinkies Blog Hop! We're showcasing lots of gorgeous projects using products from the new Stampin' Up! ® Annual Catalogue. Simply use the buttons at the end of each post to keep hopping!


Welcome if you have come from Nina's blog!

 
There are so many lovely new things in the new catalogue and I have found it really hard to narrow down my choice for today! I decided to keep it simple  and concentrate on the new In Color collection  for 2014-2016.


I have recently been experimenting with making my own backgrounds and the following projects all utilise one particular technique which I have developed: using scrunched up brown packing paper as a "stamp" which I have then tapped directly onto the ink pad to pick up some ink and then stamped all over a sheet of Whisper White cardstock. You can use a single colour or a mixture of 2 or 3 - just make sure you use a separate ball of scrunched-up paper for each individual colour.

This first project uses the lovely new In Colors Mossy Meadow (the green) and Hello Honey (the yellow) as well as a bit of Crumb Cake on the patterned background strip:
http://paperglassstitch.blogspot.co.uk  Lucy Tustian

 
I have glued the small strip of homemade background onto a Whisper White Notecard and stamped the "thanks" from the Hip Hip Hooray card kit stamps. The Elegant Butterfly punched shape is from the new Hello Honey cardstock and sits on a mini glue dot, with a strip of three pearl gems for the butterfly's body. A very simple, quick and easy card to make, don't you think?!
Here is another card which uses the same backround - this time I have used the background for the butterfly only, with a Mossy Meadow Elegant Butterfly beneath it. I used the brush stroke stamp from the new (and very versatile) stamp set: Work Of Art; with the Hello Honey stamped three times without re-inking it (the "stamping off" technique). The "Thinking of You" is from one of my go-to stamp sets: Sassy Salutations and is stamped using the Mossy Meadow ink for the words and the sponging around the oval punched shape:

http://paperglassstitch.blogspot.co.uk Lucy Tustian

 
 One of my favourite new In Colors is the lovely deep rich purple called Blackberry Bliss - the next couple of projects use this colour on its own for the handmade background for a very striking effect:
 
http://paperglassstitch.blogspot.co.uk Lucy Tustian

 
http://paperglassstitch.blogspot.co.uk Lucy Tustian


 Have you spied the lovely ribbon on the tag? It is the utterly gorgeous new 1cm (3/8") wide Stitched Satin Ribbon in the Blackberry Bliss - it is so nice - one of my all-time favourite Stampin' Up! ribbons I think! I have secured it with a little bit of Whisper White Bakers' Twine plus a tiny bit of the same white bakers' twine that I have hand-dyed using a few drops of Perfect Plum re-inker in a very small amount of water. I have also coloured in the rhinestone jewels with the brand new Stampin' Blendabilities alcohol markers in Rich Razzleberry (using all three shades of the colour).
 
 
The circle on the card is made using another stamping technique I have been experimenting with recently - reverse kissing. I'm hoping to blog a bit more about various kissing techniques (of the ink variety!) sometime soon, so do pop back again to see!
 
 
Thank you for taking the time to look at my part of the Pinkies Blog Hop. I would love to know your thoughts on the techniques and colour-combos that I have used today, so do please leave me a comment if you have time! Hope you enjoy the rest of the blog hopping: the lovely Sarah is next! :O)
 
 
Until next time, happy crafting everyone...
 
Lucy x
http://stampinsarahiow.blogspot.co.uk/2014/07/welcome-to-isle-of-wight-for-little.html

 
http://www.destempelolifant.blogspot.nl/2014/07/pinkies-blog-hop.html


Friday, 7 February 2014

New toy alert!!

Oh my gosh! I have an amazing new tool which I absolutely ADORE! It is the brand new Stampin' Up! Texture Boutique Embossing Machine... and I love it!


"So what is it?" I hear you cry! Well... here are a few facts and figures to explain:

  • It allows you to dry-emboss textured patterns onto your card/paper using the Textured Impressions Embossing Folders from Stampin' Up!
  • It is lighter and smaller than a Big Shot (but, unlike the Big Shot, it does not cut)
  • Because of its size and lightness it is easier to transport, so you can emboss anywhere!
  • It is a bargain at only £26.95 (the product code is 132657)
  • It even comes with its very own cute mini screw-driver so you can put its handle on when you get first get it out of its box!! (Love that!)

I took mine with me to my card class yesterday and the ladies all loved it (so much so that several of them ordered one straight away!) We used the machine to make of our three card projects and I gave them a choice of several embossing folders to use on their cards. I think their favourite folder design, by far, was the Decorative Dots one (which you can get for FREE if you spend £45 as it's one of the SALE-A-BRATION items!).

In fact if you buy the Texture Boutique and three embossing folders for it, during the SALE-A-BRATION period, you would qualify for a FREE item from the SALE-A-BRATION brochure - one of which is the Decorative Dots folder! Bargain, or what, hey?!

Here's another look at my card class sneak peek photo from my last post, which shows you the gorgeous textured dotty pattern that you get with the Decorative Dots embossing folder:


A little word of warning though: Stampin' Up! only have a limited initial supply of these fabby machines and once those supplies have been snapped up, they won't be getting any more in until the launch of the new Annual Catalogue in July... so don't delay, place your order with me today to avoid disappointment and what I imagine would seem a very long wait! :O)

That's it for today, I'm going off to play with my favourite new toy again!! Be sure to come back tomorrow, though, as I'm taking part in another Pinkies Blog Hop and I will be showing you a couple of projects I've made using some of the new products from the Spring Summer 2014 Catalogue...

So, until tomorrow, happy crafting everyone!

Lucy x