
I have decided to take a break from the Tip Top Taupe, Black and Whisper White colour scheme from my recent team training inspiration station projects and inject a bit of colour today!
At our team training events, one of the most popular things of the day is always the raffle, which is usually jam-packed with all sorts of fantastic Stampin' Up! goodies... (Thanks, Michelle!)
Normally, I rarely win anything in raffles, but I still optimistically buy some tickets in any raffle I'm asked to take part in... In the past if I have won anything, it's been notable for it's uselessness - think winning a turkey in a Christmas raffle when you don't eat meat and the rest of your close family is living overseas, or, winning a "romantic dinner for two" at a local gastro pub - two weeks after splitting up with a boyfriend... Yes folks, in the past I have been THAT lucky! I kid you not! So, imagine my total and utter delight at winning not one prize in the team raffle, not two, but THREE prizes! Yes THREE PRIZES... of Stampin' Up! goodies too! Whoopieeee!! I couldn't quite believe it, and felt a bit greedy for winning three... but, still took them - hey, I deserved a bit of raffle luck for a change, people, don't judge!! ;)
One of the three prizes I received, was the fabulous Garden In Bloom stamp set - a photopolymer stamp set that has several flowers, leaves, a stem, a couple of butterflies and a very cute bee as well as some lovely sentiments amongst its 20 stamps:
 |
| Garden In Bloom Photopolymer stamp set 139433 £23.00/30,00€ |
I was so excited to win this as it was one of the next items on my "wish list" of new Stampin' Up! goodies to buy for myself and my classes! I love the two-step stamping and multitude of possibilities the many different stamps give you for your cards and other paper-crafting projects. Each of the flower and leaf stamps has a little built-in tab arrow, that doesn't get ink on it, but shows you which direction your stamp needs to go in. For example if you use the largest flower outline stamp with the arrow facing straight up (in a 12 o'clock position), then you know that when it comes to the next layer of the stamp, you just face that stamp's tab at the 12 o'clock position too and then stamp within the flower outline so that your petals will all match up beautifully. Some of the stamps you can instantly see which is the correct way up, but with others the little tab arrows save you no-end of bother!
Here is what I made with my first try:

I made a series of square cards, all with Old Olive bases and Whisper White mat layers. I kept my colour palette to Rose Red, Old Olive, Daffodil Delight and the Tuxedo Black Memento ink. The cards are approximately 10cm (4") square. The outlines of the flowers and leaves were stamped directly from their ink pads, but the "solid" insides were stamped off on my grid paper first, before being stamped onto the card. The yellow flower centres are stamped with the same little stamp that the yellow bumble bee body was stamped with. I'm not sure if it was designed to be for both, but it definitely fits both!

On these two cards (above) I kept the layout pretty much the same but used differently-sized leaves on each. I think I much prefer the card without the sentiment on the front and decided to stamp on the inside of that instead:
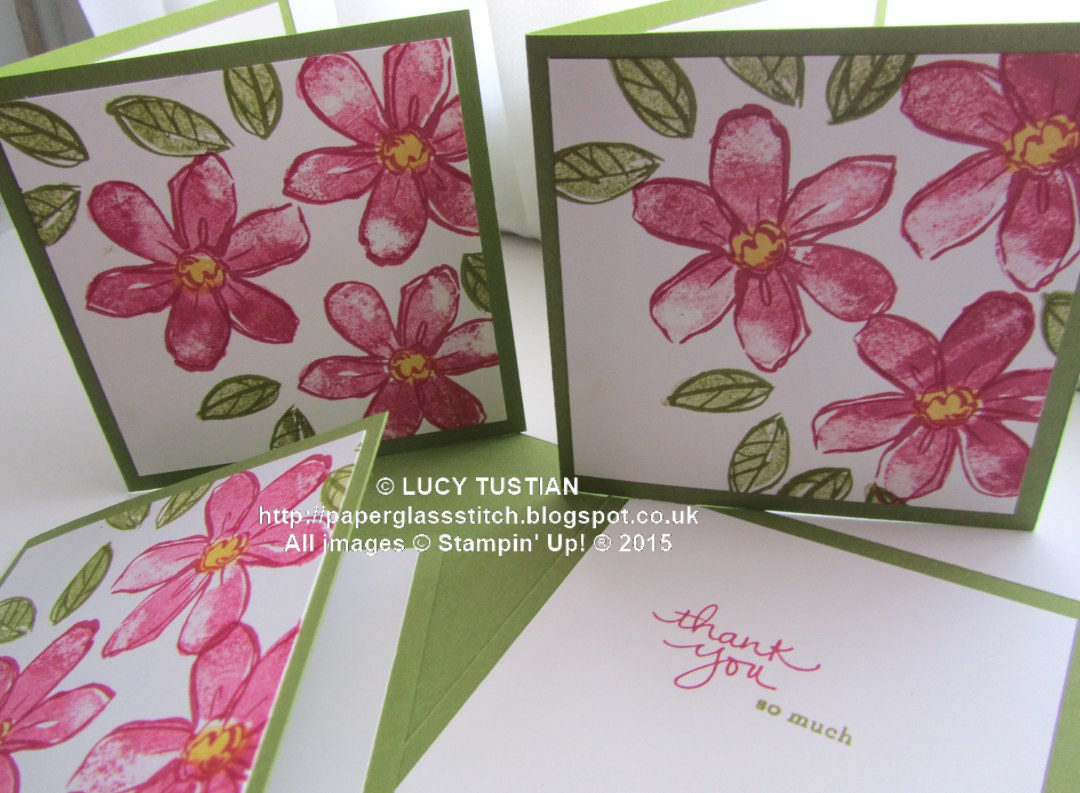
The sentiment inside these ones comes from Endless Thanks. I just love the mix of the hand-written-look font with the smaller, typed-style font. I think I shall get a lot of use out of the Endless Thanks set as it has lots of different sentiments as well as a lovely scrolled banner and several flowers, leaves and a tiny heart in it too:
 |
| Endless Thanks Photopolymer Stam Set 138796 £14.00/19,00€ |
Isn't that cute? For the next card, I stamped a single large flower and bent the stem stamp into a gentle curve on my acrylic block, before stamping it. (So easy to do with photopolymer stamps!) I really like the sentiment on this card. I thought it would make a lovely thank you card too, as you can see from the inside layer, shown below:


I love the little cute, almost blotchy, butterfly, don't you? It is so dinky!
I stepped up the next card a little, using the same curved stem and large flower, but this time adding the larger leaves, a bumble bee and an extra flower. Shh... don't tell anyone, but the small flower is hiding an inky green finger print, which I partially disguised in one of the little leaves, but then needed something else to balance it all (remember: "it is not a mistake, it is an opportunity for embellishment!"). I stamped the little, three-step flower on a scrap piece of Whisper White and fussy cut it out with my paper snips and stuck it onto the card with a glue dot. The arrow tabs are especially useful when stamping this little flower...


More leaves and this lovely sentiment taken from Butterfly Basics stamp set, made the final touches to the inside of the card. Job done!
I hope you have liked today's cards? I think that you could make several of these and put them together in a little hand made box, for a very pretty birthday or thank you gift - and of course there are endless possibilities for using different colours to get quite different looks.
These will be my July thank you cards, so if you order from me this month, whether online, at a class, by email, or, in person, you will receive one of these thank you cards from me. (If you order more than once, I shall make sure that I make your cards in different colourways, so you don't end up with several the same!0

Remember if you place an online order with me via my shop during July 2015 and you use the hostess code FQZ4JER4 when you place your order, I shall send you a little gift in the post as a thank you in August.
Well, that's it for today. Thank you for taking the time to visit my blog and reading this post. I hope you have liked today's projects? I'd love it if you left me a comment to let me know what you think and which card design you prefer the most!
Until next time, happy stamping everyone!
Lucy x


