Showing posts with label handmade. Show all posts

Monday, 13 July 2015

Onto a winner with Stampin' Up!'s Garden In Bloom stamps!

I have decided to take a break from the Tip Top Taupe, Black and Whisper White colour scheme from my recent team training inspiration station projects and inject a bit of colour today!

At our team training events, one of the most popular things of the day is always the raffle, which is usually jam-packed with all sorts of fantastic Stampin' Up! goodies... (Thanks, Michelle!)

Normally, I rarely win anything in raffles, but I still optimistically buy some tickets in any raffle I'm asked to take part in... In the past if I have won anything, it's been notable for it's uselessness - think winning a turkey in a Christmas raffle when you don't eat meat and the rest of your close family is living overseas, or, winning a "romantic dinner for two" at a local gastro pub - two weeks after splitting up with a boyfriend... Yes folks, in the past I have been THAT lucky! I kid you not! So, imagine my total and utter delight at winning not one prize in the team raffle, not two, but THREE prizes! Yes THREE PRIZES... of Stampin' Up! goodies too! Whoopieeee!! I couldn't quite believe it, and felt a bit greedy for winning three... but, still took them - hey, I deserved a bit of raffle luck for a change, people, don't judge!! ;) 

One of the three prizes I received, was the fabulous Garden In Bloom stamp set - a photopolymer stamp set that has several flowers, leaves, a stem, a couple of butterflies and a very cute bee as well as some lovely sentiments amongst its 20 stamps:

Garden In Bloom Photopolymer stamp set 139433 £23.00/30,00€
I was so excited to win this as it was one of the next items on my "wish list" of new Stampin' Up! goodies to buy for myself and my classes! I love the two-step stamping and multitude of possibilities the many different stamps give you for your cards and other paper-crafting projects. Each of the flower and leaf stamps has a little built-in tab arrow, that doesn't get ink on it, but shows you which direction your stamp needs to go in. For example if you use the largest flower outline stamp with the arrow facing straight up (in a 12 o'clock position), then you know that when it comes to the next layer of the stamp, you just face that stamp's tab at the 12 o'clock position too and then stamp within the flower outline so that your petals will all match up beautifully. Some of the stamps you can instantly see which is the correct way up, but with others the little tab arrows save you no-end of bother! 

Here is what I made with my first try:


I made a series of square cards, all with Old Olive bases and Whisper White mat layers. I kept my colour palette to Rose Red, Old Olive, Daffodil Delight and the Tuxedo Black Memento ink. The cards are approximately 10cm (4") square. The outlines of the flowers and leaves were stamped directly from their ink pads, but the "solid" insides were stamped off on my grid paper first, before being stamped onto the card. The yellow flower centres are stamped with the same little stamp that the yellow bumble bee body was stamped with. I'm not sure if it was designed to be for both, but it definitely fits both!


On these two cards (above) I kept the layout pretty much the same but used differently-sized leaves on each. I think I much prefer the card without the sentiment on the front and decided to stamp on the inside of that instead:
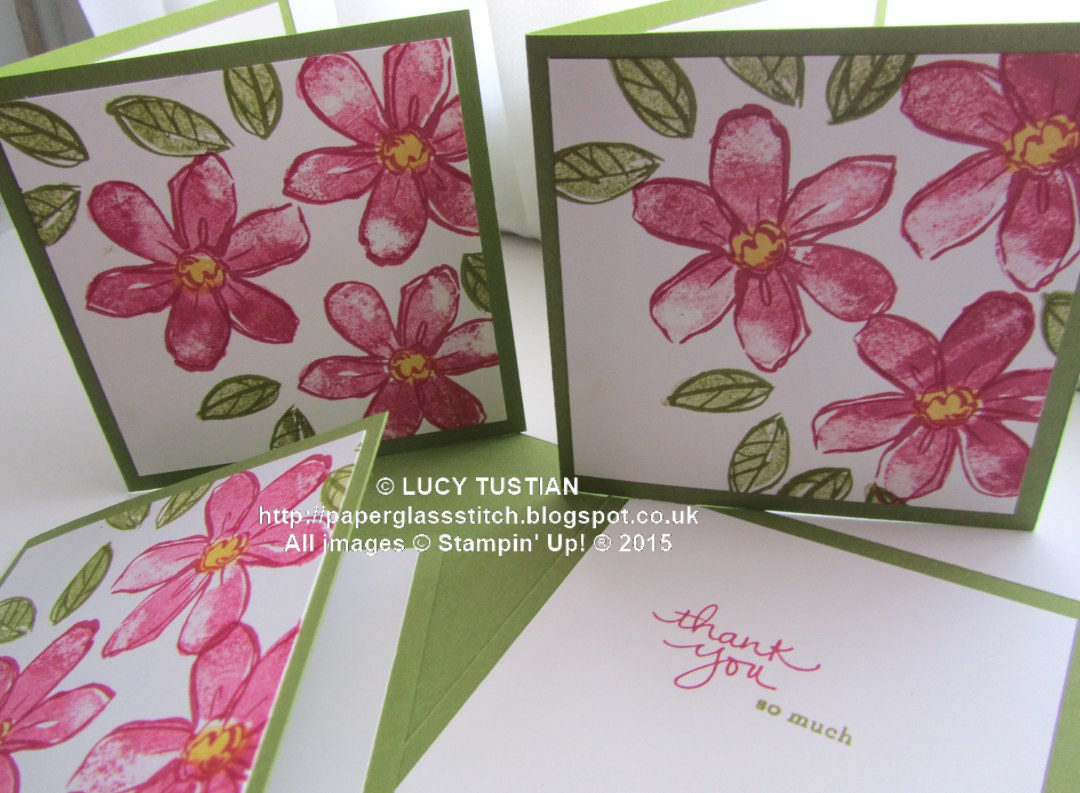

The sentiment inside these ones comes from Endless Thanks. I just love the mix of the hand-written-look font with the smaller, typed-style font. I think I shall get a lot of use out of the Endless Thanks set as it has lots of different sentiments as well as a lovely scrolled banner and several flowers, leaves and a tiny heart in it too:

Endless Thanks Photopolymer Stam Set 138796 £14.00/19,00€

Isn't that cute? For the next card, I stamped a single large flower and bent the stem stamp into a gentle curve on my acrylic block, before stamping it. (So easy to do with photopolymer stamps!) I really like the sentiment on this card. I thought it would make a lovely thank you card too, as you can see from the inside layer, shown below:


I love the little cute, almost blotchy, butterfly, don't you? It is so dinky!

I stepped up the next card a little, using the same curved stem and large flower, but this time adding the larger leaves, a bumble bee and an extra flower. Shh... don't tell anyone, but the small flower is hiding an inky green finger print, which I partially disguised in one of the little leaves, but then needed something else to balance it all (remember: "it is not a mistake, it is an opportunity for embellishment!"). I stamped the little, three-step flower on a scrap piece of Whisper White and fussy cut it out with my paper snips and stuck it onto the card with a glue dot. The arrow tabs are especially useful when stamping this little flower...


More leaves and this lovely sentiment taken from Butterfly Basics stamp set, made the final touches to the inside of the card. Job done!

I hope you have liked today's cards? I think that you could make several  of these and put them together in a little hand made box, for a very pretty birthday or thank you gift - and of course there are endless possibilities for using different colours to get quite different looks.

These will be my July thank you cards, so if you order from me this month, whether online, at a class, by email, or, in person, you will receive one of these thank you cards from me. (If you order more than once, I shall make sure that I make your cards in different colourways, so you don't end up with several the same!0


Remember if you place an online order with me via my shop during July 2015 and you  use the hostess code FQZ4JER4 when you place your order, I shall send you a little gift in the post as a thank you in August.

Well, that's it for today. Thank you for taking the time to visit my blog and reading this post. I hope you have liked today's projects? I'd love it if you left me a comment to let me know what you think and which card design you prefer the most!

Until next time, happy stamping everyone!

Lucy x


Wednesday, 3 September 2014

A new catalogue is here; and there are "Good Greetings" to look forward to as well!

Hellooooo!
 
Sorry for my long absence... the hot summer, a holiday with my sister and her family in Wales, plus, an operation on my knee a few weeks ago, have all got in the way of my crafting somewhat!
 
How is it September already?! Wow, where does the time go? Ooer! The Summer is truly over. Lots of schools have started back this week and I am very proud of my eldest niece who had her first day at secondary school yesterday :O) Can't believe she's growing up so much - I was spooning yogurt to her in her highchair not so long ago, or so it seems! She is now eleven! Wowser! Hmm...That yogurt-feeding memory is over ten years old! Eek! Aunty Lucy is feeling old right now!
 
But, do not fear, Stampin' Up!'s brand new spangly, nay, SPARKLY, Autumn-Winter Catalogue has arrived! Yey! There are sooooo many lovely, yummy things in there. You can buy from it up until 5th January 2015, but you don't have to wait until then!! Once you see it, you will NOT want to wait very long to get your hands on all the yummyness, I am sure!
 
You can click here for a link to the pdf of the catalogue, or, click here to go straight to my online shop and view all the products...


http://www2.stampinup.com/ECWeb/ItemList.aspx?categoryid=3568
 
 
The catalogue is jam-packed with ideas for so many creative projects - ideas for cards, decorations, gift wrapping, packaging, advent calender box ideas, home decor, Autumnal events, Halloween and of course Christmas too. I think it covers a wide range of tastes and styles too, so there really is something for everybody in there I believe! There are lots of kits to make your crafting quicker if you get short of time and there are several bundles of items that offer a discount, so will save you money too. I am looking forward to sharing some of things I have made (or plan to make!) over the next few weeks and months in the run up to Christmas. It is not all Christmas stuff though, there are all sorts of fab ideas buzzing around my head! So, watch this space, as they say!
 
The title on the front cover of the catalogue says  "Make it fun, make it together" - don't you think that is a lovely idea? I think it is always nice to create things in the company of others, don't you? It can help inspire you  and you can share ideas - and perhaps some of the workload too!  Lots of the celebrations throughout the Autumn and over the Christmas and New Year period are all about celebrating those special occasions with family and friends gathered around you.
 
On top of all the excitement of the new catalogue, there is also a limited-time special offer where anyone who hosts a £200 Stampin' Up! party can get a FREE stamp set called "Good Greetings" - on top of the normal Hostess Rewards. The offer ends on 31st October 2014, so, if you'd like to get your hands on the free stamp set, earn some more free products and have a fun night in with friends and me showing you how to make some fantastic, easy to make, but impressive paper craft projects, then get in touch with me as soon as possible to get a date booked in the diary with me! There are 19 sentiment stamps in the Good Greetings Stamp Set and they cover all sorts of occasions so will be a very useful set to have in your crafting stash I think, don't you? It is available in wood- or clear-mount. Come and have a look:


If you don't live near enough to me to have a party, don't worry, you can still get the stamp set for free: either place an order for yourself for £200, or, contact me and together we can organise a catalogue party where you pass a catalogue or two around family and friends, collate their orders and I will help you place the orders and then the goodies will be shipped directly to you. It doesn't matter if you and your family and friends are scattered all around the UK, they can still order using a specially designated hostess code for your party and get their goodies sent directly to them, wherever they are! If you would like to know a bit more about it, or, have a date in mind already, then please do contact me and I shall be happy to help you. Distance should be no barrier to getting this gorgeous freebie! :O)


Well, that's it for today. I will leave you with a photograph I took yesterday in the sunshine which I think sums up the changing of the seasons. I really love this time of year when the last rays of Summer mingle with the cooler temperatures and that distinctive smell of Autumn is in the air! We have all the amazing changing colours; scrunchy falling leaves and delicious fruits coming into season, to look forward to from now on in - yum! Plus all the excitement of Harvest Festivals, Halloween and Christmas is on its way too! How exciting! What is your favourite part of Autumn? Please do leave me a comment and let me know! Or maybe it is a different season where you are in the world? What does September mean to you, where you are? I'd love to know! :O)


Happy crafting everyone - and remember to contact me if you'd like a paper copy of the catalogue, book a party date or would like more information about how to earn that gorgeous stamp set for FREE!


Lucy x


Saturday, 19 July 2014

Pinkies Blog Hop: Showcasing New Annual Catalogue projects!


Thank you for joining us on another Pinkies Blog Hop! We're showcasing lots of gorgeous projects using products from the new Stampin' Up! ® Annual Catalogue. Simply use the buttons at the end of each post to keep hopping!


Welcome if you have come from Nina's blog!

 
There are so many lovely new things in the new catalogue and I have found it really hard to narrow down my choice for today! I decided to keep it simple  and concentrate on the new In Color collection  for 2014-2016.


I have recently been experimenting with making my own backgrounds and the following projects all utilise one particular technique which I have developed: using scrunched up brown packing paper as a "stamp" which I have then tapped directly onto the ink pad to pick up some ink and then stamped all over a sheet of Whisper White cardstock. You can use a single colour or a mixture of 2 or 3 - just make sure you use a separate ball of scrunched-up paper for each individual colour.

This first project uses the lovely new In Colors Mossy Meadow (the green) and Hello Honey (the yellow) as well as a bit of Crumb Cake on the patterned background strip:
http://paperglassstitch.blogspot.co.uk  Lucy Tustian

 
I have glued the small strip of homemade background onto a Whisper White Notecard and stamped the "thanks" from the Hip Hip Hooray card kit stamps. The Elegant Butterfly punched shape is from the new Hello Honey cardstock and sits on a mini glue dot, with a strip of three pearl gems for the butterfly's body. A very simple, quick and easy card to make, don't you think?!
Here is another card which uses the same backround - this time I have used the background for the butterfly only, with a Mossy Meadow Elegant Butterfly beneath it. I used the brush stroke stamp from the new (and very versatile) stamp set: Work Of Art; with the Hello Honey stamped three times without re-inking it (the "stamping off" technique). The "Thinking of You" is from one of my go-to stamp sets: Sassy Salutations and is stamped using the Mossy Meadow ink for the words and the sponging around the oval punched shape:

http://paperglassstitch.blogspot.co.uk Lucy Tustian

 
 One of my favourite new In Colors is the lovely deep rich purple called Blackberry Bliss - the next couple of projects use this colour on its own for the handmade background for a very striking effect:
 
http://paperglassstitch.blogspot.co.uk Lucy Tustian

 
http://paperglassstitch.blogspot.co.uk Lucy Tustian


 Have you spied the lovely ribbon on the tag? It is the utterly gorgeous new 1cm (3/8") wide Stitched Satin Ribbon in the Blackberry Bliss - it is so nice - one of my all-time favourite Stampin' Up! ribbons I think! I have secured it with a little bit of Whisper White Bakers' Twine plus a tiny bit of the same white bakers' twine that I have hand-dyed using a few drops of Perfect Plum re-inker in a very small amount of water. I have also coloured in the rhinestone jewels with the brand new Stampin' Blendabilities alcohol markers in Rich Razzleberry (using all three shades of the colour).
 
 
The circle on the card is made using another stamping technique I have been experimenting with recently - reverse kissing. I'm hoping to blog a bit more about various kissing techniques (of the ink variety!) sometime soon, so do pop back again to see!
 
 
Thank you for taking the time to look at my part of the Pinkies Blog Hop. I would love to know your thoughts on the techniques and colour-combos that I have used today, so do please leave me a comment if you have time! Hope you enjoy the rest of the blog hopping: the lovely Sarah is next! :O)
 
 
Until next time, happy crafting everyone...
 
Lucy x
http://stampinsarahiow.blogspot.co.uk/2014/07/welcome-to-isle-of-wight-for-little.html

 
http://www.destempelolifant.blogspot.nl/2014/07/pinkies-blog-hop.html


Friday, 18 July 2014

Project Life: Not just for memory making! #PLxSU

Hellooo...
 
Sorry I have really neglected my blog recently, life has just got in the way it seems! I am going to try and change my ways and endeavour to blog more often! Ooops! It is silly really, as I have made so many lovely things recently, with some of the fabulous new goodies from the new 2014-2015 Stampin' Up! ® Catalogue and I really should share some of them with you!
 
So, here we go!
 
Some of my favourite things from the new catalogue are the Stampin' Up! Project Life collection of products - Project Life allows you to document your memories in a quicker way than the more traditional scrapbooking method. I love it! BUT, even if you are not into scrapbooking or memory keeping, a lot of the #PLxSU products can be used in alternate ways - you can use the Card Collections and items from the Accessory Packs to make all sorts of things - come and see just a couple of examples:
 
Here is one card that I have made using the Everyday Adventure Project Life Card Collection and the coordinating Every Day Adventure P.L. Accessory Pack:
 
Http://paperglassstitch.blogspot.co.uk Lucy Tustian

Http://paperglassstitch.blogspot.co.uk Lucy Tustian
 
I am a huge fan of washi tape and I just LOVE this geometrical design in the gorgeous Bermuda Bay colour that comes in the Everyday Adventure Accessory Pack (see the close-up pic., above!).
 
I love how all the #PLxSU items coordinate exactly with the Stampin' Up! colours - see how nicely the Bermuda Bay Candy Dot matches the washi tape? Swoon! I added interest by using the fabulous new Stampin' Up! Project Life Corner Punch on just two corners of the card's layers (one of my favourite tricks!).
 
As you can see from the photograph below, washi tape has many uses! I have stuck it onto some clothes pegs (clothes pins, to my American friends!) and made a hanging weekly reminder to go onto a cork board or edge of a shelf in an office/craft room.
 
For the string, I plaited three pieces of the Silver Baker's Twine together to make a sturdy cord and then threaded this through the pegs, with knots either side, to stop the pegs from moving along the cord.
 
I have stamped directly onto the washi-taped pegs with the days of the week from the Project Life Day to Day photopolymer stamp set, using black Stazon Ink. (So easy to do with photopolymer stamps as you can see through them to place them exactly where you want them!) The little heart stamp comes from another #PLxSU stamp set: Point & Click. isn't it cute! I finished the pegs with Basic Black and Bermuda Bay punched cardstock shapes (using the Chevron border Punch).
 

Http://paperglassstitch.blogspot.co.uk Lucy Tustian
 
To complete the reminder set, I covered a small notepad and decorated it with the same cardstock, stamps and washi tape and glued a length of the plaited baker's twine under the cover, so it can hang next to the line of pegs. I clipped a small pen (also decorated with the washi tape!) onto the cord and hey presto, you have a handy hanging "to do list" reminder for every day of the week, plus a handy pen and pad of paper to jot your notes onto before you clip them onto the relevant day of the week.
 
Http://paperglassstitch.blogspot.co.uk Lucy Tustian
 
 
Http://paperglassstitch.blogspot.co.uk Lucy Tustian
 
I have given this set away... but think that maybe I should make another one for myself to keep as an "aide memoir" seeing as I have such a dreadful memory and am always forgetting things! Perhaps I might remember to blog more often if I had one of these on my pin board in my craft room or stuck onto my 'fridge with magnets.... hmmm... now there's an idea..... ;O)
 
Well, that's it for today, I think, (unless I've forgotten something!!). Do let me know if I have inspired you to use the #PLxSU items in a different way...
 
Until next time, happy crafting folks!
 
Lucy x


Tuesday, 8 April 2014

More Easter Treats!

Hey there!

I thought I'd share some photographs of the Easter Treat projects that I designed especially for the Stampin' Up! UK Stampissimo video that I shared with you in my last post... come and have a look:
 
This is the Crocus Treat Pouch that I made, step-by-step, on the video:


And here is a close-up of the cello bag:


On this one I stamped the "Happy Easter" sentiment from the very versatile "Delightful Dozen" stamp set with my white Stazon ink pad. On the one I showed you how to make in the video, I changed it up a bit and stamped that cello bag with one of the flowers from the very popular "Petite Petals" stamp set. (Be careful that you use a food-safe cello bag like the ones that Stampin' Up! sell, though, if you are putting unwrapped food items in them like I have here.)
 
Next is the little Daffodil (or should that be narcissi?!) Miniature Easter Egg Holder which is made in a very similar way to the above Crocus Pouch but with the addition of a little upside-down tray to hold the egg in place:


I show you how to make this in the video too. It uses the fabulous Scallop Tag Topper Punch, the Petite Petals Punch and the really useful (and time-saving) Fringe Scissors - all of which are in the gorgeous 2014 Spring/Summer catalogue.
 
I think that these would make lovely table-setting gifts - you could stamp, print or write your guests' names on the little banner instead of the Happy Easter that I stamped using the  Teeny Tiny Sentiments stamp set. I am sure that you could also change the size up for a bigger egg if you wanted the gift to be a bit more generous, chocolate-wise!!
 
I got a little bit carried away with the punch art theme when I was designing these projects, but I couldn't leave out the Easter Bunny, now could I? Here he is:


I must confess that I have left the bunny's face blank, because whatever I tried just seemed to make it look cross-eyed, demonic or scary like the Were-Rabbit from the Wallace and Gromit film - so I just left it clean and simple... and plain. But, seeing as this bucket gift bag can house more chocolate treats than the other two treat holders can, I hope I am forgiven for leaving the bunny without a face?! hehe
 
 
The final two projects were a couple of 8"x8" (20.5cm x20.5cm) scrap book pages that I have turned into home decor pieces by placing them in 9"x9" (23.5cm) box frames:


The wording on these is stamped using the Notable Alphabet stamp set (for the larger letters) and the really useful, but perhaps over-looked, Simply Serif Mini Alphabet stamp set - which I use a lot for scrapbooking and for adding names onto special birthday cards etc.


Snowdrops are my absolute, all-time favourite flowers, as the optimistic arrival of their delicate pure white and bright green flowers, in the dull and dreary, early part of the year, is the first cheery sign that Spring will indeed at last be on it's way soon! They never fail to bring a smile to my face! :O)
 
Well, that's it for today, I hope that I have put a smile on your face and inspired you to make some of the above cute Spring and Easter projects.
 
I shall be back soon with some more Easter ideas and instructions on how to make the Easter Bunny bucket gift bag too...
 
Until then, happy crafting everyone!
 
Lucy x
 
 
All the Stampin' Up! products can be purchased on my online-shop, as long as you are from the UK, France, Germany, Austria or the Netherlands, and will be delivered direct to your door! Alternatively, please contact me directly to place an order if you prefer, and I shall place the order for you.