Friday, 30 May 2014

Exciting news: the Retirement List is here and you can join my team for less!!

Wow! So much is going on with Stampin' Up! at the moment, retirement lists have been launched today, Project Life is just around the corner AND you can join my team for as little as £50 at the moment... where do I begin?!! Eeek!
 
Think I will start here:
 
RETIREMENT LIST:
 
With a new Annual Catalogue about to launch at the start of July 2014, there will be a huge amount of lovely new Stampin' Up! goodies coming with it - but, to make room for all those brand new spangly things that are on the horizon, we must first say goodbye to some current products...
 
This is where the Retirement List comes in. This is a list (well, strictly speaking two lists) of all the stamp sets and accessories that will be discontinued (or, "retired") to make way for the new products... The goodies on this retirement list are on a limited stock, only while it lasts, basis - so once they are all sold, they are gone for good... Needless to say that things will sell out fast - especially the 2012-2014 In Color items and certain punches etc. I should imagine.
 
So, if you want to get any items that appear on the list, do so QUICKLY - to avoid disappointment... Click on the photo to go straight to my online shop where you can see what is on the retirement list and place your order:

http://www.stampinup.net/esuite/home/lucytustian/

 
They WILL sell out and fast, so don't hang around - once they are gone, they are gone! I would urge you to buy items you like that are on the retiring list sooner rather than later - and I would suggest you buy them via my online shop, to prevent any disappointment from a delay in getting your list to me via email or phone call, me placing the order and then me finding out by then that the items have sold out.
 
Remember, if you order online from me before 6th June 2014 and use the hostess code H2DZVX6U, I will give you a free gift as a thank you. (N.B. this is an offer from me, personally, not from Stampin' Up!)
 
Also, if you order before the end of 31st May and spend £60 you will get a free photopolymer stamp set too (as long as they haven't sold out by then, either!) If you have any problems or queries, please do not hesitate to ask me and I will be happy to help :O)
 
You can also click on this link to go to my online shop:


SPECIAL OFFER TO JOIN MY TEAM:
 

http://www.stampinup.net/esuite/home/lucytustian/
 
 
For a very limited time, you can join my team for only £50. Your starter kit will include up to £55's worth of products, plus the usual business pack of catalogues, order forms etc worth an additional £45. This offer runs out on 30th June. During the offer period, you can still, if you prefer, choose to join with the regular £99 starter kit (which gives you £130 worth of products, plus the usual business pack).
 
If you join before the end of June you will be able to order sneak-peek products from the new Annual Catalogue too and see them before regular customers will. Click the picture above to get more information, or contact me and I will be happy to answer any questions you may have! Clicking on the "join the fun" tab on my online shop will also give you more information about joining and becoming a demonstrator, too!
 
 
STAMPIN' UP! MEETS PROJECT LIFE:
 
I am sure, that by now, you will have heard the exciting news that Stampin' Up! have joined forces with Becky Higgins and will be offering exclusive Stampin' Up! Project Life products which will make scrapbooking easier, faster and in the co-ordinated colourful way that Stampin' Up! does best. Some of these #PLxSU products will be launched for sale ahead of the main Annual Catalogue on, I believe, the 10th June. 
 
For those of you who don't know, or who haven't heard about Project Life, it is a really quick way of documenting your life and memories in special, scrapbook pages that have divided pockets for your photographs (and other memorabilia) to be easily and quickly slotted into. Thus, it's all about spending more of your time making memories and less time scrapbooking them!
 
Recently, I was honoured and delighted to be asked, by Stampin' Up! Europe, to do a Creative Presentation using some of these Stampin' Up! Project Life products (such as stamps, pages, journalling cards etc etc) as a top secret, sneak peek presentation, on stage, in front of 360+ excited UK demonstrators at the UK Regional Training Day in Telford a few weeks ago!
 
Until today, I have not been allowed to show you any of the things that I made for the presentation, but, as the demonstrator pre-order for the selected Project Life products began today, I am delighted to say that  I am now allowed to show them! It has been REALLY hard not to let the cat out of the bag, as I have absolutely fallen in love with the products and their versatility! There are many uses for all the Stampin' Up! Project Life products - not just the originally-intended album pages - and because the journalling cards all coordinate perfectly with the Stampin' Up! colours (and cardstock, papers, ribbons, inks, embellishments etc etc.) the possibilities are pretty much endless: greeting cards, gift-wrapping, home decor and organisation etc. are just some ideas for #PLxSU items!
 
Here is just one page layout that I made for the presentation:
 
 
http://paperglassstitch.blogspot.co.uk #PLxSU Lucy Tustian
 
 
I am passionate about plants and I love to take photographs of beautiful flowers.  The happy colours of these gorgeous Spring flowers just cried out to be matched with the colours of the words on this inspirational quote on one of the  Everyday Events journalling cards. I used cardstock in those same colours (Coastal Cabana, Crushed Curry, Strawberry Slush and Tangerine Tango) as mats, behind the larger photographs. It was so quick to make - in fact, I think it took much longer for me to print the photographs from my laptop, than it did to complete the entire layout! It is so much fun and very satisfying producing layouts like these so effortlessly. In fact, choosing which photos to use, was my hardest task for the presentation - the rest was a doddle!!
 
Please come back over the next few days, as I will be showing you many more photographs of my #PLxSU presentation projects - including more page layouts, several greetings cards, a mini envelope album, a wedding album and a cute peg organiser idea too! I will also be giving you some top tips that I have learnt whilst making these projects, so that  you can get the most out of your Stampin' Up! Project Life goodies;  but,  for now, I think there's more than enough information here for you to digest already!
 
Don't forget to pop over to my online shop to grab yourself some of those fantastic retiring products before they all go... I don't want you to miss out on any crafting products that you have your heart set on... Go!  Go now!! ;O)
 
Until next time, happy crafting everyone!
 
Lucy xx


Sunday, 4 May 2014

EXPLODING STARS BIRTHDAY POP-UP-BOX-CARD & CCC #031

Hey Crafters!
 
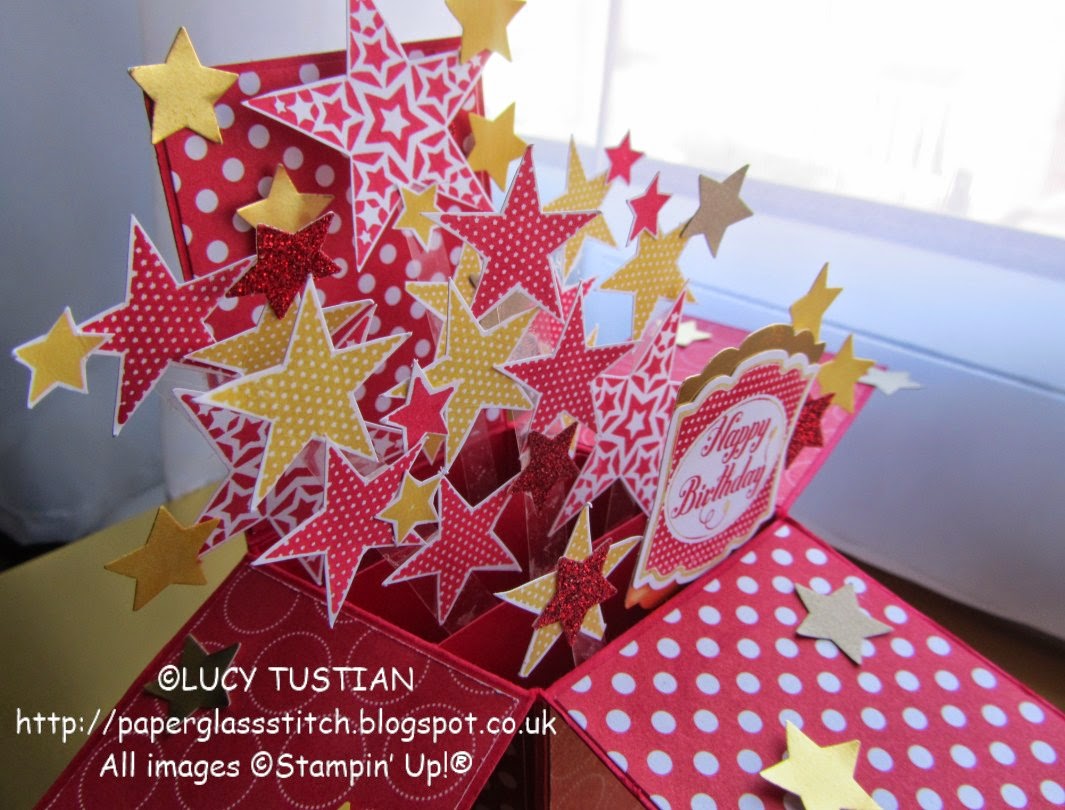
Thought I'd share a very special birthday card with you today - I made it for my eldest niece who turned 11 recently. It was my first attempt at a "pop up box card" - which is a card style which seems to be very hot trend in the paper-crafting world at the moment!
 
The colours were inspired by the colours of her bedroom, which are red, gold and yellow and I decided that stars were more appropriate for my niece than flowers might be.

Here is the card:


I wanted it to look like the stars were bursting out of the card in a joyous explosion of celebration! The card was definitely a "labour of love", as apart from the smallest stars, which I punched out, all the other stars had to be fussy-cut, by hand, with my trusty Paper Snips (what would I do without those little essential crafting beauties, hey??!!) - but, it was very therapeutic nonetheless!


I stamped the patterned stars using the fabulous Simply Stars stamp set in Real Red and Daffodil Delight ink on Whisper White Cardstock. Some of the smaller stars were punched out using the little star punch from the Merry Minis Punch Pack (order ref = 126882, which was carried over from last year's Holiday Mini Catalogue). I punched them out of the Red Glimmer Paper, Daffodil Delight Cardstock, the Gold Foil Sheets and also the much-overlooked-but-fabulous Brushed Gold cardstock. I really must use that more often, as it is so nice and gives a lovely, subtle, gold sheen to your projects... 
 

You can just about make out in these photographs (above and below), that the stars are stuck to little strips of Window Sheet: Stampin' Up!'s more sturdy equivalent of acetate sheets. I found that the Tombow Multipurpose Liquid Glue and the Mini Glue Dots were the best adhesives to use for gluing on the stars to the Window Sheet strips and the strips to the box support struts etc. The Tombow allows a little "wiggle time" to get the shapes in the right positions, but does take a little longer to dry than when gluing two pieces of cardstock together - so you need to be a little patient with it!
 
Another top tip is to glue all the decorations onto the card support struts before you stick the struts inside the box of the card! You can of course add a few more stars and things after they are in the box, if you discover any gaps that need filling with more things. This is one card design where less is definitely not more! Excess is best! ;O)


I thought the polka dotted stars echoed the lovely Real Red Polka Dot Parade Designer Series Paper (DSP) that I had used to decorate the card flaps and panels - this is such a versatile set of papers and I used both sides of the sheets on the card. I have used this DSP a LOT. The Happy Birthday comes from the Label Something Stamp Set and I punched it out using the Artisan Label Punch. I punched a second one out of Gold Foil Sheet, cut it in half and stuck the two pieces to the back of the Birthday one, to give the greeting label an extra border. This is a great trick to make your punched shapes "pop" on a card or gift tag.
 
I glued an extra layer of Real Red Cardstock, Gold Foil Sheet and then Whisper White cardstock (stamped with more stars), onto the back panel of the card base in order to add stability and provide a space for writing my message onto. (See picture below:)
 
I also attached a few small stars to the flaps of the card base, to make it look like the stars had exploded out of the card and landed on them! Some I glued flat onto the card with my most-used crafting tool: the Tombow Multipurpose Liquid Glue, and others I popped onto a Stampin' Dimensional to add a little bit of height.
 
 
As you can see below, I got a little bit carried away with adding the exploding stars and several of them poked outside the card base when the card was folded flat, ready for posting... So much so, that the card didn't fit in the standard C6 envelope that I had originally planned to use - Oops!! BUT, luckily this didn't matter a jot, as I had my extremely useful Envelope Punch Board to hand and I was able to make  an extra-special envelope from some more of the Polka Dot Parade DSP! Phew! Thank the stars (no pun intended!) for the Envelope Punch Board, eh?!


Here is the envelope I made, along with it's belly band which I made using the Daffodil Delight colourway of the same Polka Dot Parade DSP - the "just for you" stamp is from the Label Love Stamp Set and again uses the Artisan Label Punch and the little star punch from the Merry Minis Punch Pack - is it just me, or, does it remind you somehow of Wonder Woman's headband?!  No? OK, just me then!! Ahem...


My niece had asked for money for her birthday so that she could go on a "girly shopping day with just Mummy"- gosh how grown up is she getting - it hardly seems like yesterday that my sister announced she was expecting and now my niece is ELEVEN!! (Gulp! Am getting old! LOL!!) The smaller, yellow envelope is what I put her birthday money into and uses the same Daffodil Delight and Real Red Polka Dot Parade DSP, the Artisan Label Punch and the "To:/From:" label comes from the Label Love Stamp Set...


I thought the back of the belly band on the large red envelope looked a little plain, compared to the front, so, I glued a left-over Red Glimmer Paper star for a little bit of extra bling/interest!


This last photo is a close up of the front of the belly band showing the "Wonder Woman" style label and also illustrates the sparkle and glimmer of the red and gold little stars. It always amazes me how even a teeny bit of the glimmer paper can add such a lot of sparkle and glamour to a hand made project - and a little goes a long way, so it is great value for money too!


Hope you have liked today's project? In my monthly card-making classes this month (May 2014) we are making similar  pop-up-box-cards - using slightly different dimensions for the card base, different stamp sets/punches and different colours - last week's class was great fun - I am very much looking forward to the repeated, evening class towards the end of the month too, now!  I know that this will definitely NOT be the last of this style of card that I make - as they are great fun to construct and are such a "wow" card for any occasion as well!


Don't forget that all of the supplies used on today's project can be bought from my online shop (click here!) or by contacting me directly if you prefer.
 
Anyone who places an online order with me before the 29th May 2014 using the hostess code VRSJWE3R on their order will get a little thank you gift from me in the snail-mail post, too (as long as you don't click the "no contact" button - which will mean I don't have access to your contact details and will therefore be unable to get your gift to you!). N.B.: If your order is for £150 or more, don't use this hostess code for your order or you won't qualify for your "Stampin' Rewards"!
 
Oh and don't forget that during May there is a special offer to receive a free exclusive brand new Photopolymer Stamp set, for all orders of at least £60/75€, while stocks last- see my online shop for details! They are all rather fabby, I must say! :O)
 
Well, that's it from me today, I really hope you are inspired to make your own Pop Up Box Card now? I am entering this card into the Catherine & Cathy Create "Starlight, Star Bright" Blog Challenge. seeing as they wanted to see projects using stars on them - I think this card qualifies, don't you?! It is definitely very starry! Hehe! 
 
Until next time: happy crafting!
 
Lucy xx

Thursday, 17 April 2014

More Easter Ideas!

Hey there folks!
 
Are you getting "eggscited" about Easter yet?! Hehe. Personally, I am looking forward to a lovely long sunny bank holiday weekend - or at least I'm looking forward to scoffing all that yummy guilt-free chocolate on Sunday, rain or shine!!
 
I've got a few more ideas for you, that I have made for Easter.... come and have a look:
 
Here are a couple of punch art Easter cards which were inspired by my mini Easter egg holders I designed and made for the recent Stampin' Up! UK Stampissimo Easter Treats youtube video. Do you recognise the little daffodils?!


I used Stampin' Up!'s fantastic Note cards & Envelopes as the base of these cards. (Yey, no cutting and scoring, makes for a quicker project and I like the size of them too - they are smaller than A6 cards.) The background piece is Soft Sky cardstock. As you probably know from my previous posts, the daffodils were made using the Petite Petals Punch and the flower shape from the Itty Bitty Punch Pack, with Daffodil Delight and Pumpkin Pie cardstock. The leaves were hand cut using my trusty Paper Snips (what would I do without those essential wonders?!) and the grass was cut using the fabulous Fringe Scissors (both are cut from Gumball Green cardstock).
 
 
The clutch of Easter eggs were punched out of the really pretty Gingham Garden designer series paper (dsp) using the Small Oval Punch and then tucked behind the grass and under the Daffodil Delight Stitched Grosgrain Ribbon. Here is a close up to show you the three-dimensional effect and texture of the card's design:


Here is a closer view of the eggs:


Actually, I must confess that the idea for tucking the eggs behind the ribbon came from a little mistake I made when punching out one of the egg shapes - I wasn't concentrating and the dsp didn't go all the way into the punch properly (oops! "More haste, less speed" as my darling Nan used to say to me when I was little!). So, I ended up with an egg with a missing slice off it. I love this paper so much, I didn't want to waste it, plus, I liked the way the pink daisy was positioned on it - so following my ethos of "it's not a mistake, it's an opportunity for embellishment!" I decided to place the egg so it looked like it wasn't really missing a bit, but was a whole egg tucked behind the ribbon! Another example of a "happy accident" in Lucy's craft room! hehe ;O)
 
I often say that to be a good crafter, you don't have to be perfect, it's more important to know what to do when things go a bit wrong and be able to rectify these little mistakes and accidents to rescue your project - otherwise you can end up wasting a lot of time and effort as well as materials! A smudged finger print on your card, or, a dot of ink? Don't worry, "it's not a mistake it's an opportunity for embellishment..."  - so, think on your feet and hey presto, you can decide that actually where that finger print or ink spot was, is really a perfect place for a flower, a butterfly, a rhinestone jewel or even a ribbon bow!
 
I also had fun recently making a couple more designs of little Easter egg holders using the Scallop Tag Topper Punch - these are slightly larger than the Mini Daffodil Easter Egg Holders I have already showed you, but hold the same-sized egg. I made a yellow Easter Chick and an Easter Bunny - they were inspired by some I'd seen on a facebook crafting forum, but I'm afraid, I can't remember exactly where I saw them or who had made them now (I must start paying more attention to these things!) Sorry, if they were yours, thank you and please let me know who you are so that I can credit you by name! Anyway, here they are:


 I was really chuffed with my idea of using the Mosaic Punch for the chick's open beak! I think he looks like he's squawking rather loudly, don't you?! And possibly tapping his foot with impatience here maybe? hehe
 
We made these two egg holders in the last class that  I taught and all the ladies said that they had great fun making them and that they wanted to make more of them at home. Hope that they have! I know that my nieces and nephew would love making these...not sure the chocolate eggs would last until Easter Sunday though!!
 
Anyway, Happy Easter everybody, hope you all have a lovely long weekend, preferably a sunny one with lots of chocolate and plenty of time for crafting! I seem to have used a lot of punches recently but not done much stamping... Need to rectify that, I think...
 
Until next time, happy crafting!
 
Lucy x


Wednesday, 16 April 2014

Easter Bunny Bucket Gift Bag Tutorial

Hey there folks!

Really sorry for the delay in getting this to you, but I've been laid low with a lurgy this past week or so - ug! BUT am better now! Hurrah - just in time for all the yummy Easter chocolate goodies, that I hope to scoff over the weekend!! Nom nom!

Anyway, without further ado - and due to popular request -  here is my step-by-step tutorial for how to make the Easter Bunny  Bucket Gift Bag that I showed you in my last post:
 
This is what we will be making:


To make the bag, you first need to make a tray box. Cut a piece of Old Olive cardstock to 10cm x 10cm (3 & 15/16ths" x 3 & 15/16ths") and score it on all four sides at 2cm (13/16ths") as shown below:


You then need to crease the score lines with a bone folder. Cut along the scorelines from the edge of the cardstock, up to where they meet the horizontal score line, on two opposing sides of the cardstock as per the photograph below. It is a good idea to trim a little wedge out of the square corner pieces, as shown here:

 
Next you need to put a little bit of liquid Tombow multipurpose glue on the four square tabs on one side of the square of card and then fold the sides in and glue it together to make the tray. The Tombow allows you some wiggle time to get your box square but you will need to press & hold the glued-down corners a little, between your fingers to help them stay stuck:


Your tray box should look like this:
 

Next you need to cut a piece of designer series paper (dsp), that is 12cm x 27cm (or approx. 4 & 3/4" x 10 & 10/16"). I used an Old Olive coloured sheet from the lovely Polka Dot Parade dsp (I do love that dsp, I use it a lot!).


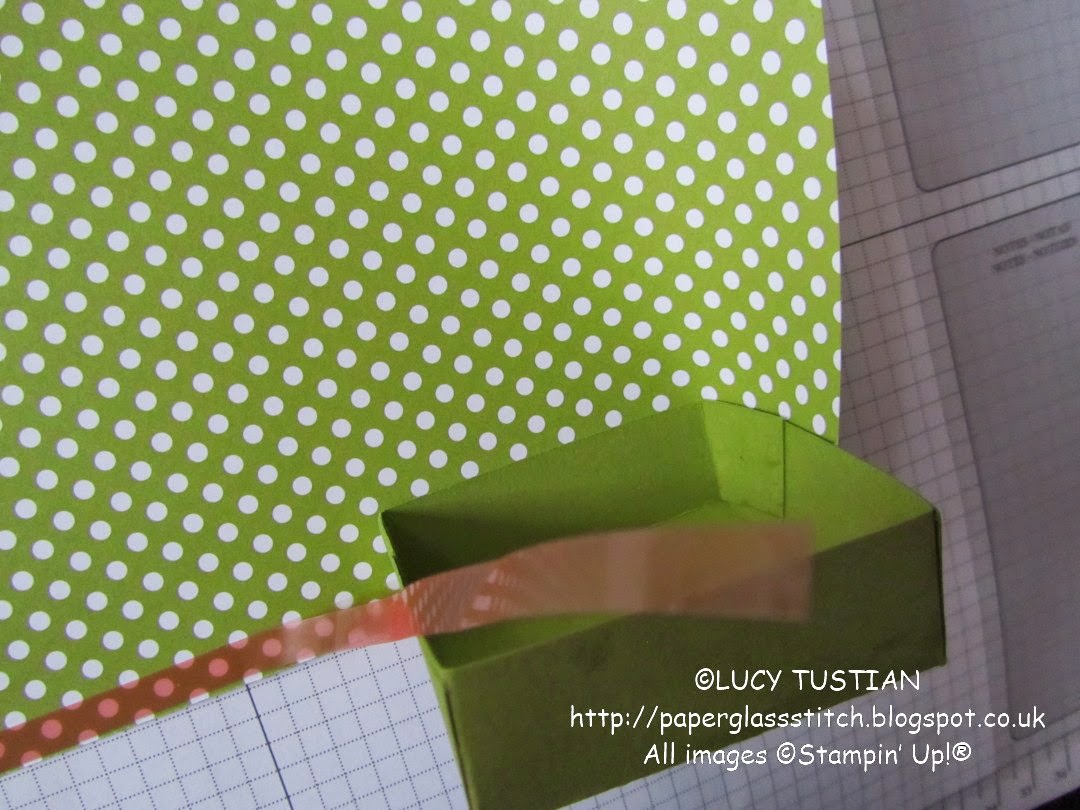
Then you need to put a piece of Sticky Strip (double-sided tape) along one long edge and one short edge of the wrong side/back of the dsp, (as close to the edge of the dsp as possible) as shown below:


Now you need to carefully adhere the tray to the dsp in the following way: Peel a little of the backing off the piece of sticky strip which is along the long edge of the dsp. Start at the corner that is nearest to the short side of the dsp, that doesn't have sticky strip on it (i.e. the bottom right hand side corner as you look at it in the above photograph). Place the tray with the bottom edge of its base lining up along the edge of the dsp, so that the short edge of the dsp starts half way along one side of it. (It is easier to see what I mean if you look at the next  few photographs.) You will then need to carefully roll the tray, peeling the Sticky Strip backing off as you go, making sure that the edge of the dsp aligns with the base of the box as you turn it, sticking the tray to the dsp:


Just before you reach the end, you will need to stop and peel off the backing from the Sticky Strip that is along the short edge of the dsp. You can then carry on rolling the box until you reach the end of the dsp. Be careful when sticking down the short edge of the dsp to the back of the bucket bag as you want it to stick straight and not buckle it up. Press it down to create a good seal, with your hand inside the bag: 


You will now have your basic bucket shape made:

 
Next you need to make the handles of the gift bag by using the Large Oval Punch:
 
 
The following photographs show you where to place the punch, in order to get the oval holes in the right place. The front of the bag will be the side opposite where the ends of the dsp overlap. Turn the gift bag so that the opening/neck of the bag is towards you and with the punch upside down, so that you can see where you will be punching, slide the front side of the dsp into the punch. To make sure your oval is central to the top of the bag, line up the corners of the punch, by eye, to match the corners of the tray/base. Then, to make sure you will be punching the oval handle far away enough from the top of the gift bag, make sure you line up the edge of the dsp (top of the bag) to correspond with the top edge line of the Stampin' Up! logo that is on the bottom of your punch (see the photograph below!). When you are satisfied that the position is right, punch your first oval out. Remove the punch and then repeat the above instructions to line up and punch out a second oval, from the back of the gift bag (i.e. from the side that has the seam along it). Here is a photograph to make all this a bit clearer:


Note that the top corners of the punch in the picture above are in alignment with the top (well, the base, really!) of the bag and that the top line of the frame of the logo near my thumbnail is in alignment with the open/top edge of the bag.


Now for the Easter Bunny decoration! You will need the following punched shapes to make your bunny: the Large Oval Punch - x2 in Whisper White and x2 in Pink Pirouette; the 1 & 3/4" (4.4cm) Circle Punch x1 in Whisper White; and finally the 2 & 1/2" (6.4cm) Circle Punch x1, cut in half,  in Whisper White:
 
 
You will need to trim a little bit off each of the pink ovals for the Bunny's inner ears, so that they are slightly smaller than the white, outer ears (see my pen line on the pink oval on the right, below, to see what to trim off) and then you can glue the pink ones on top of the white ones in the position  that is shown below:
 
 
Next you need to put a little bit of Tombow glue onto the bottom of the front of each ear and stick them behind the white 1 & 3/4" (4.4cm) punched circle, in the position shown in the next photograph:
 
 
To get one ear to flop over at a cute and jaunty angle, fold the tip of it over your bone folder like I have done here, and rub your thumb along the edge of the bone folder to crease it, like so:


Next, attach four Stampin' Dimensionals to the back of the bunny's head and remove the backing paper in readiness to stick the head on the bunny's body:


The half circle cut from the 2 &1/2" (6.4cm) circle punch, circle makes the body. Glue this with Tombow, onto the lower part of the front of the bucket gift bag, aligning the straight cut edge along the bottom of the gift bag like this:


Now you can attach your prepared bunny head onto the bunny's body:
 
 
All you need now is a sachet of small but yummy Easter eggs, - or any other gift that takes your fancy -  to pop inside the decorated Easter Bunny Bucket Gift Bag and then a bit of Stampin' Up!'s lovely Whisper White 5/8" (1.6cm) wide Organza Ribbon to tie the handles together with a pretty bow and hey presto, you've got a beautiful, hand made Easter gift for a loved one, friend or colleague:


They are so easy and quick to make, why not make more than one?!
 
 
I hope that you have enjoyed this step-by-step tutorial and that you do have a go at making some of these yourself. The basic Bucket Gift Bag can be made in all sorts of different sizes: smaller, taller, thinner, fatter, shorter etc. and can be decorated in all sorts of ways - just make your initial tray box a different size or alter the dimensions of the dsp to suit the gift you wish to put in it. I made several at Christmas. They are great for gift-wrapping awkward shaped or easily-squashed/fragile items - as well as last minute gifts - so go on, give them a try!! They are not just for Easter presents you know! Oh and also you can have fun trying different punches for the handles, too...
 
I first learnt how to make the Bucket Gift Bag (in a different size) a while ago, I think it was at a team-training event with the lovely Michelle Last, but I can't remember exactly when it was now. Thank you, Michelle, for the great idea that inspired me to make these. The Bucket Gift Bag is now one of my "go to" gift-wrapping staple stand-bys! :O)
 
 
Phew, after such a long blog post, I think it is time for a lovely cup of peppermint tea...and perhaps a little "quality control test" of some of the dark chocolate mini eggs that I bought to go in one of these bucket bags - but, shhhh, don't tell anyone that one of the gift bags might end up being short a couple or three choccy eggs!!  I'd better not "test" too many though, or, I shall have to go and buy some more.... ;O)
 
Until next time, happy crafting, and do let me know how you get on with making these gift bags yourself. Hopefully I'll have time to show you a couple more Easter ideas before the weekend, if not, have a lovely Easter weekend everybody!
 
Lucy x