Showing posts with label Birthday card. Show all posts

Wednesday, 1 July 2015

Go spread some sunshine with a handmade card - nothing wishy-WASHI about cheering someone's day, is there?

Gosh, July? Already? Wow! Pinch punch, first of the month, no returns, white rabbits - as we used to say when I was a kid! Do you say that where you are in the World too, I wonder? I would love to know!

As it is the first of July today, I believe it is Canada Day, so, for all my Canadian family and friends and readers - happy Canada Day to you all. Hope you celebrate it well?

Today I have a bright and jolly birthday card for you that was quick and easy to make, using the gorgeous Cherry On Top Designer Washi Tape, some circle punches and not much else! Come  and take a look:


The card base is Watermelon Wonder, with a mat of Whisper White on top. I tore off a strip of each of the different washi tape designs and laid them in a criss-cross, random position on the white card layer. I then stamped the scalloped flower from the Crazy About You stamp set in Watermelon Wonder ink onto a scrap of Whisper White Cardstock and punched it out with the 1 3/4" (4.4mm) scallop circle punch, popped it up on dimensionals and stuck it onto the card.

I then punched out several tiny circles, from Cucumber Crush cardstock scraps, using the smallest eye pieces of the Owl Builder Punch, then a couple of the largest eye circles plus a 1/2" (1.3cm) circle punch circle in Bermuda Bay cardstock. Then, finally, I punched one Watermelon Wonder 3/4"(1.9cm) circle and randomly stuck them all onto the card with Tombow glue, so that they followed a vague triangle pattern, to make it easy on the eye and balance out. I wanted them to echo the multi-coloured, different-sized circles on the spotty washi tape.

The final touch was to stamp the greeting, in Bermuda Bay ink, onto another scrap of Whisper White cardstock, using my trusty, much-used and much-loved Stamp-a-ma-jig to align the words; then, punch it out with my 1 3/8" (3.5cm) circle punch and glue it on top of the scalloped flower. The sentiments come from the Crazy About You set - there are an abundance of words to choose from in that fabulously useful stamp set! I love it!


However, before I stuck down the mat to the card base and chose what greeting to use, I decided to have a play around, to see which combination I preferred. The following two photographs show what the card looks like with either a Bermuda Bay or Cucumber Crush base:


I think the choice of background colour makes a huge difference to the look of the card, don't you? Each one picks out different aspects of the embellishments on the card and puts a different emphasis on the card as well.

I also played around with the greetings too, as you can see in these rough "drawing board" photographs that I took at my crafting table:


You'll have to excuse the rather messy (and inky!) backdrop in these last two photographs, and I apologise for the less than perfect picture quality too - I hadn't intended on showing them to anyone when I took them -  but, I just wanted to show you how you can make cards for several different occasions using the exact same card design, but switching up the sentiment choice. I think they all work well, but I chose the birthday one in the end.

I think these would make a great gift,  if you made a set of several cards, with different greetings on each one and either made a box for them, or, popped them in one of the Stampin' Up! Tag A Bag Gift Bags, tied up with a pretty ribbon, with a personalised hand-stamped tag on it.

I am sure that any teacher would appreciate a set of these at the end of the school term, or, you could just send them to someone you know as a "happy mail" RAK (Random Act of Kindness) to cheer them on their way?

I love to get anything in the post that is not a bill or a pizza flyer - and proper old-fashioned snail mail is so few and far between these days, isn't it? When was the last time you received something through your letterbox that was neither a bill nor a piece of junk mail? And, more to the point, when was the last time you SENT a piece of anything handwritten or handmade in the post "just because"? Just think how much happier we could make the world, if everyone sent out something in the "snail mail" today? You never know how much you might brighten someone's day by sending them something pretty and unexpected in the post, it might just tip the balance if they are feeling down. So, what are you waiting for? Make something and send it out to someone you know TODAY. Go on, do it, today, now, and make a small but significant difference to someone's week... I think it might even brighten your own week, knowing that you have sent somebody else some sunshine too...

Until next time, happy crafting everyone. Go spread some sunshine today...

Lucy x 

P.S. Last minute edit: Stampin' Up! have added even more products to both this week's Weekly Deals  AND to the Clearance Rack! Here are this week's Weekly Deals - there are a bumper 11 items for you this week: 
My top picks from the clearance rack are the Texture Boutique Embossing Machine which is down to only £13.49 (half price!), the Mosaic Punch which is now only £5.59 (60% off!), the Jumbo Sticky Rounds, now only £1.79 and also the Kartenset hip, hip, hurra! - which although is only available in German, is a bargain at only £7.19, down from £17.95 - worth it for the ink spots, clear block and card blanks and die cuts alone, even if you don't use the stamps, I think! Bargain! Some whopping deals there - that will definitely add to this week's sunshine, don't you think?! Lucy x

Sunday, 4 May 2014

EXPLODING STARS BIRTHDAY POP-UP-BOX-CARD & CCC #031

Hey Crafters!
 
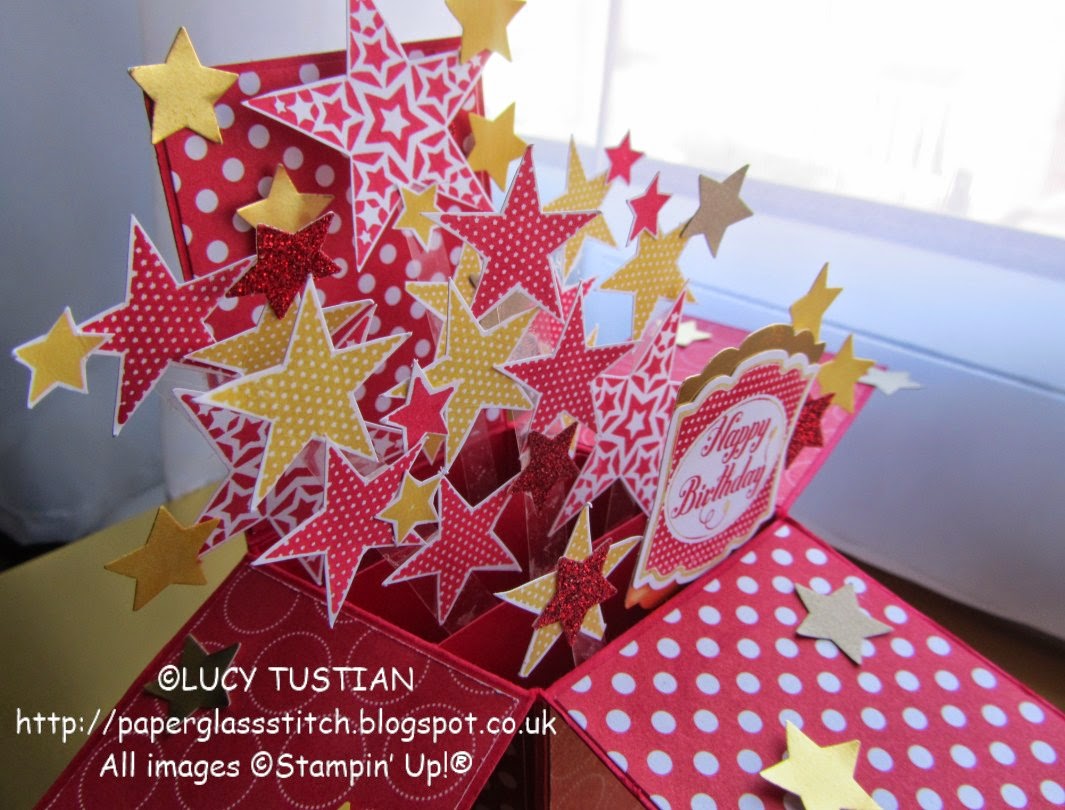
Thought I'd share a very special birthday card with you today - I made it for my eldest niece who turned 11 recently. It was my first attempt at a "pop up box card" - which is a card style which seems to be very hot trend in the paper-crafting world at the moment!
 
The colours were inspired by the colours of her bedroom, which are red, gold and yellow and I decided that stars were more appropriate for my niece than flowers might be.

Here is the card:


I wanted it to look like the stars were bursting out of the card in a joyous explosion of celebration! The card was definitely a "labour of love", as apart from the smallest stars, which I punched out, all the other stars had to be fussy-cut, by hand, with my trusty Paper Snips (what would I do without those little essential crafting beauties, hey??!!) - but, it was very therapeutic nonetheless!


I stamped the patterned stars using the fabulous Simply Stars stamp set in Real Red and Daffodil Delight ink on Whisper White Cardstock. Some of the smaller stars were punched out using the little star punch from the Merry Minis Punch Pack (order ref = 126882, which was carried over from last year's Holiday Mini Catalogue). I punched them out of the Red Glimmer Paper, Daffodil Delight Cardstock, the Gold Foil Sheets and also the much-overlooked-but-fabulous Brushed Gold cardstock. I really must use that more often, as it is so nice and gives a lovely, subtle, gold sheen to your projects... 
 

You can just about make out in these photographs (above and below), that the stars are stuck to little strips of Window Sheet: Stampin' Up!'s more sturdy equivalent of acetate sheets. I found that the Tombow Multipurpose Liquid Glue and the Mini Glue Dots were the best adhesives to use for gluing on the stars to the Window Sheet strips and the strips to the box support struts etc. The Tombow allows a little "wiggle time" to get the shapes in the right positions, but does take a little longer to dry than when gluing two pieces of cardstock together - so you need to be a little patient with it!
 
Another top tip is to glue all the decorations onto the card support struts before you stick the struts inside the box of the card! You can of course add a few more stars and things after they are in the box, if you discover any gaps that need filling with more things. This is one card design where less is definitely not more! Excess is best! ;O)


I thought the polka dotted stars echoed the lovely Real Red Polka Dot Parade Designer Series Paper (DSP) that I had used to decorate the card flaps and panels - this is such a versatile set of papers and I used both sides of the sheets on the card. I have used this DSP a LOT. The Happy Birthday comes from the Label Something Stamp Set and I punched it out using the Artisan Label Punch. I punched a second one out of Gold Foil Sheet, cut it in half and stuck the two pieces to the back of the Birthday one, to give the greeting label an extra border. This is a great trick to make your punched shapes "pop" on a card or gift tag.
 
I glued an extra layer of Real Red Cardstock, Gold Foil Sheet and then Whisper White cardstock (stamped with more stars), onto the back panel of the card base in order to add stability and provide a space for writing my message onto. (See picture below:)
 
I also attached a few small stars to the flaps of the card base, to make it look like the stars had exploded out of the card and landed on them! Some I glued flat onto the card with my most-used crafting tool: the Tombow Multipurpose Liquid Glue, and others I popped onto a Stampin' Dimensional to add a little bit of height.
 
 
As you can see below, I got a little bit carried away with adding the exploding stars and several of them poked outside the card base when the card was folded flat, ready for posting... So much so, that the card didn't fit in the standard C6 envelope that I had originally planned to use - Oops!! BUT, luckily this didn't matter a jot, as I had my extremely useful Envelope Punch Board to hand and I was able to make  an extra-special envelope from some more of the Polka Dot Parade DSP! Phew! Thank the stars (no pun intended!) for the Envelope Punch Board, eh?!


Here is the envelope I made, along with it's belly band which I made using the Daffodil Delight colourway of the same Polka Dot Parade DSP - the "just for you" stamp is from the Label Love Stamp Set and again uses the Artisan Label Punch and the little star punch from the Merry Minis Punch Pack - is it just me, or, does it remind you somehow of Wonder Woman's headband?!  No? OK, just me then!! Ahem...


My niece had asked for money for her birthday so that she could go on a "girly shopping day with just Mummy"- gosh how grown up is she getting - it hardly seems like yesterday that my sister announced she was expecting and now my niece is ELEVEN!! (Gulp! Am getting old! LOL!!) The smaller, yellow envelope is what I put her birthday money into and uses the same Daffodil Delight and Real Red Polka Dot Parade DSP, the Artisan Label Punch and the "To:/From:" label comes from the Label Love Stamp Set...


I thought the back of the belly band on the large red envelope looked a little plain, compared to the front, so, I glued a left-over Red Glimmer Paper star for a little bit of extra bling/interest!


This last photo is a close up of the front of the belly band showing the "Wonder Woman" style label and also illustrates the sparkle and glimmer of the red and gold little stars. It always amazes me how even a teeny bit of the glimmer paper can add such a lot of sparkle and glamour to a hand made project - and a little goes a long way, so it is great value for money too!


Hope you have liked today's project? In my monthly card-making classes this month (May 2014) we are making similar  pop-up-box-cards - using slightly different dimensions for the card base, different stamp sets/punches and different colours - last week's class was great fun - I am very much looking forward to the repeated, evening class towards the end of the month too, now!  I know that this will definitely NOT be the last of this style of card that I make - as they are great fun to construct and are such a "wow" card for any occasion as well!


Don't forget that all of the supplies used on today's project can be bought from my online shop (click here!) or by contacting me directly if you prefer.
 
Anyone who places an online order with me before the 29th May 2014 using the hostess code VRSJWE3R on their order will get a little thank you gift from me in the snail-mail post, too (as long as you don't click the "no contact" button - which will mean I don't have access to your contact details and will therefore be unable to get your gift to you!). N.B.: If your order is for £150 or more, don't use this hostess code for your order or you won't qualify for your "Stampin' Rewards"!
 
Oh and don't forget that during May there is a special offer to receive a free exclusive brand new Photopolymer Stamp set, for all orders of at least £60/75€, while stocks last- see my online shop for details! They are all rather fabby, I must say! :O)
 
Well, that's it from me today, I really hope you are inspired to make your own Pop Up Box Card now? I am entering this card into the Catherine & Cathy Create "Starlight, Star Bright" Blog Challenge. seeing as they wanted to see projects using stars on them - I think this card qualifies, don't you?! It is definitely very starry! Hehe! 
 
Until next time: happy crafting!
 
Lucy xx