Thank you for joining us on another Pinkies Blog Hop! We're showcasing lots of gorgeous projects using products from the new Stampin' Up!® Autumn/Winter Seasonal Catalogue.
Simply use the buttons at the end of each post to keep hopping!
Welcome, especially if you have hopped directly from Angélique's blog,
what fab ideas she has - I think my wishlist has just grown... again!!
what fab ideas she has - I think my wishlist has just grown... again!!
I am SO excited by this new Autumn/Winter Catalogue - I LOVE this time of year and the build up to Christmas and boy, does this catalogue deliver! There are SO many gorgeous products in it - I had a really hard time deciding which items to buy first and then I remembered you don't actually have to buy it ALL at once...hard not to though!! I'm looking forward to my second order already! Us "demos" are lucky to be able to get our mitts on the new goodies early, via a demo pre-order and we get sneak peeks at it all before our customers. Let me know if you'd like to join my team and get that privilege before the next catalogue comes out! ;)
Anyway... I have chosen to show you a few items I have made using the fabulous new Holly Jolly Greetings stamp set and Christmas Greetings Thinlits Dies bundle:

I fell in love with this stamp set and the lovely word thinlits as soon as Ii saw it. (It reminds me of the Crazy About You set that is in the Annual Catalogue - one of my favourite "go to" sets!) I was inspired by one of the ideas that the A/W catalogue shows. Here is the card in a bit more detail:
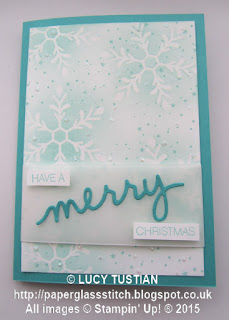
I used the emboss resist technique for the snowflake background. To do this I swiped my embossing buddy all over a 9.5x13.8cm piece of Whisper White cardstock, then stamped the lovely snowflake stamp several times in Versamark ink over the card. I then added Stampin' Up!'s clear embossing powder and heated it with my Heat Tool. Then I took a Stampin' Sponge and rubbed Pool Party ink just in the centres of the snowflakes, using a circular motion, making it darker nearer the centres and lighter towards the edges. A quick rub with a piece of kitchen towel and I was ready for the next stage - stamping the dots and stars stamp randomly over the card in Pool Party ink. I then rubbed the embossing buddy over the card again and applied small dots of the amazing brand new Fine Tip Glue Pen in precise, tiny dots, then spooned Dazzling Diamonds glitter over it and tapped the excess off! Oh my gosh, that Fine Tip Glue is AWESOME!! Swoon! You MUST get some! Trust me, it is fantastic!

The next step was to wrap a 4cm strip of Vellum Cardstock across the bottom third of the now sparkly snowflake background piece. I cut the vellum about 2cm wider than the piece of card and stuck the overlap excess on the back of the piece of card using Fast Fuse. Now for the greeting - the "Have a" and "Christmas" words were stamped with Pool Party ink on scraps of whisper white cardstock and trimmed to size, then stuck to the vellum with cut up pieces of Stampin' dimensionals to give them a bit of depth. The gorgeous "merry" is one of the Christmas Greetings Thinlits Dies (there is also a "jolly" and a "peace" in the set too). I cut it from a scrap of Bermuda Bay cardstock with my Bigshot and used teeny tiny dots of the Fine Tip Glue to stick it at a jaunty angle onto the vellum - it is so easy to be very precise with this special glue - the tip of the applicator really is tiny! The final stage was to glue this all onto an A6-sized, Bermuda Bay card base. I really hope that you can see just how glossy the snowflakes are and how sparkly and glittery the dots are?
I decorated the inside of the card with a Pool Party stamped snowflake with added Fine Tip glued-on glitter and then, whilst I had the inks and stamp set still out on my desk, I decided to make some Christmas gift tags in the same vein:

Well, I hope that I have inspired you with my projects today, do click on the button below to click onto Lea's blog and continue looking at all the other hop stops along the way!
Thank you for taking the time to visit my blog today. If you have any questions about what I have made, then please leave me a comment below and I shall be very happy to help answer them if I can! I would love to know what is on the top of your wishlist. If you would like me to send you a paper copy of the catalogue before you decide, then please do contact me and I will happily send one out to you.
Until next time, happy crafting (and shopping) everyone!
Lucy x


I used the emboss resist technique for the snowflake background. To do this I swiped my embossing buddy all over a 9.5x13.8cm piece of Whisper White cardstock, then stamped the lovely snowflake stamp several times in Versamark ink over the card. I then added Stampin' Up!'s clear embossing powder and heated it with my Heat Tool. Then I took a Stampin' Sponge and rubbed Pool Party ink just in the centres of the snowflakes, using a circular motion, making it darker nearer the centres and lighter towards the edges. A quick rub with a piece of kitchen towel and I was ready for the next stage - stamping the dots and stars stamp randomly over the card in Pool Party ink. I then rubbed the embossing buddy over the card again and applied small dots of the amazing brand new Fine Tip Glue Pen in precise, tiny dots, then spooned Dazzling Diamonds glitter over it and tapped the excess off! Oh my gosh, that Fine Tip Glue is AWESOME!! Swoon! You MUST get some! Trust me, it is fantastic!

The next step was to wrap a 4cm strip of Vellum Cardstock across the bottom third of the now sparkly snowflake background piece. I cut the vellum about 2cm wider than the piece of card and stuck the overlap excess on the back of the piece of card using Fast Fuse. Now for the greeting - the "Have a" and "Christmas" words were stamped with Pool Party ink on scraps of whisper white cardstock and trimmed to size, then stuck to the vellum with cut up pieces of Stampin' dimensionals to give them a bit of depth. The gorgeous "merry" is one of the Christmas Greetings Thinlits Dies (there is also a "jolly" and a "peace" in the set too). I cut it from a scrap of Bermuda Bay cardstock with my Bigshot and used teeny tiny dots of the Fine Tip Glue to stick it at a jaunty angle onto the vellum - it is so easy to be very precise with this special glue - the tip of the applicator really is tiny! The final stage was to glue this all onto an A6-sized, Bermuda Bay card base. I really hope that you can see just how glossy the snowflakes are and how sparkly and glittery the dots are?
I decorated the inside of the card with a Pool Party stamped snowflake with added Fine Tip glued-on glitter and then, whilst I had the inks and stamp set still out on my desk, I decided to make some Christmas gift tags in the same vein:

On the tags I stamped the large snowflakes in Pool Party ink and the dots and stars in Smoky Slate ink. The Fine Tip ink is precise enough to add glittery detail to the small teardrop shapes and centres of the snowflakes. The words are from the Holly Jolly stamp set too, and are in Bermuda Bay ink. I decided to just have a play when I made these tags and tried out various ways of tying on the ribbons/twine. The tags on the above photograph are sitting on an A4 piece of cardstock, to give you an idea of their sizes. The white ribbon is the Whisper White seam-binding ribbon and the thick bakers' twine and sequin trim are Bermuda Bay. There is also a little bit of the fine silver metallic thread on one of them too - I think that the thicker Cording Trim from the new A/W catalogue would probably look much better though, so I shall be adding that to my next order! I think these would make great card-toppers too, don't you?
Thank you for taking the time to visit my blog today. If you have any questions about what I have made, then please leave me a comment below and I shall be very happy to help answer them if I can! I would love to know what is on the top of your wishlist. If you would like me to send you a paper copy of the catalogue before you decide, then please do contact me and I will happily send one out to you.
Until next time, happy crafting (and shopping) everyone!
Lucy x